Contents
Required tools
Go to Resources for download links.
- Blender
- SuperBMD
- j3dview
- Collision Creator
- Arc Convertor
- Whitehole
- Wiimm's ISO Tools (to get your SMG1 dump)
About Blender
If you don’t know how to use Blender yet I suggest you to see these tutorials: English Spanish
Watch the basic stuff (first videos) and try creating something not that difficult. When you start doing something you will get how stuff works on Blender and then you can search for the info you need on the web, but you have to understand the basic stuff first.
If you wonder about the older Blender version, I believe newer versions also work; you can try them if you want. However I don’t need a newer version so I can stay with 2.79 (Blender 2.79 Reference Manual).
Warnings
1) If you want to use custom textures (textures not extracted from the game) be sure that they have sizes like 64x64, 128x128, 64x128, etc. (power of 2) otherwise Whitehole wont load your object and the texture will crash the console!
2) As the objects in normal size in Blender are extremely tiny when imported on the game you can decide to scale them on Blender (Edit Mode only) or to scale them on Whitehole (I choose to scale them on Whitehole on this tutorial).
3) If your model appears white in Game/Whitehole you forgot to apply the materials or SuperBMD did not assign the textures to the model (maybe you moved the textures to another place and SuperBMD could not locate them).
4) If your model appears as a blue box on Whitehole then you missed something in the steps or did something else wrong (the error could be anywhere with this one).
5) Do not make any scale or movement action in Object Mode only in Edit Mode if you scale or move and object while being in Object Mode the visual model will be improperly scaled and or positioned to the collision model in game!
6) Set your model in Blender to have no angles against any axis if your model on Blender has an angle with an axis, the collision and the 3d model will be rotated that angle in game!
7) Regarding rotations, translations and scaling done while not being in Edit Mode, (2) (the Edit Mode scaling part), (5) and (6) can be completely ignored if, at the end of doing the model, you reset the position, angles with any axis and scaling of the object by pressing Ctrl + A and, in the window that shows, click those options to reset (Thanks to Gabbo for the info! - Fig. 0).
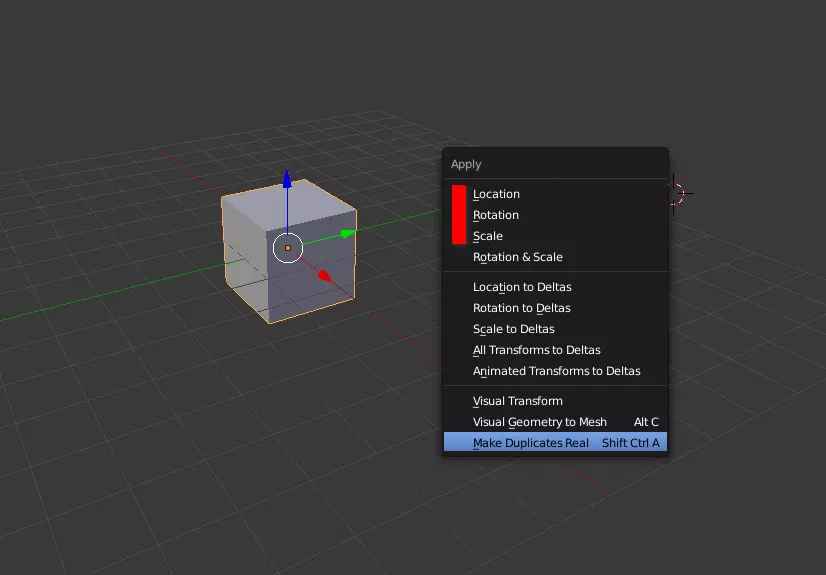
(Fig. 0 - Blender Apply functions)
Steps --- files used: tutorial1.zip
First, I will assume you already have a model on Blender with no materials assigned. In this example I will work with several materials (Fig. 1).
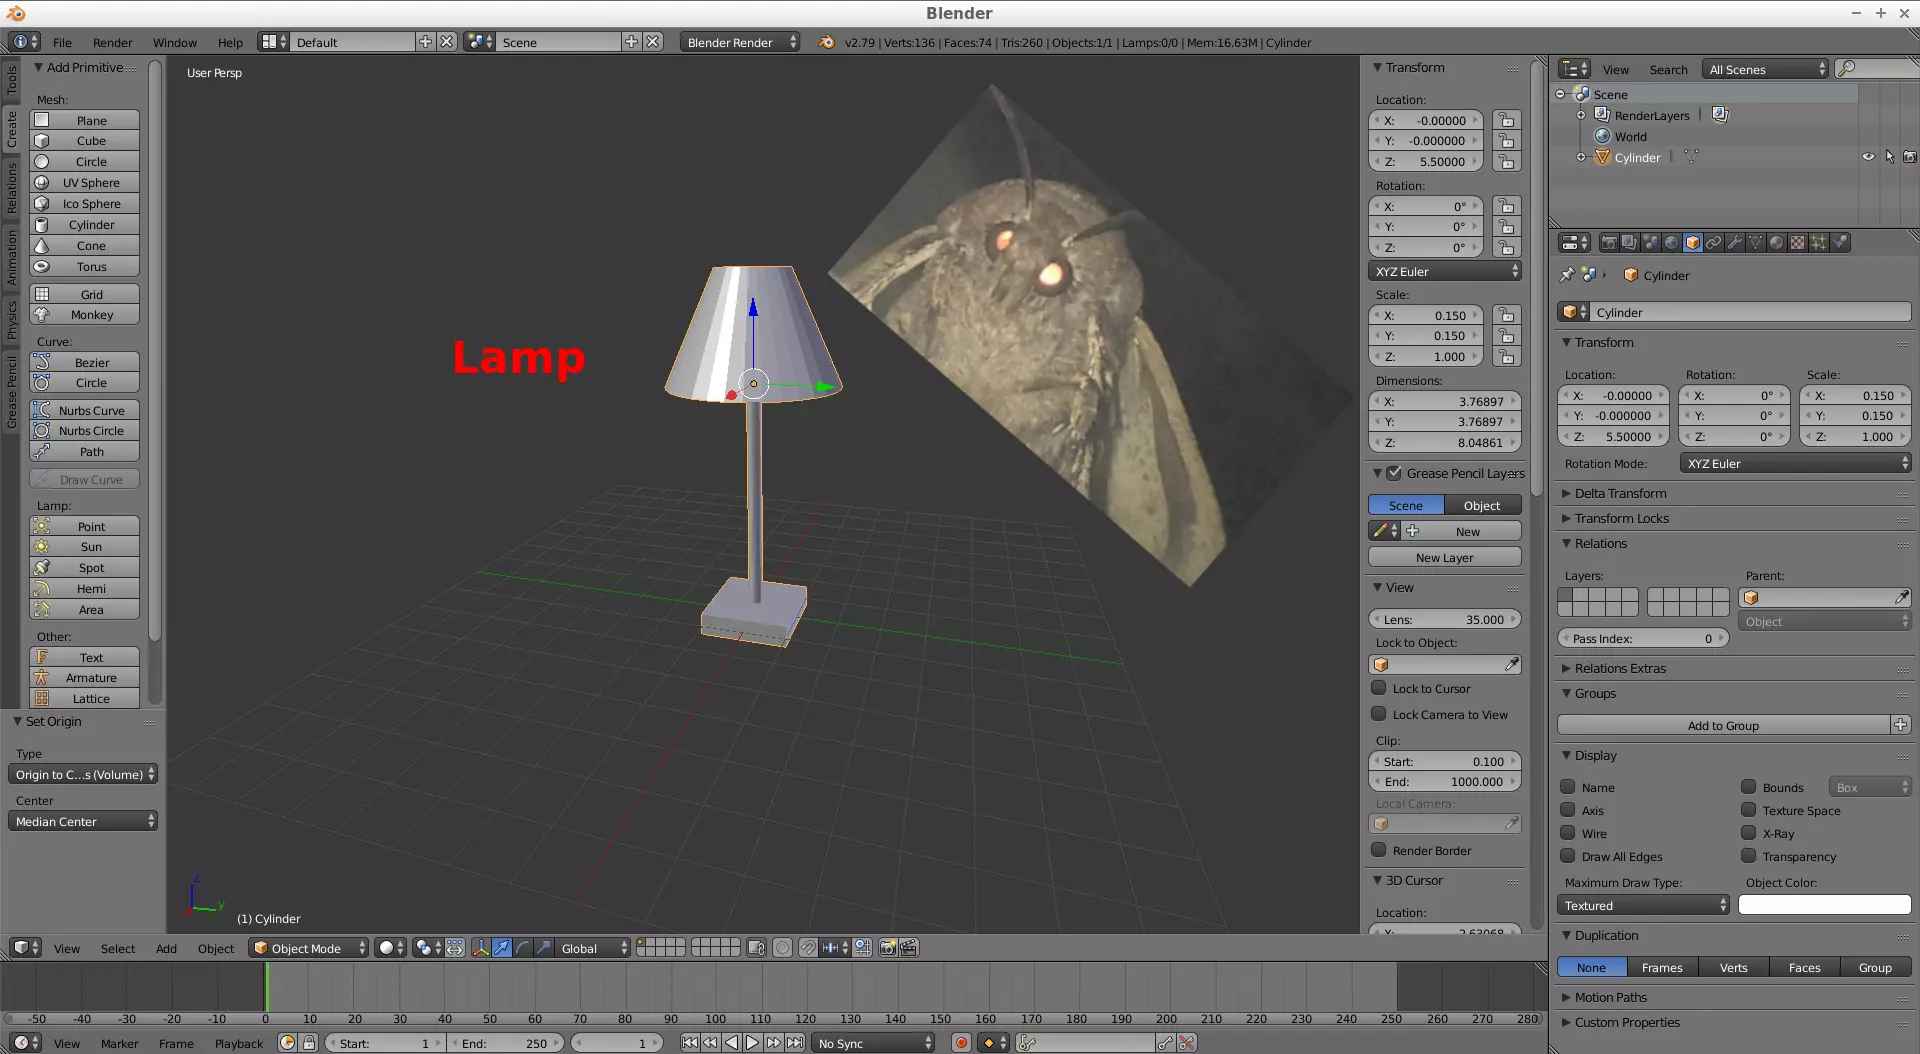
(Fig. 1 - Blender model example)
Create the materials to be used on the model. This is important since it is how the model will look on game. To assign materials, go to the right section of Blender and click on the Material tab (Fig. 2).
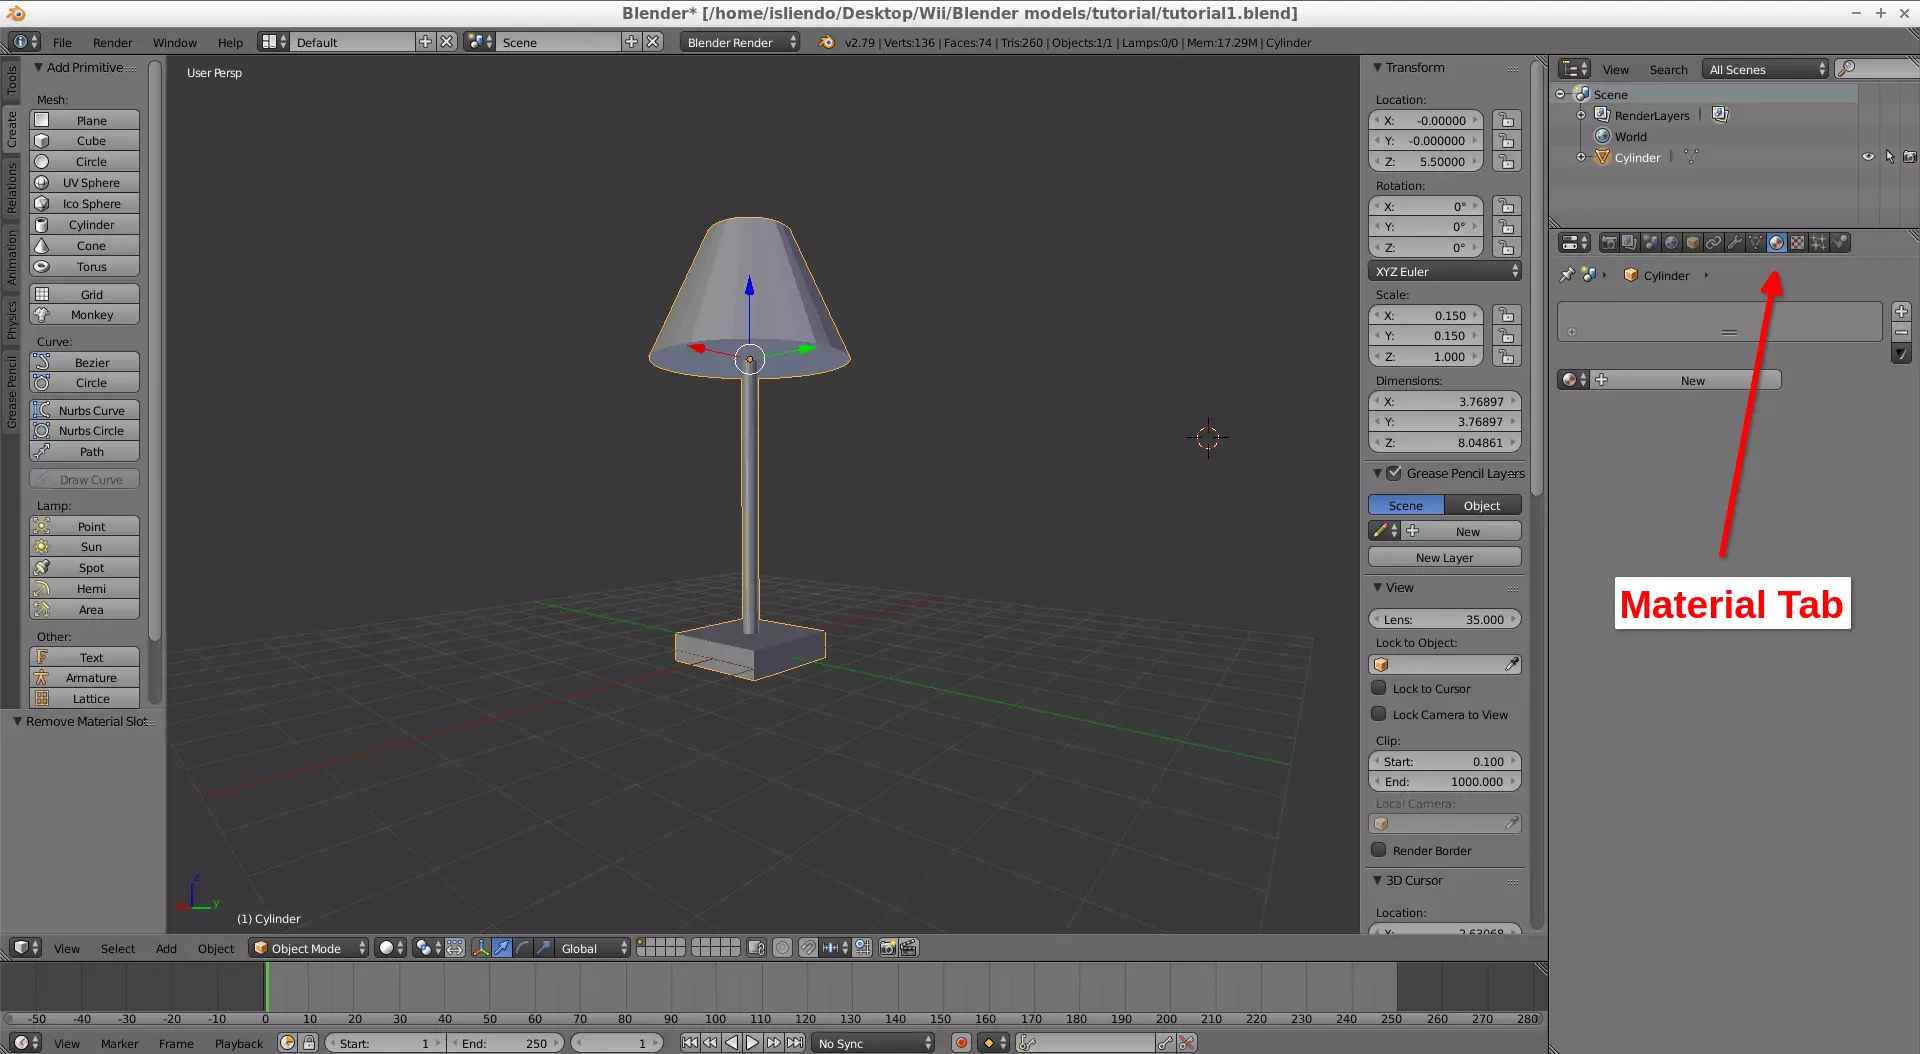
(Fig. 2 - Material tab)
If you are creating the first material to be used on the model, a default material will be already there, if not then add a new material by clicking + (to add a new material slot) and then on the New button to add a material to that slot. Change its name to anything you want (you will need to know the materials name in the future - Fig. 3). I will create 4 materials (metal1, wood1, cloth1 and light1), to add more than one material do the same mentioned above and change their names (Fig. 4).

(Fig. 3 - Create materials)
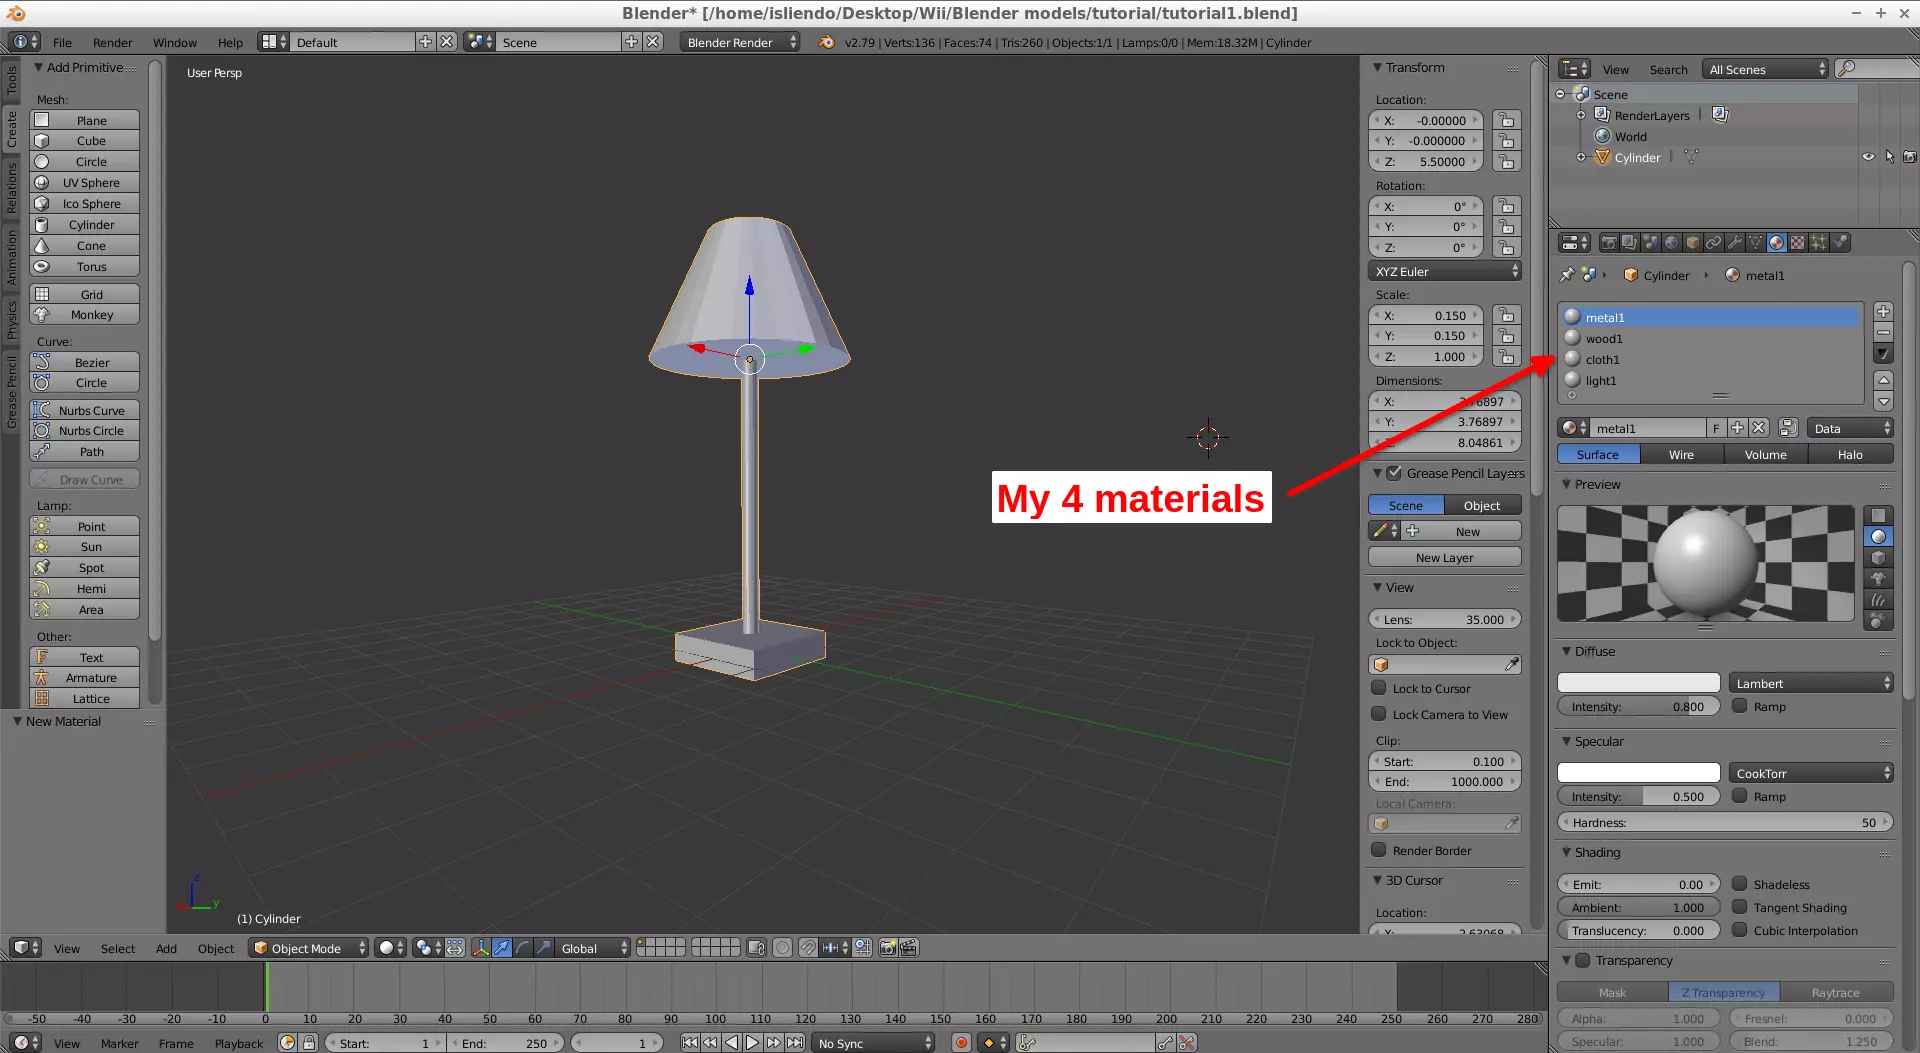
(Fig. 4 - Example materials created)
With that done, you need to assign a texture to all materials, to do that click on a material and go to the Texture tab (Fig. 5). If a default texture is in there then erase it and add a new one, if not then add a new texture with the New button (Fig. 5 and 6).
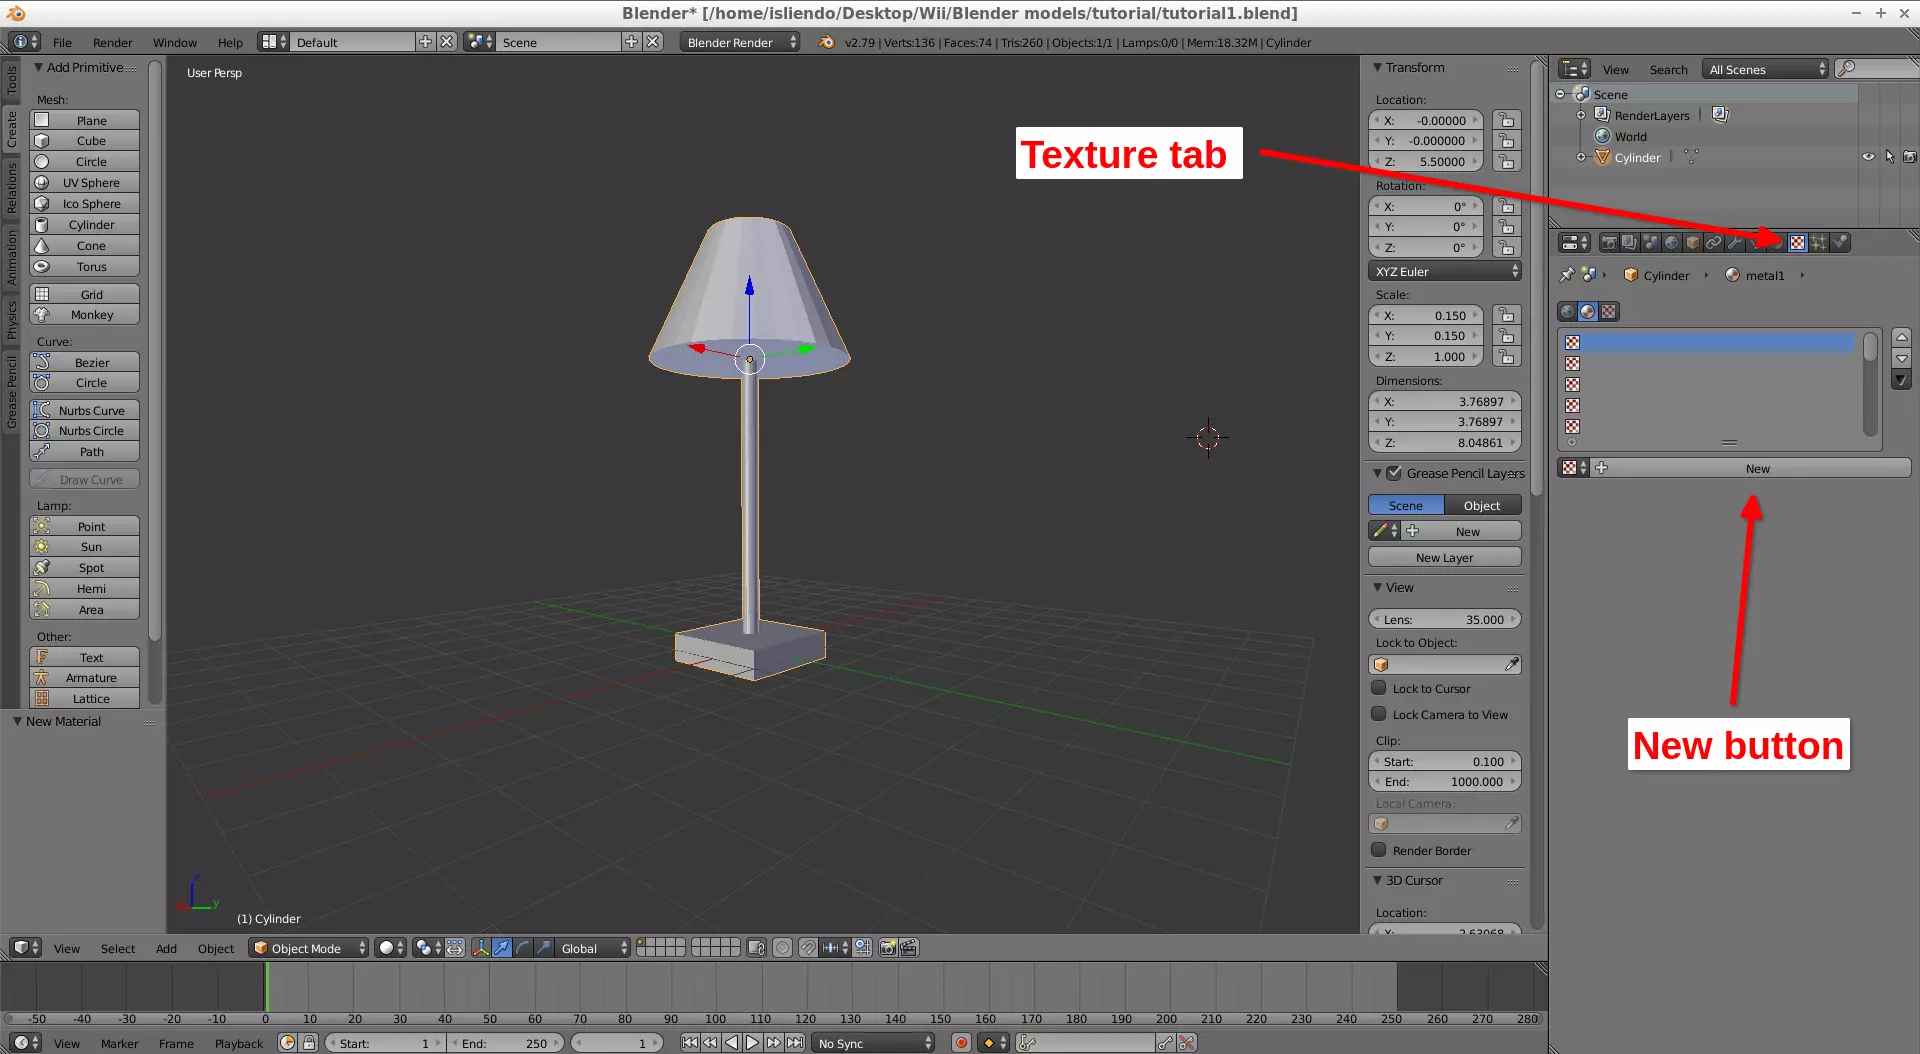
(Fig. 5 - Texture tab)
(Fig. 6 - Example texture created)
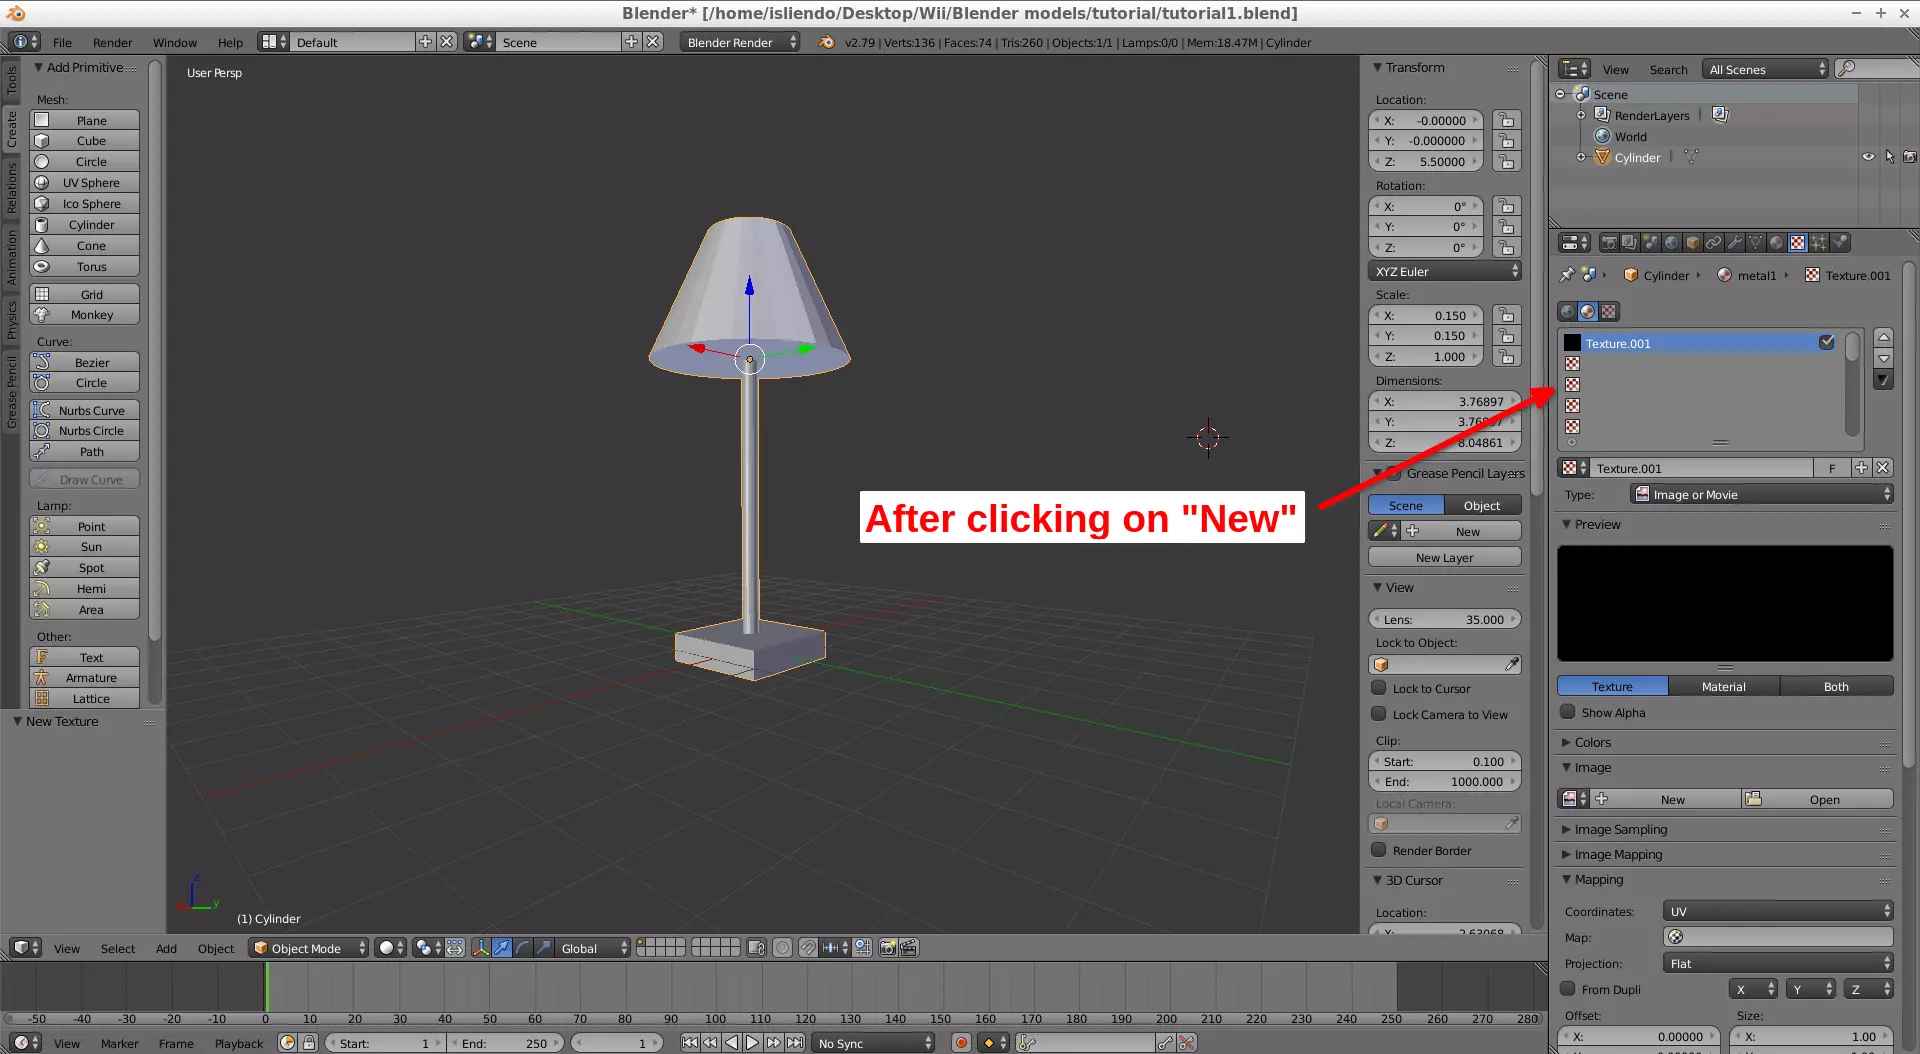
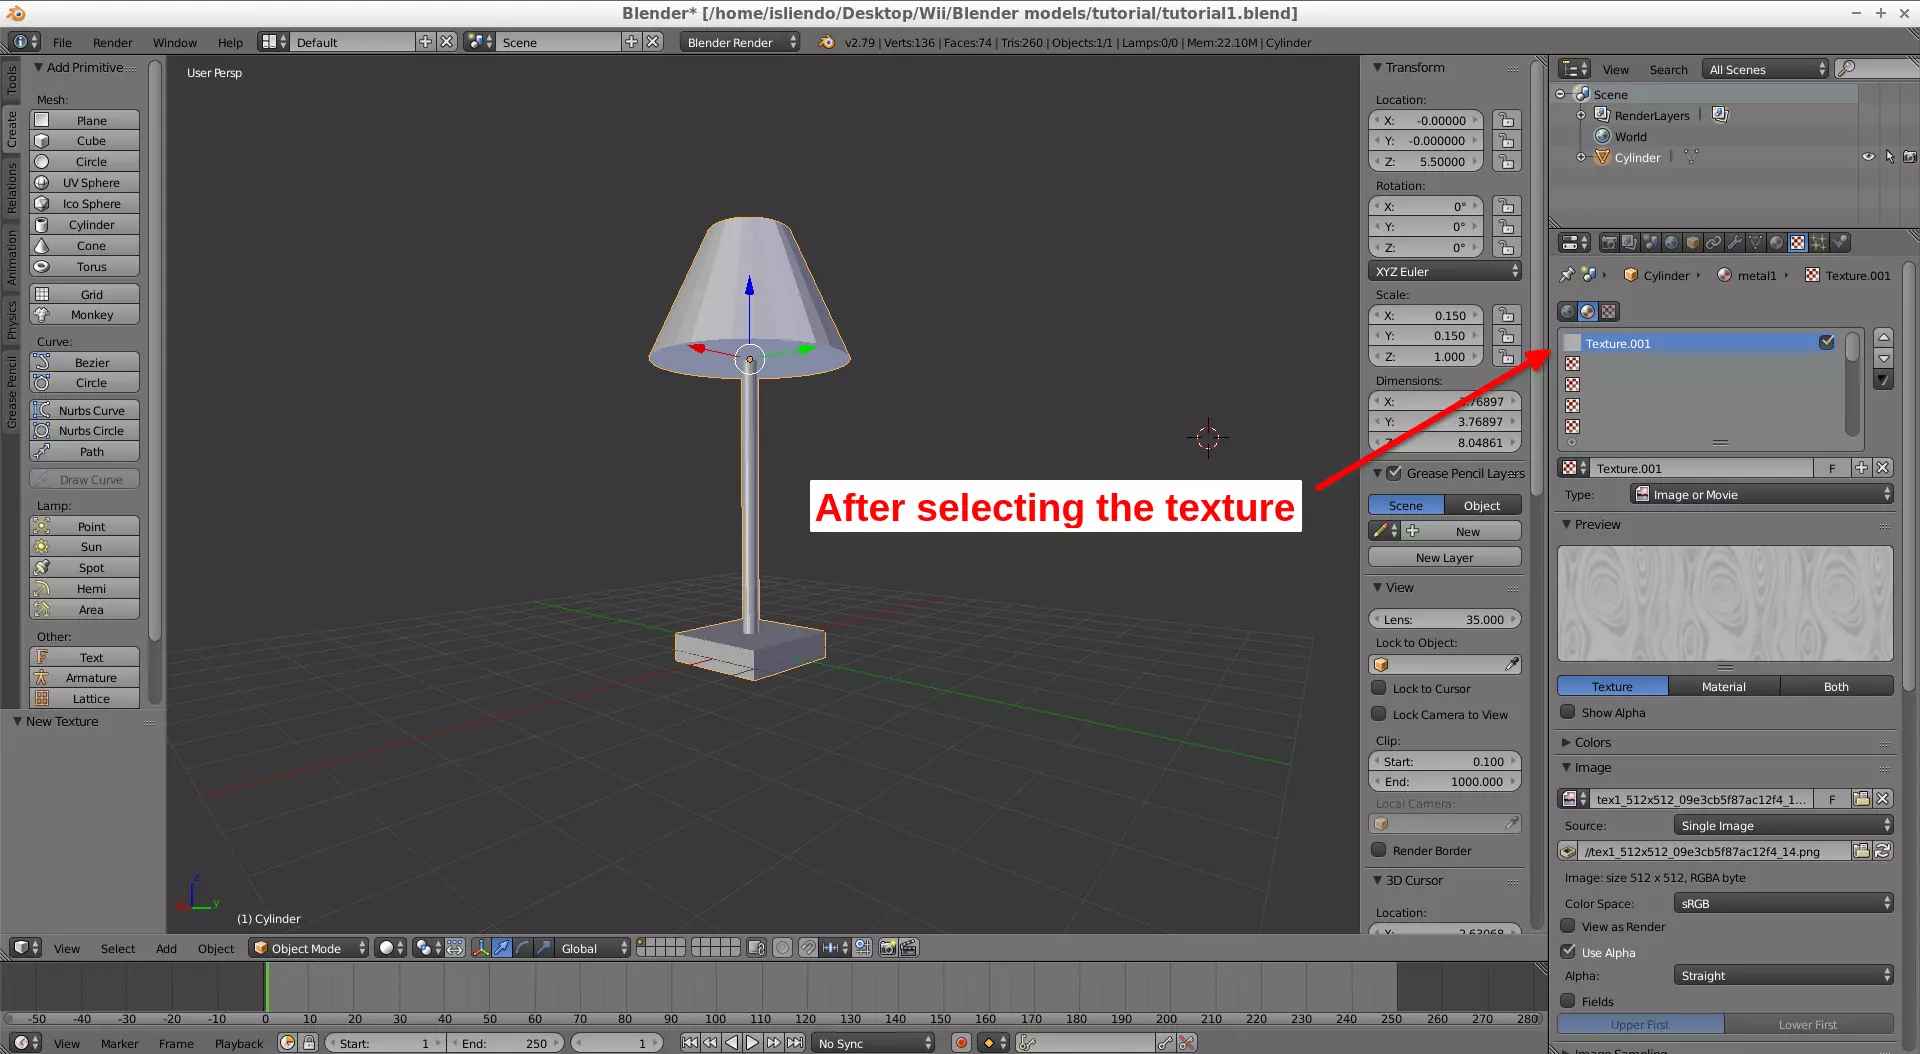
After creating a new texture, it will appear what is shown on Fig. 6, click on Open and select the texture you want to assign to your material (Fig. 7 and 8). You can leave the texture name as you want (you don’t need to assign a name to it). Do this to all materials created (Fig. 9).
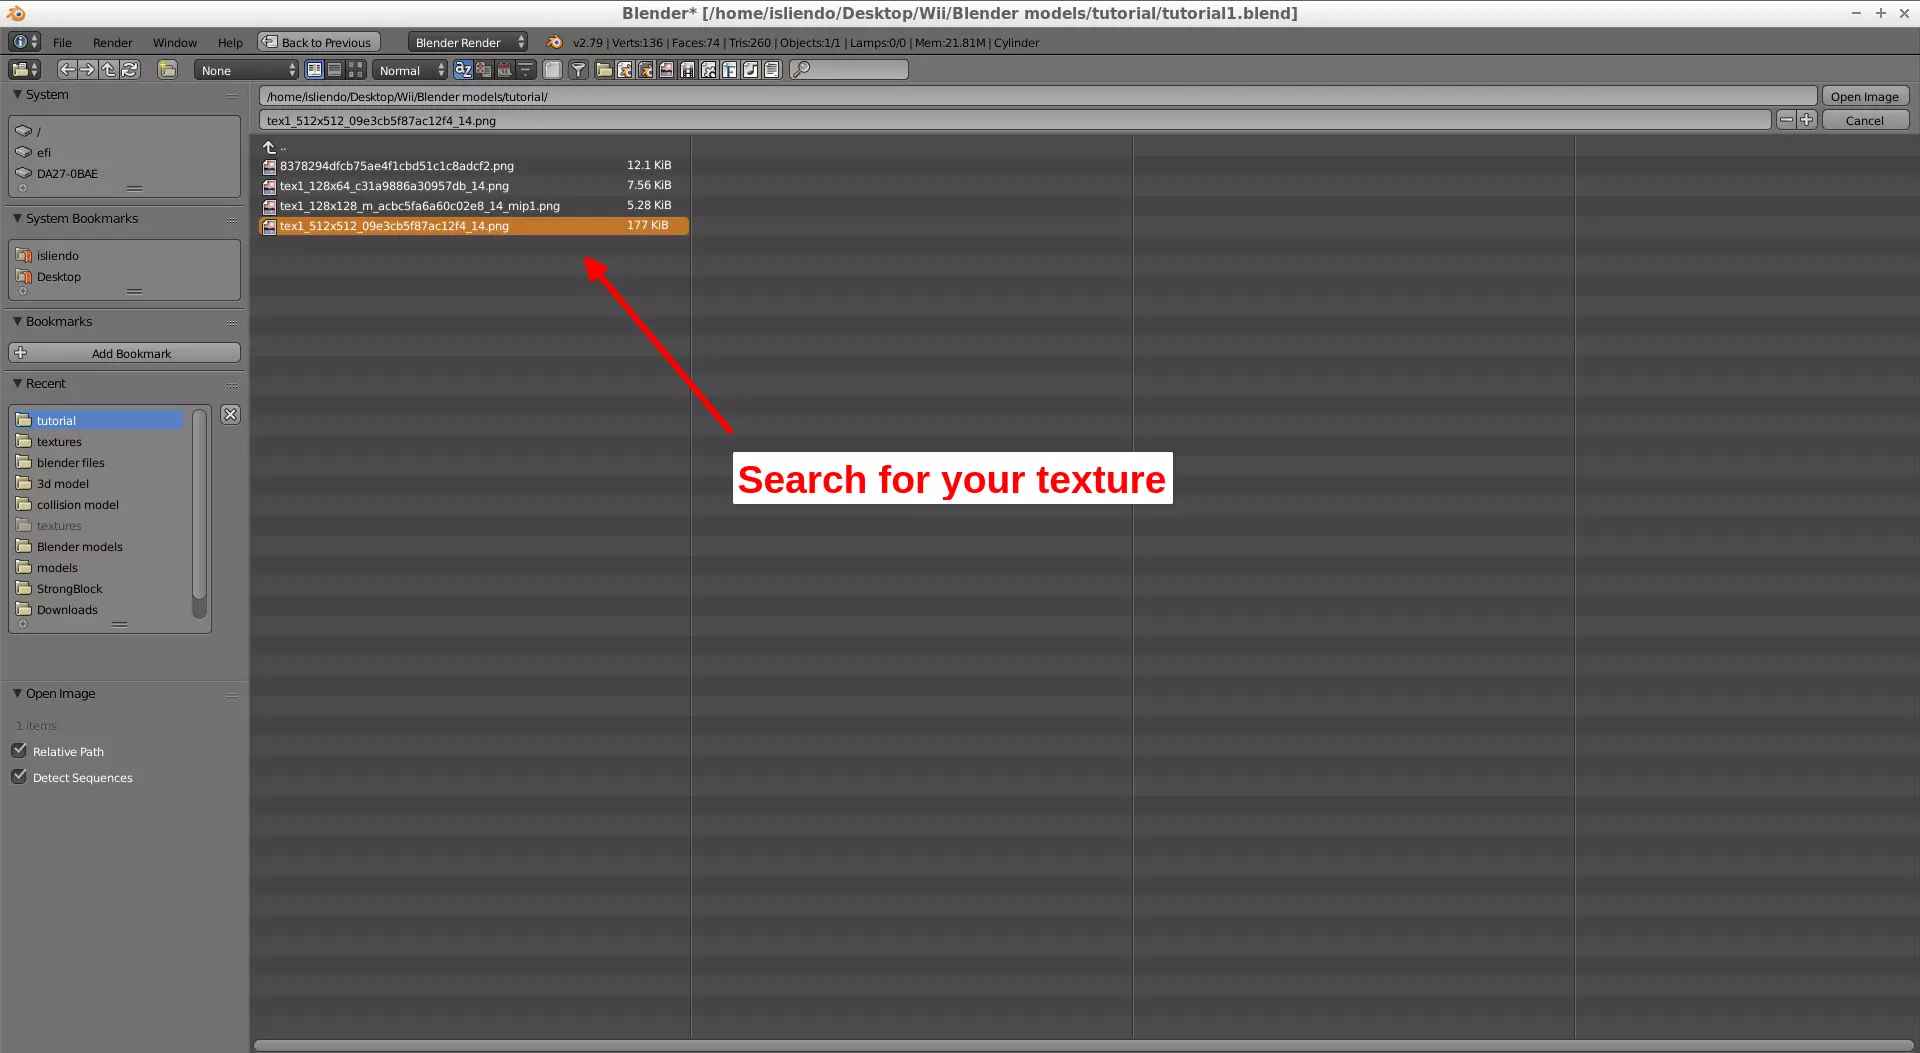
(Fig. 7 - Texture search)
(Fig. 8 - Texture picture selected)
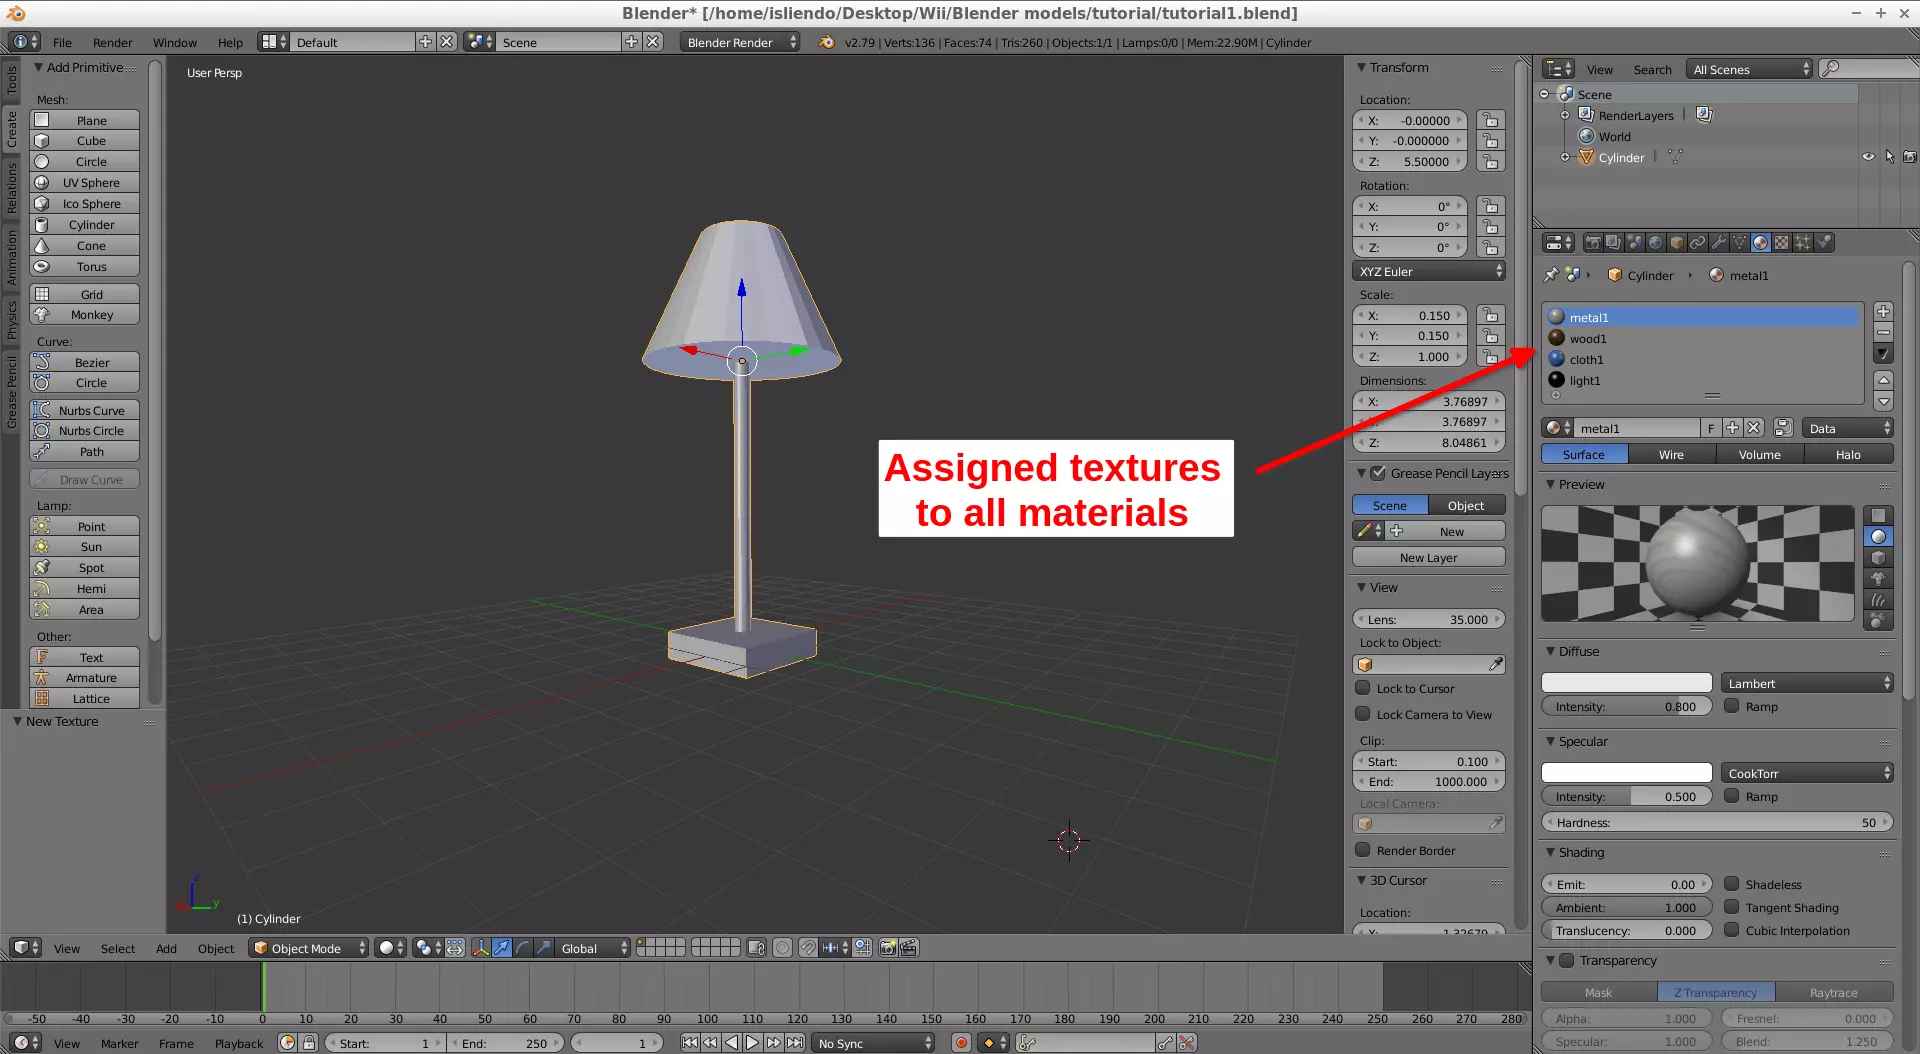
(Fig. 9 - All materials with textures assigned)
After all that, now is the time to assign the materials to the parts of the object we want the materials on. I want the wood1 on the base of the lamp model, the metal1 on the pole of the lamp, the cloth1 on the cone part of the lamp and the light1 on the base and top of the cone part of the lamp (to simulate a light bulb). To do this we have to enter Edit Mode (pressing Tab while the cursor is on the same location as the model/3d view area), then change to the face selection method, select the faces of the model in which we want our material to be added, click on the material that you want to assign to those faces and click on the Assign button (Fig. 10a, 10b, 10c and 10d).
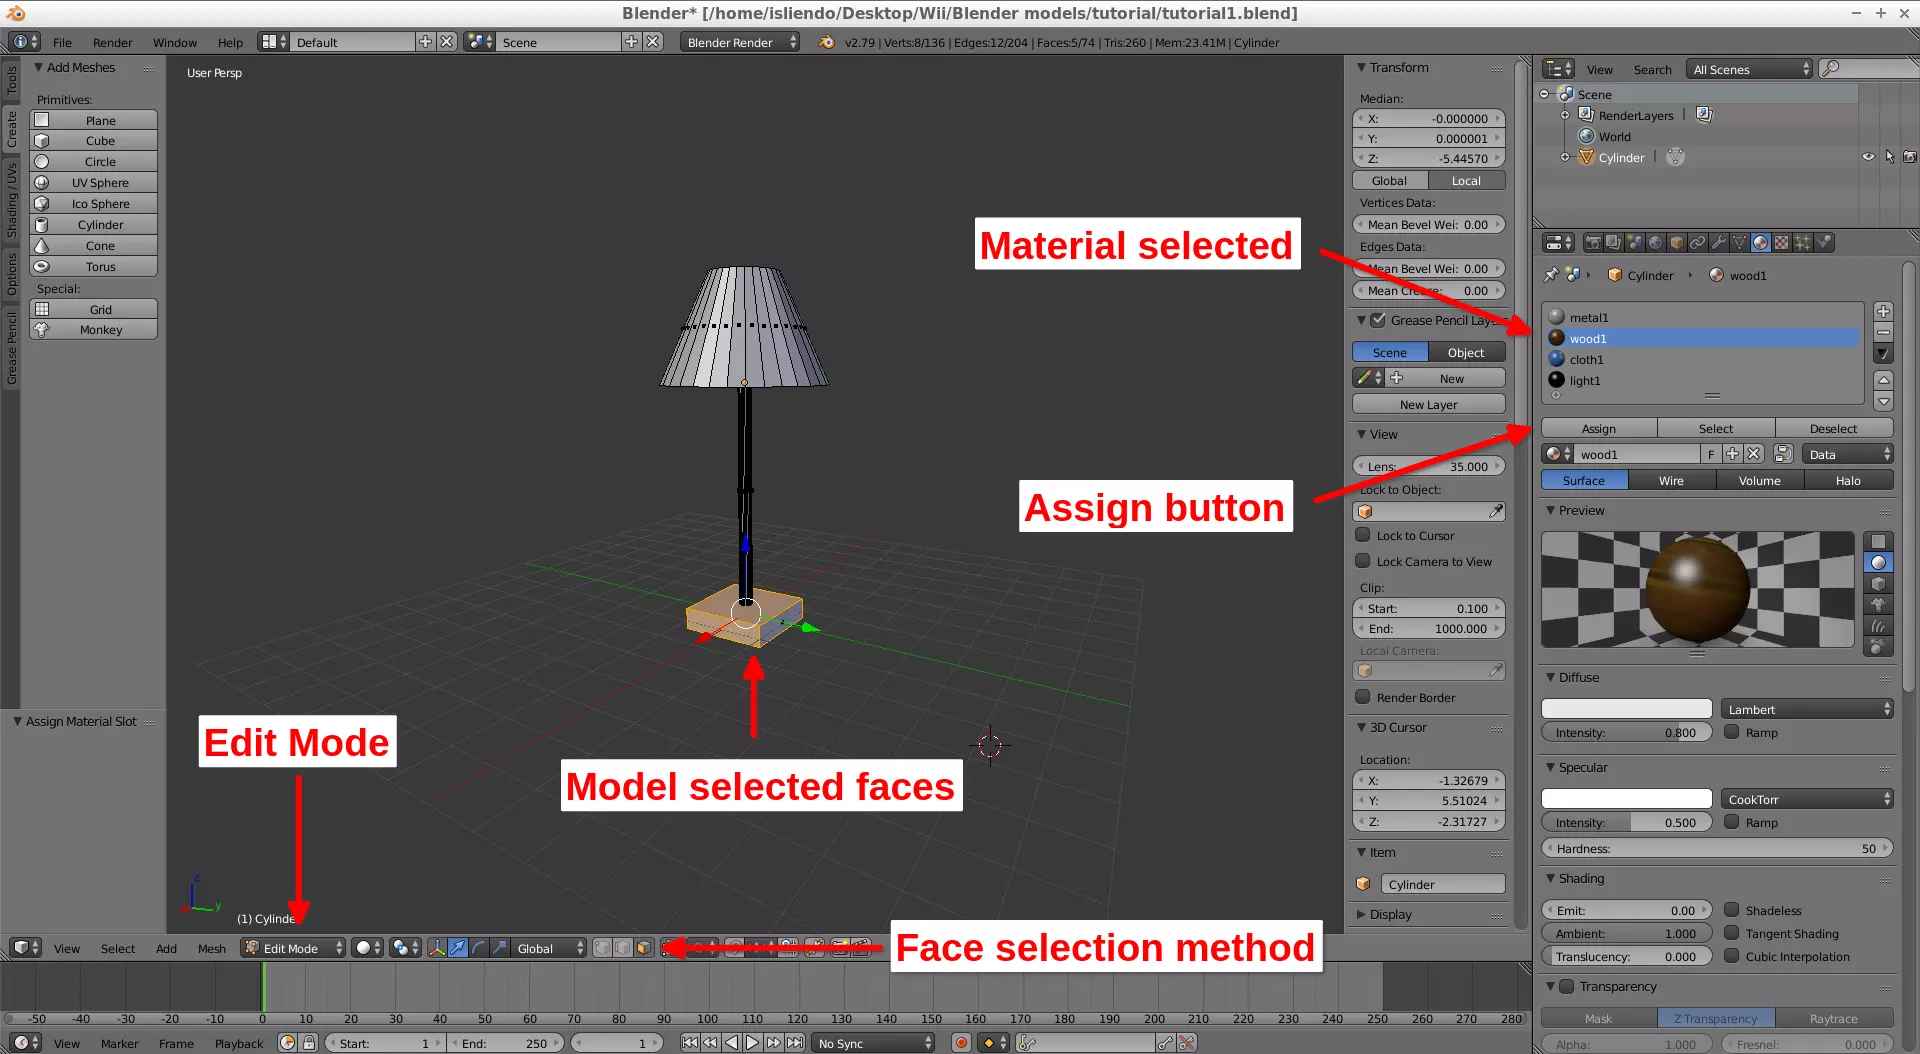
(Fig. 10a - Assign wood1 to respective faces of model)
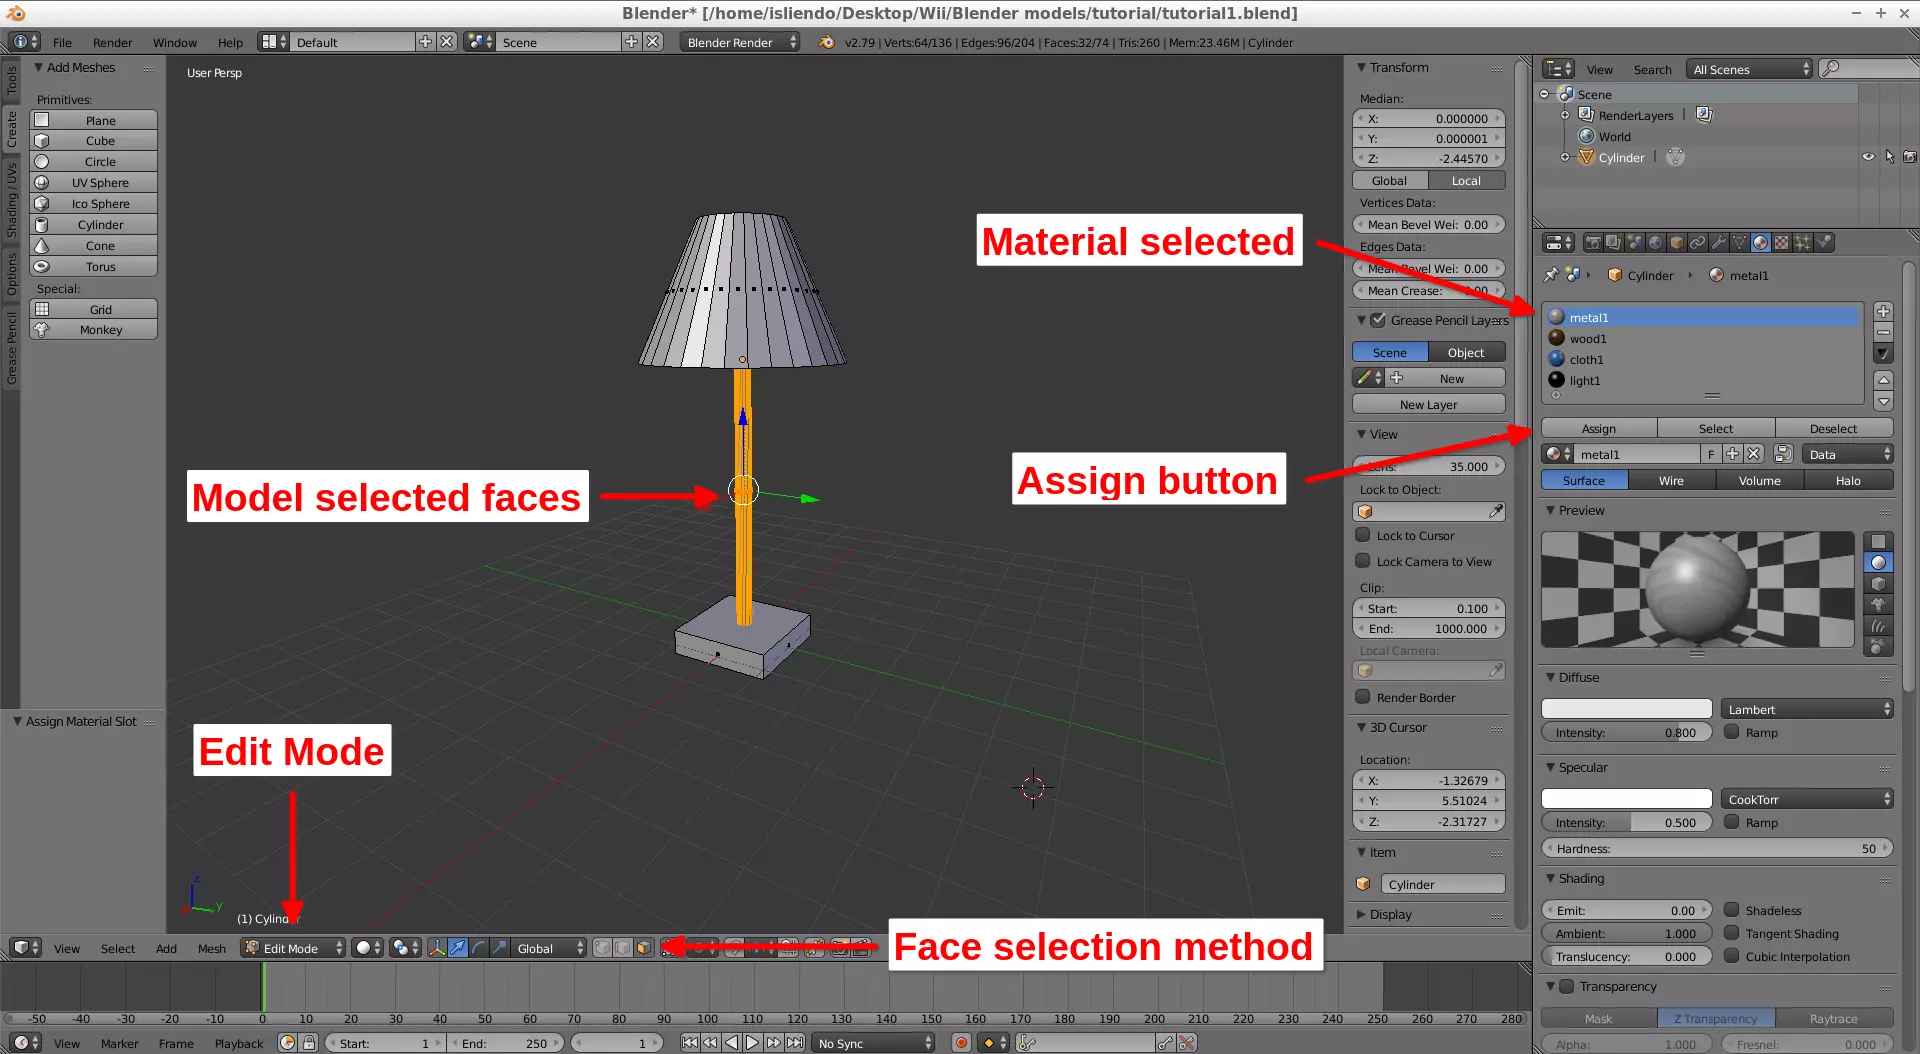
(Fig. 10b - Assign metal1 to respective faces of model)
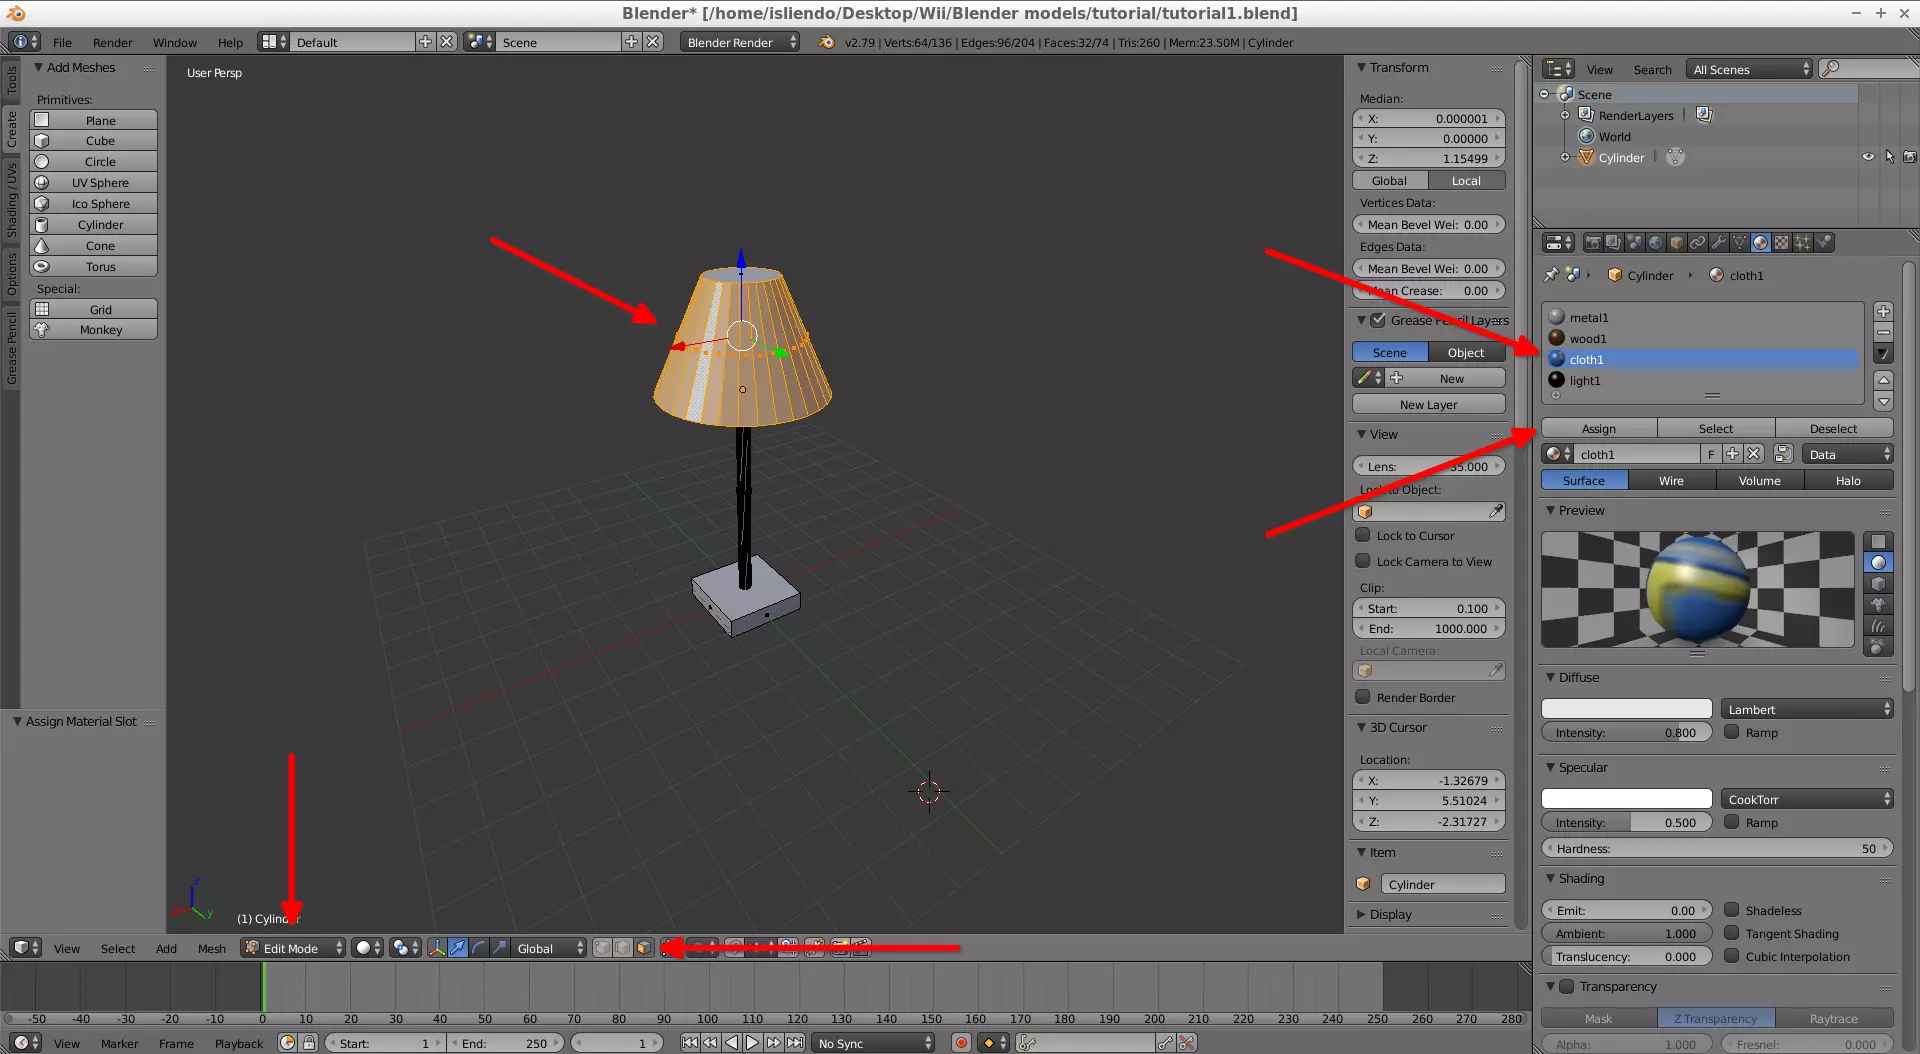
(Fig. 10c - Assign cloth1 to respective faces of model)
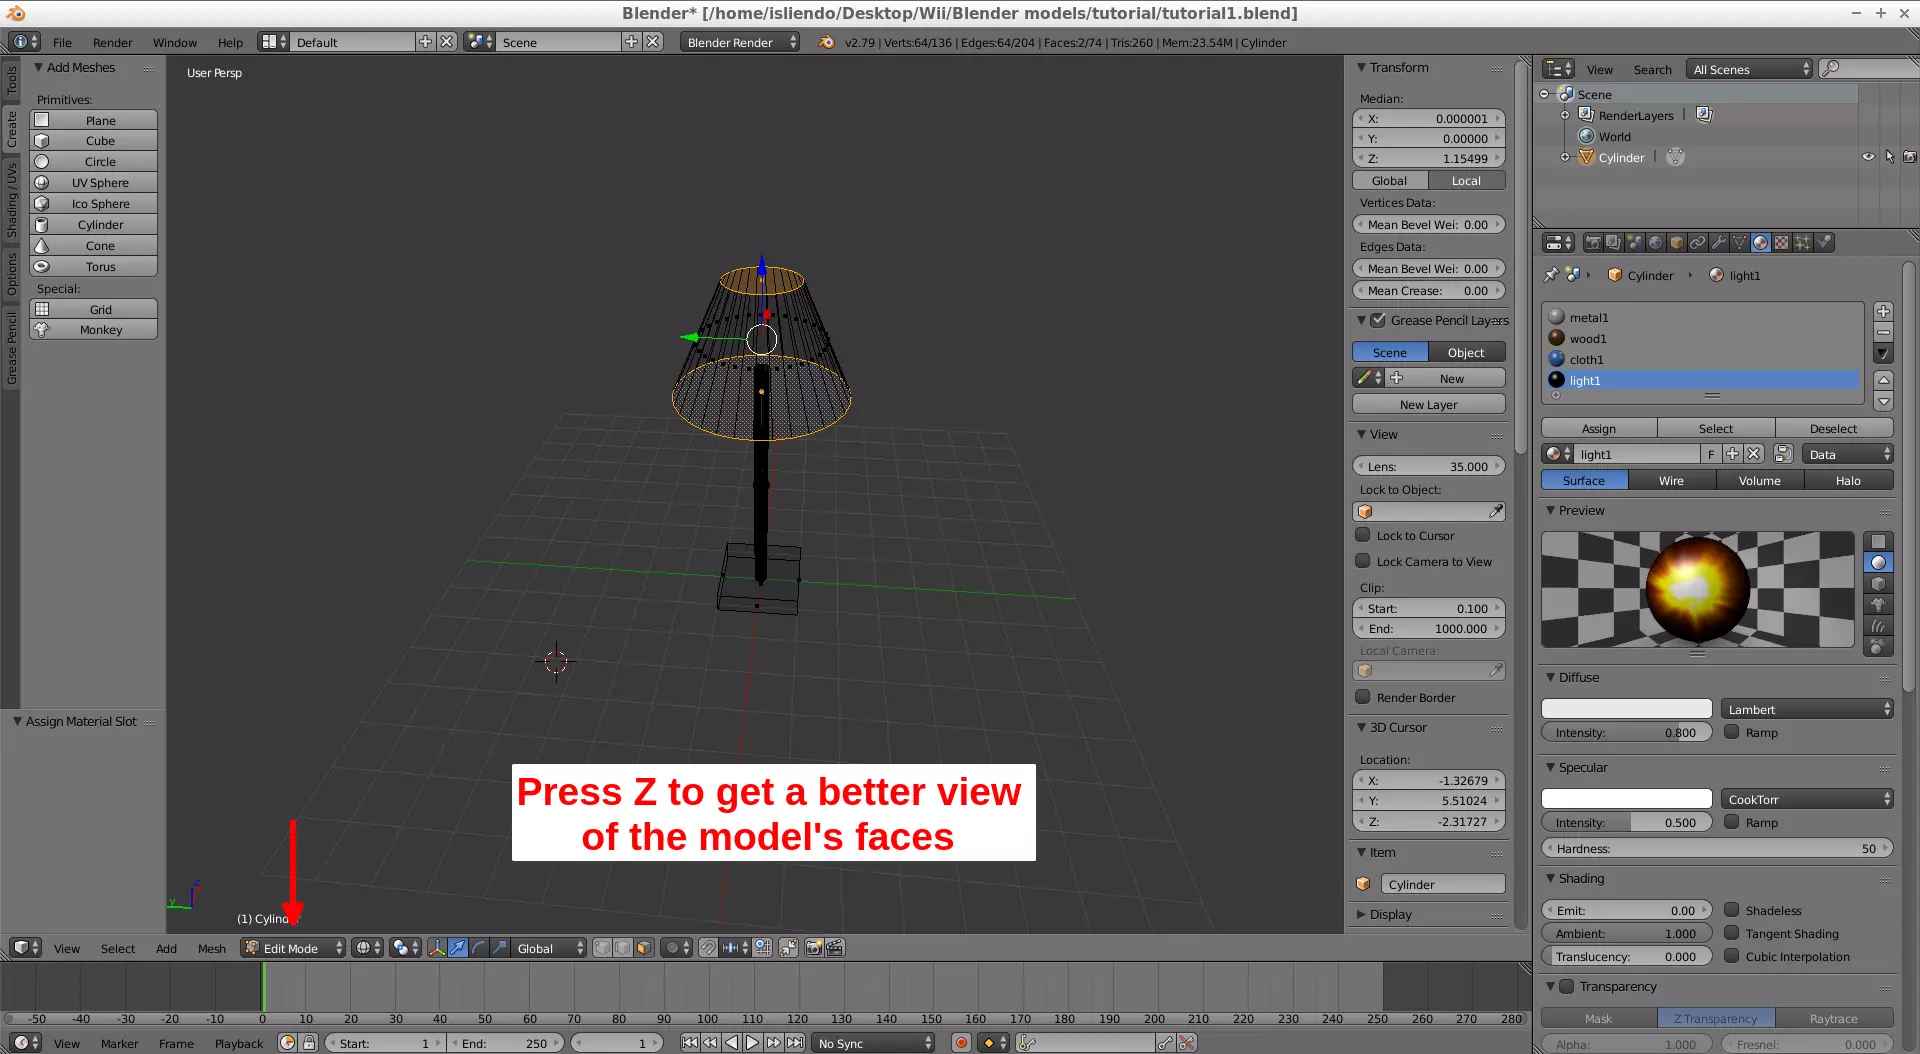
(Fig. 10d - Assign light1 to respective faces of model)
To be able to see your materials assigned to the model, click on the World tab, scroll down and check the Enviroment Lighting, then, change to Material view (Fig. 11 and 12).
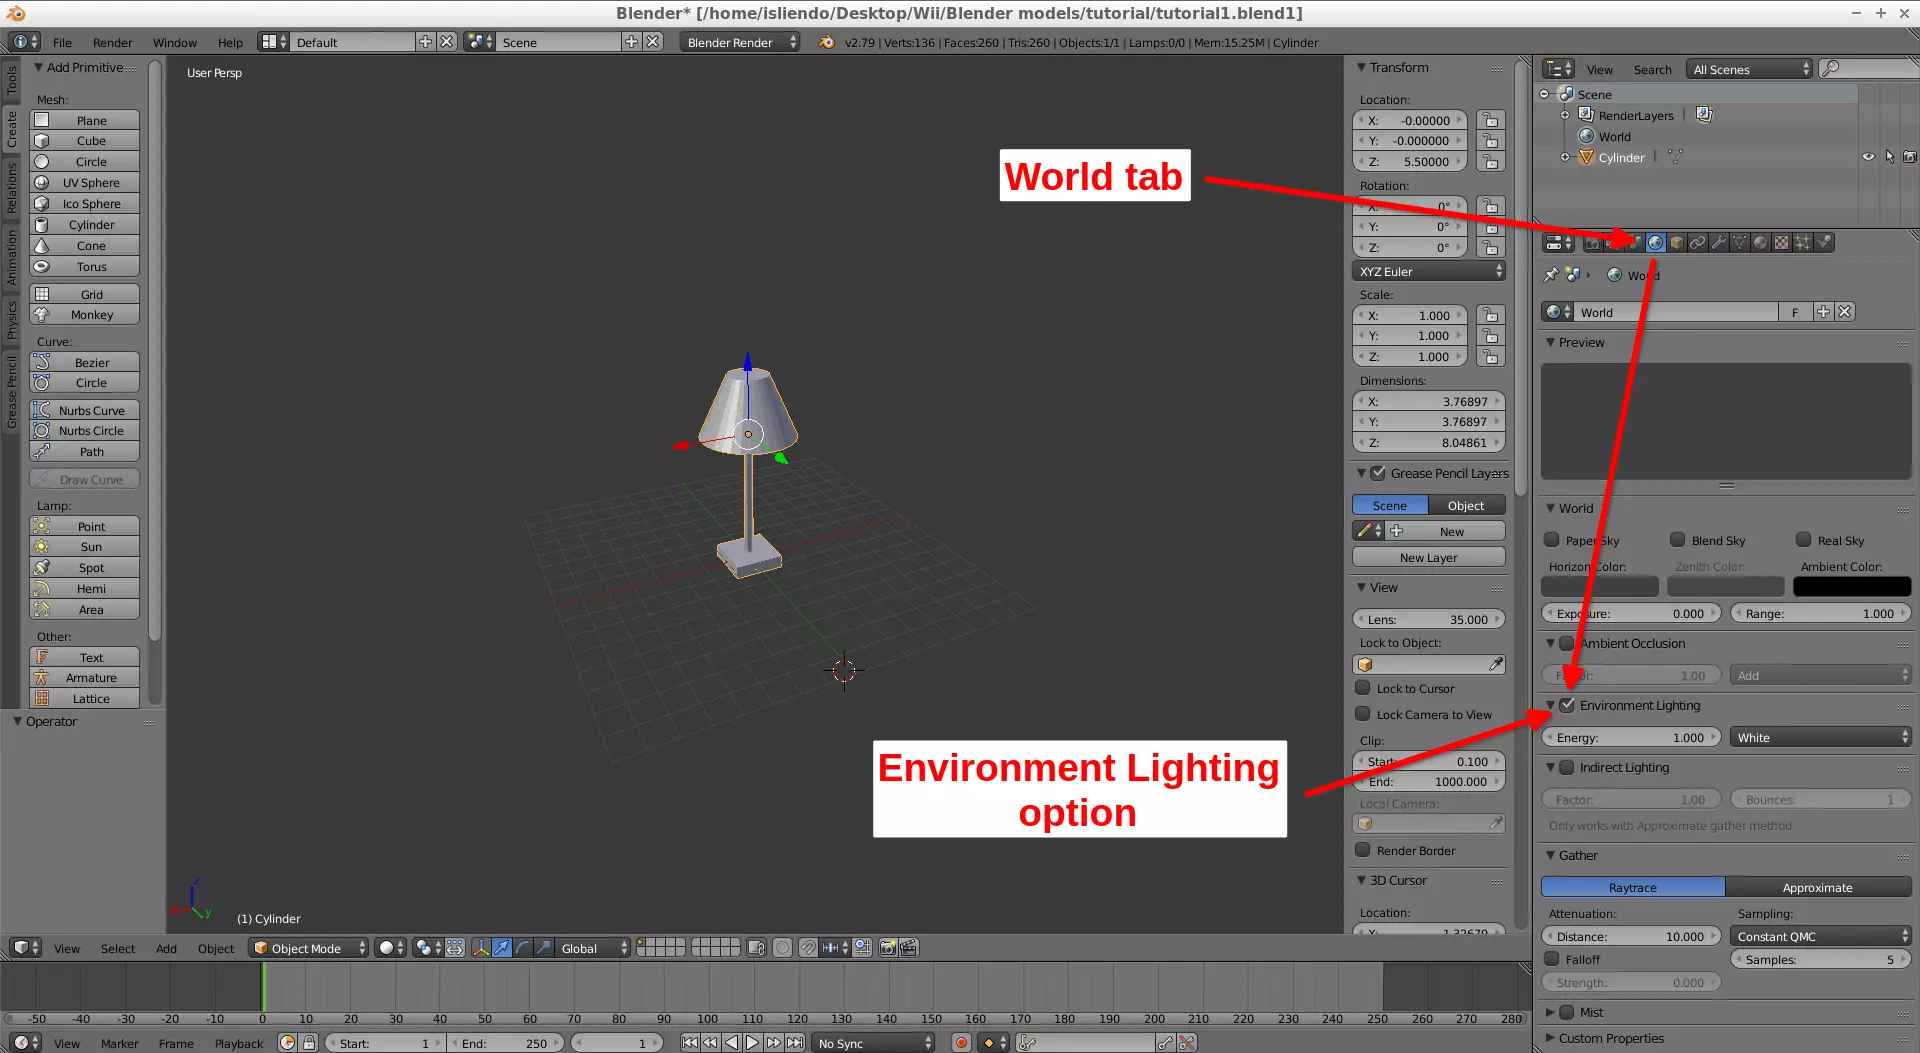
(Fig. 11 - Check the Enviroment Lighting option)
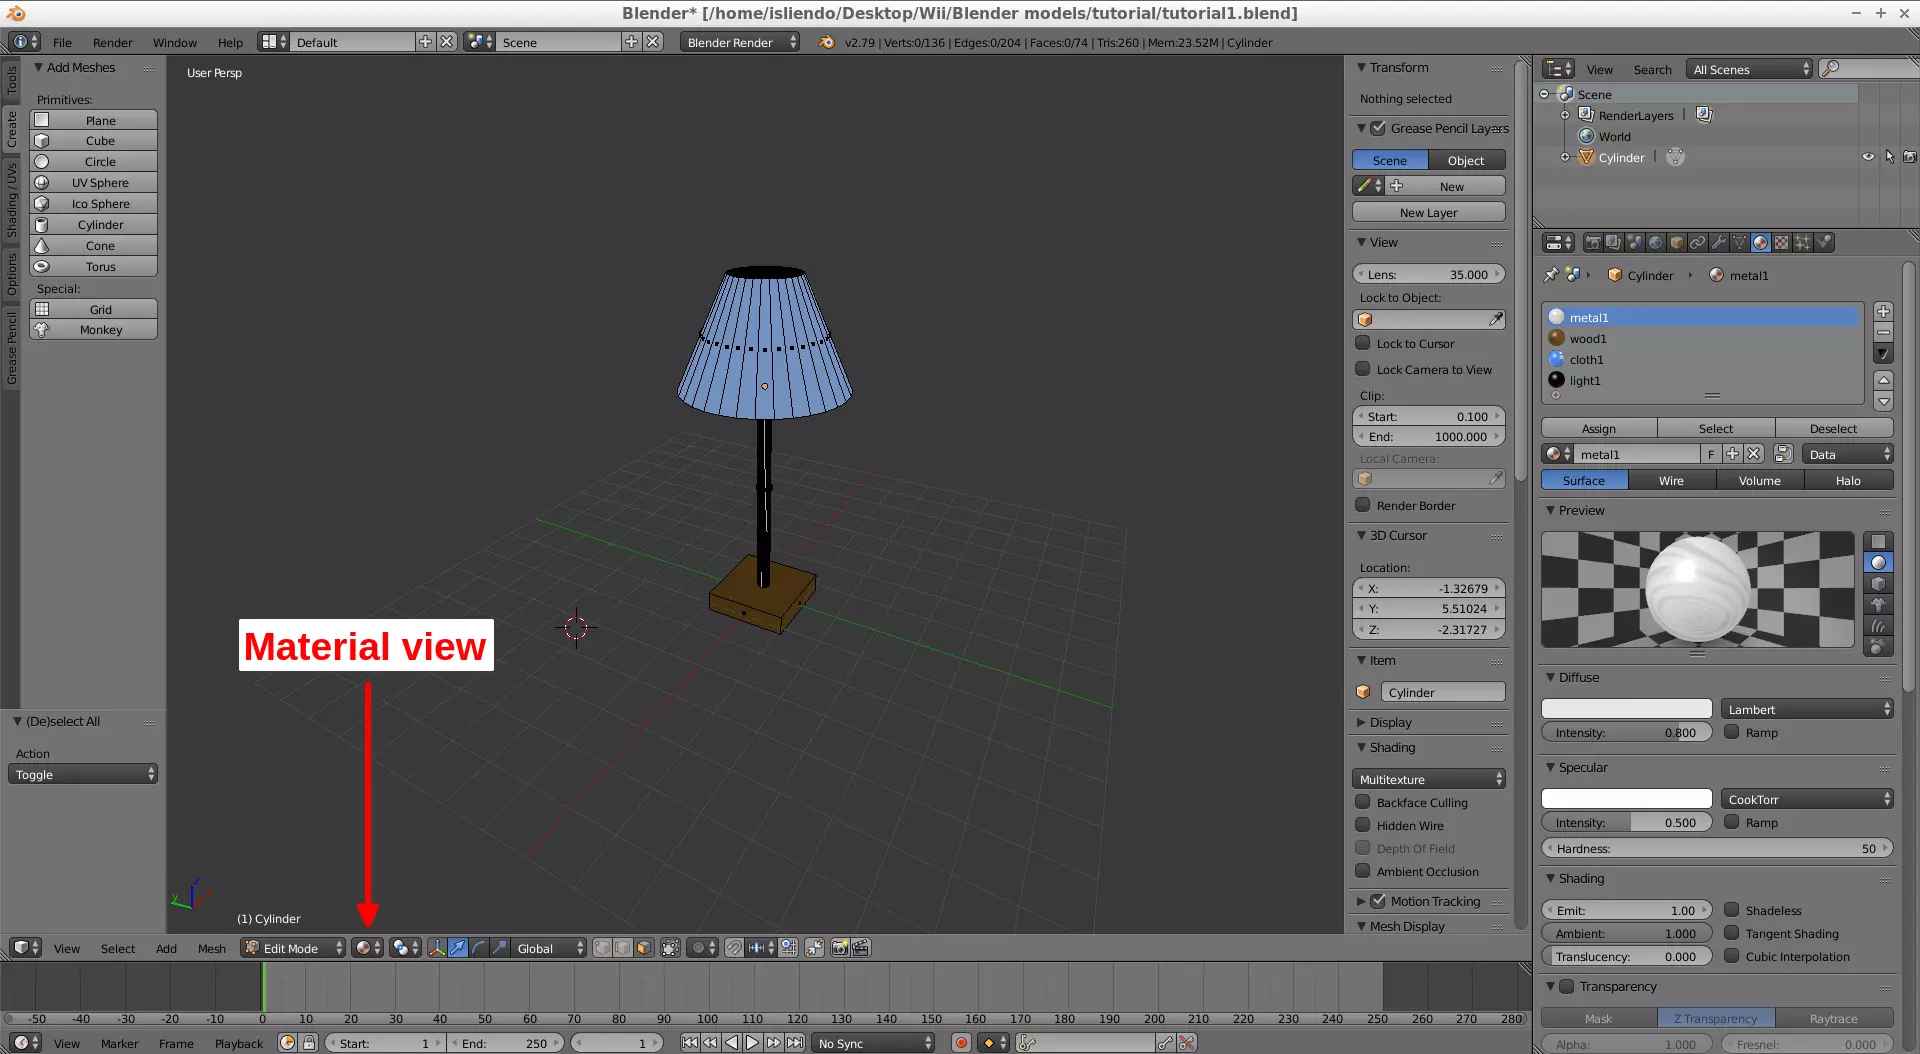
(Fig. 12 - Change to Material tab)
You might see that the colors of your textures are applied to the faces but not the image textures (Fig. 12). To solve this you have to unwrap the faces of your object: on Edit Mode double press A to select all faces of the model, press U and select Unwrap (Fig. 13 and 14).
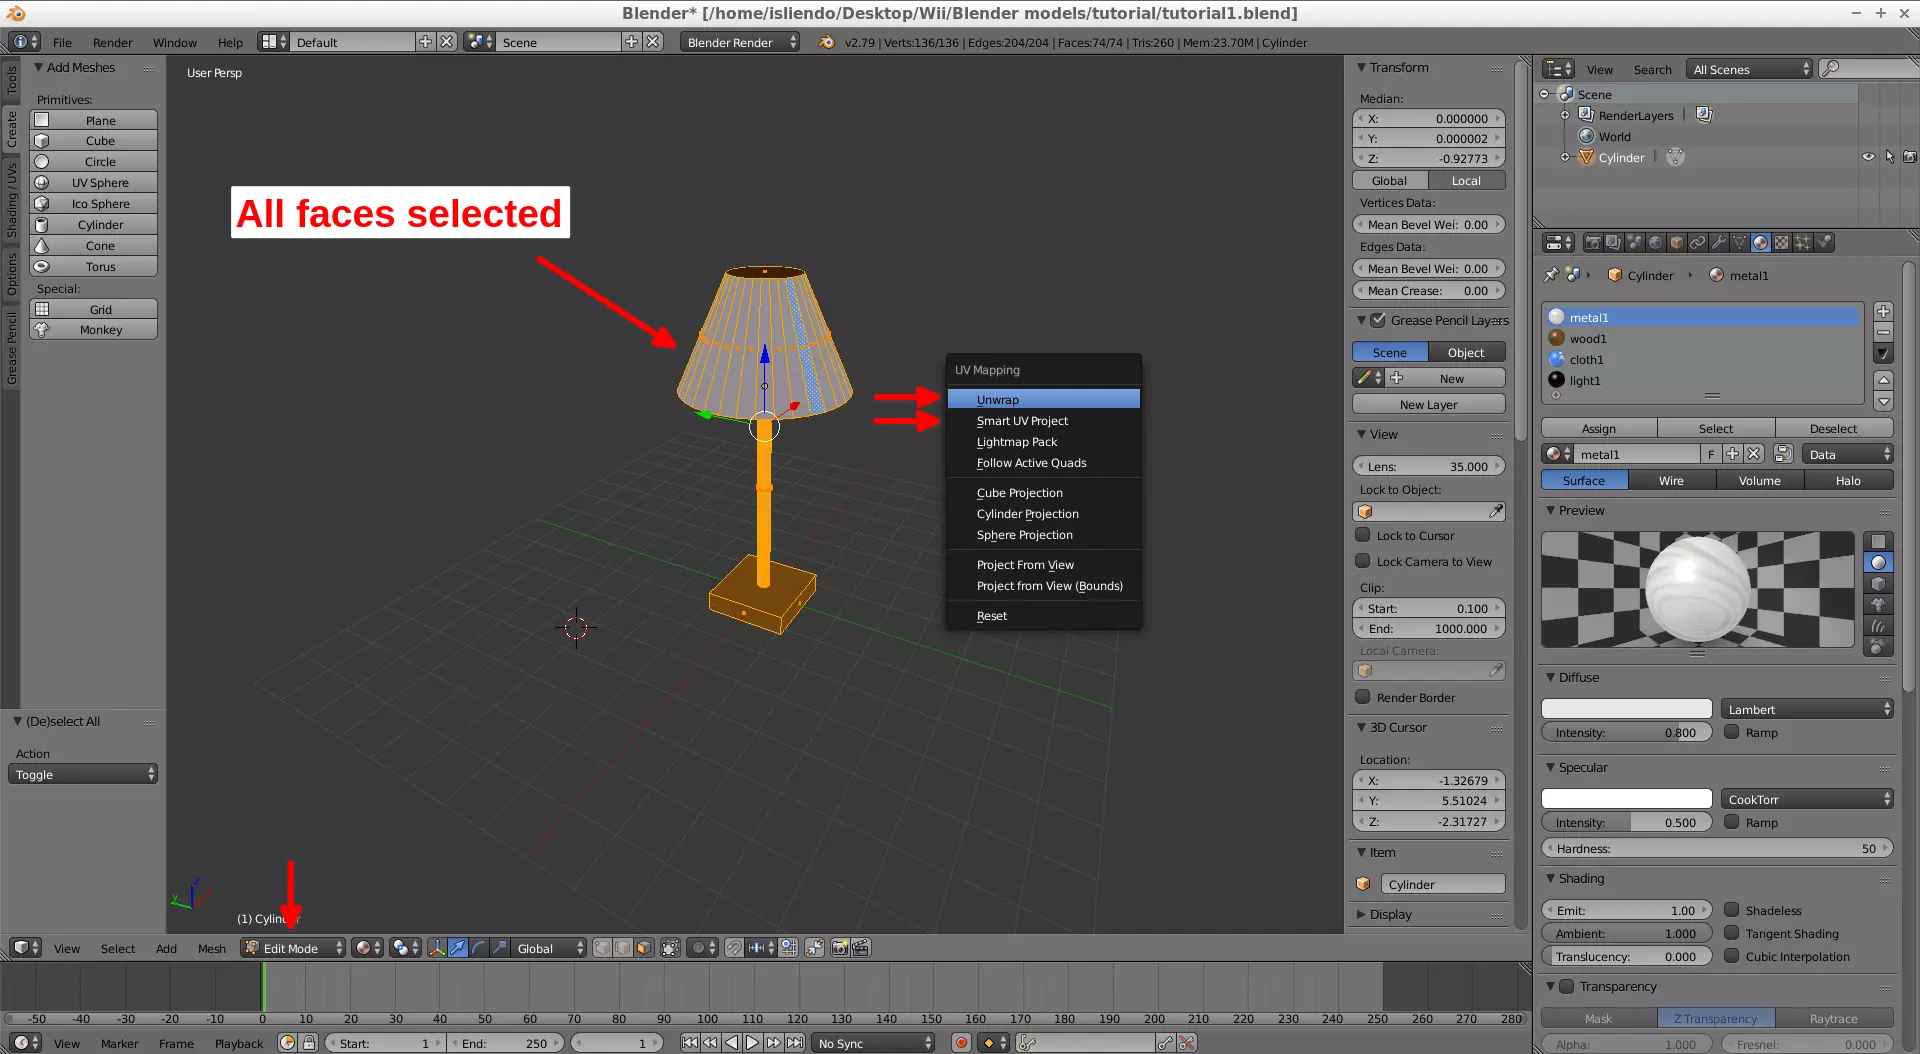
(Fig. 13 - Unwrap procedure)
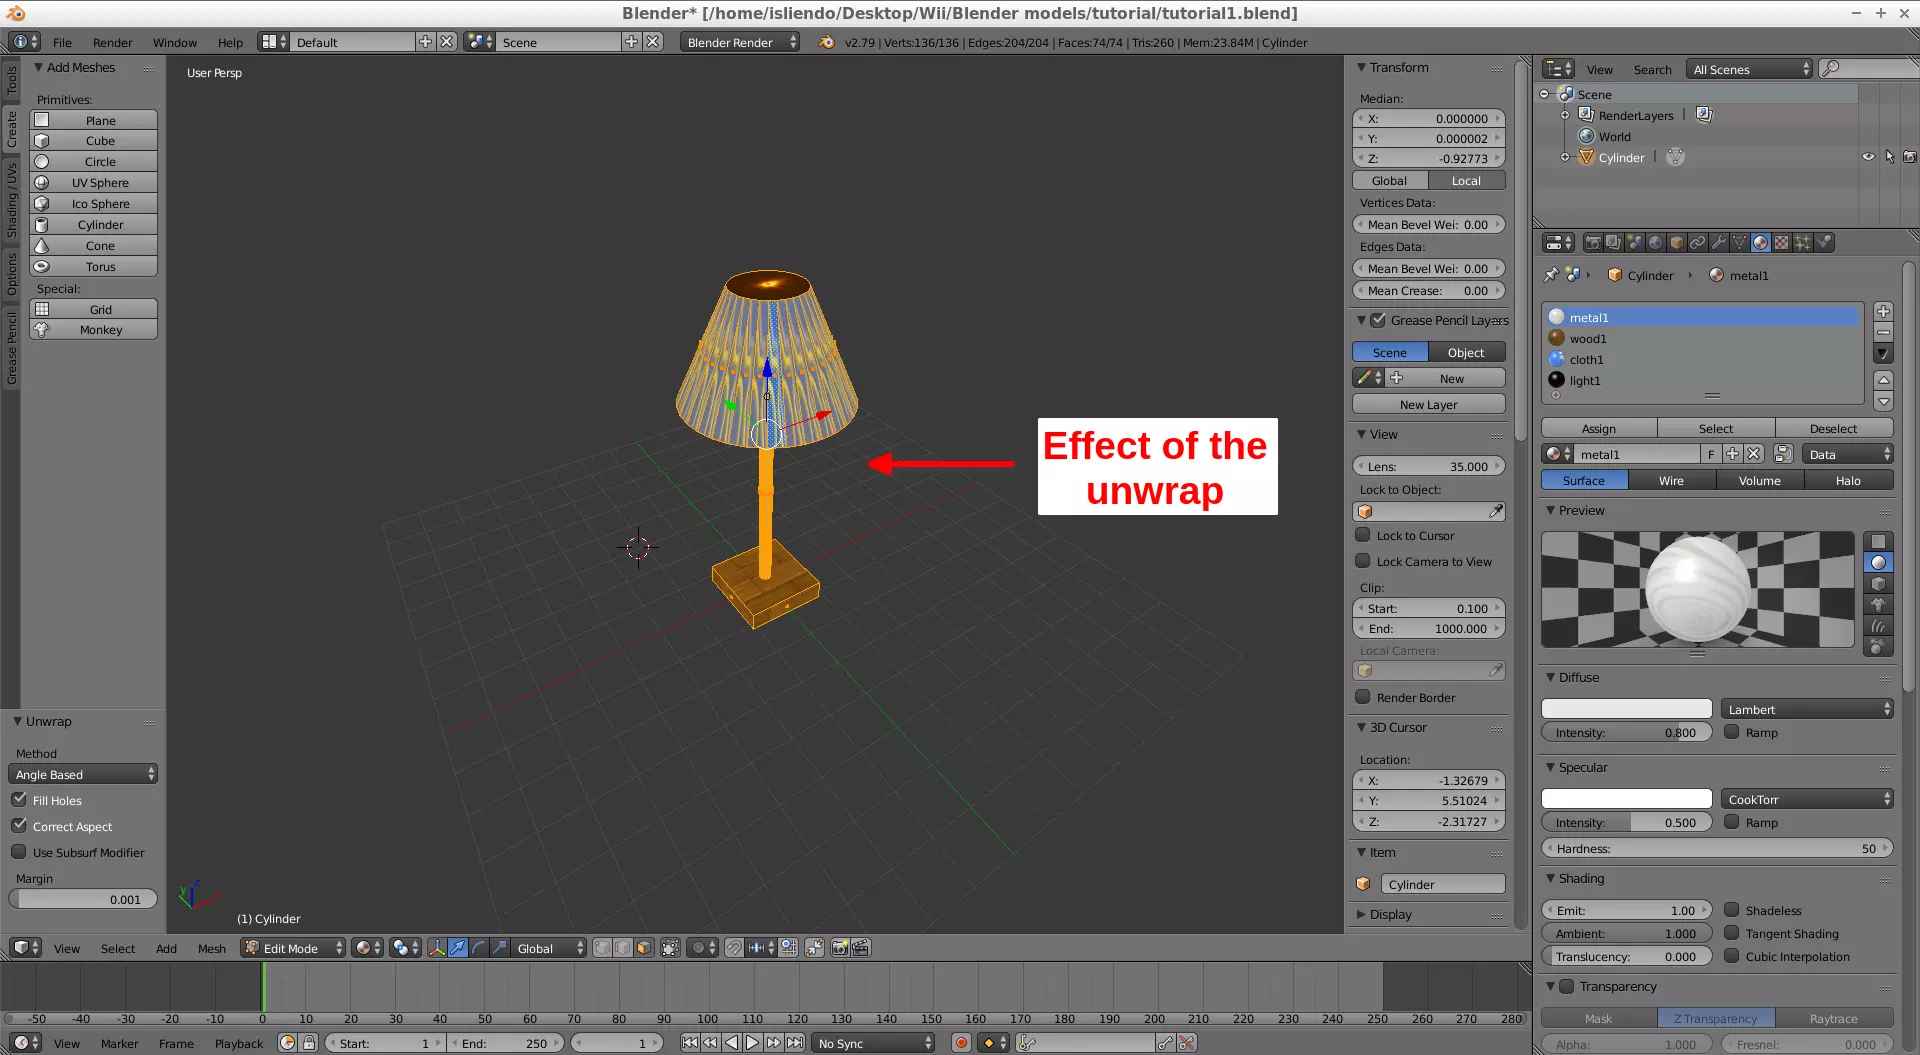
(Fig. 14 - Unwrap effect)
Note 1: you can also select Smart UV Project. Both options do different stuff and in some cases it is preferable the effect of one in relation to the other.
My textures did not assign very well so I had to adjust them a little. I used Smart UV Project to the faces of the cone part of the lamp and also scaled the image of the light1 material in UV Editing so more light is seen (Fig. 15).
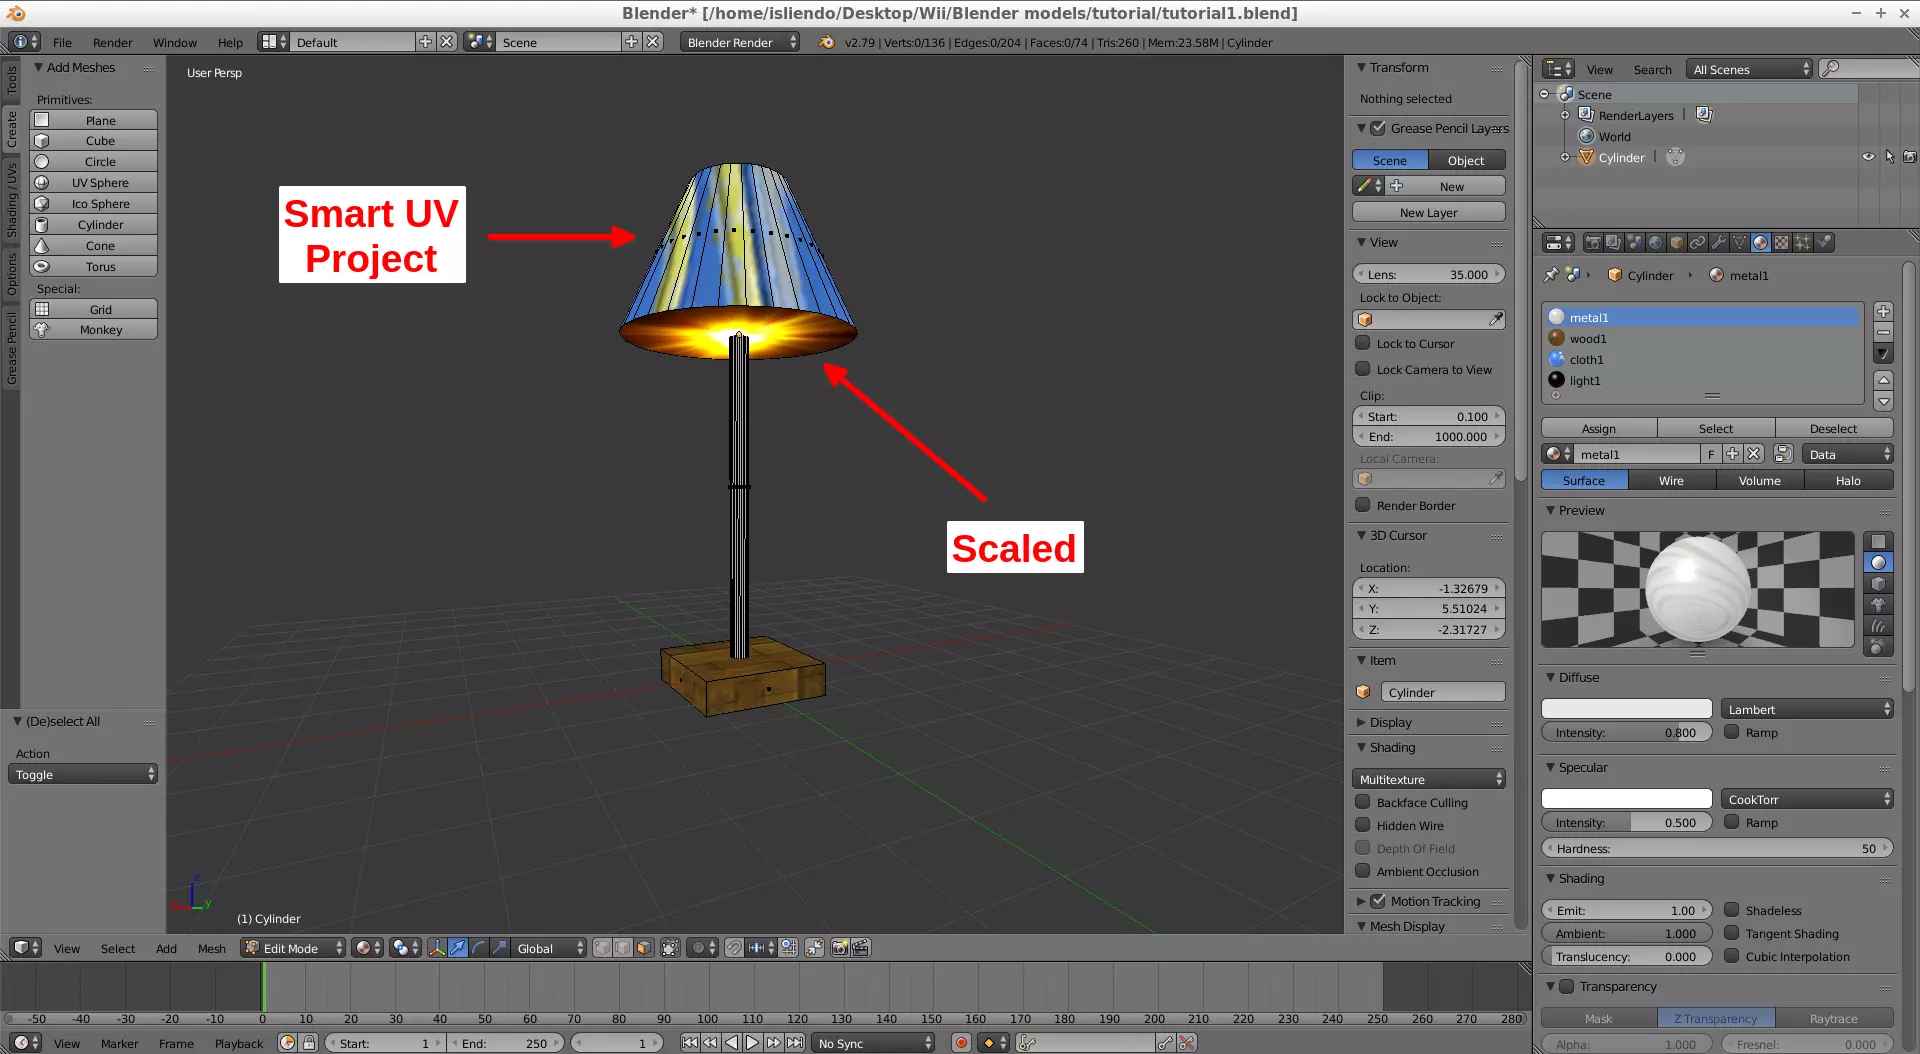
(Fig. 15 - Smart UV Project effect)
Now, you have to apply a triangulate modifier to the model, click on Modifiers, Add Modifier, Triangulate, verify that you are on Object Mode, select your model and then click on Apply (Fig. 16 and 17).
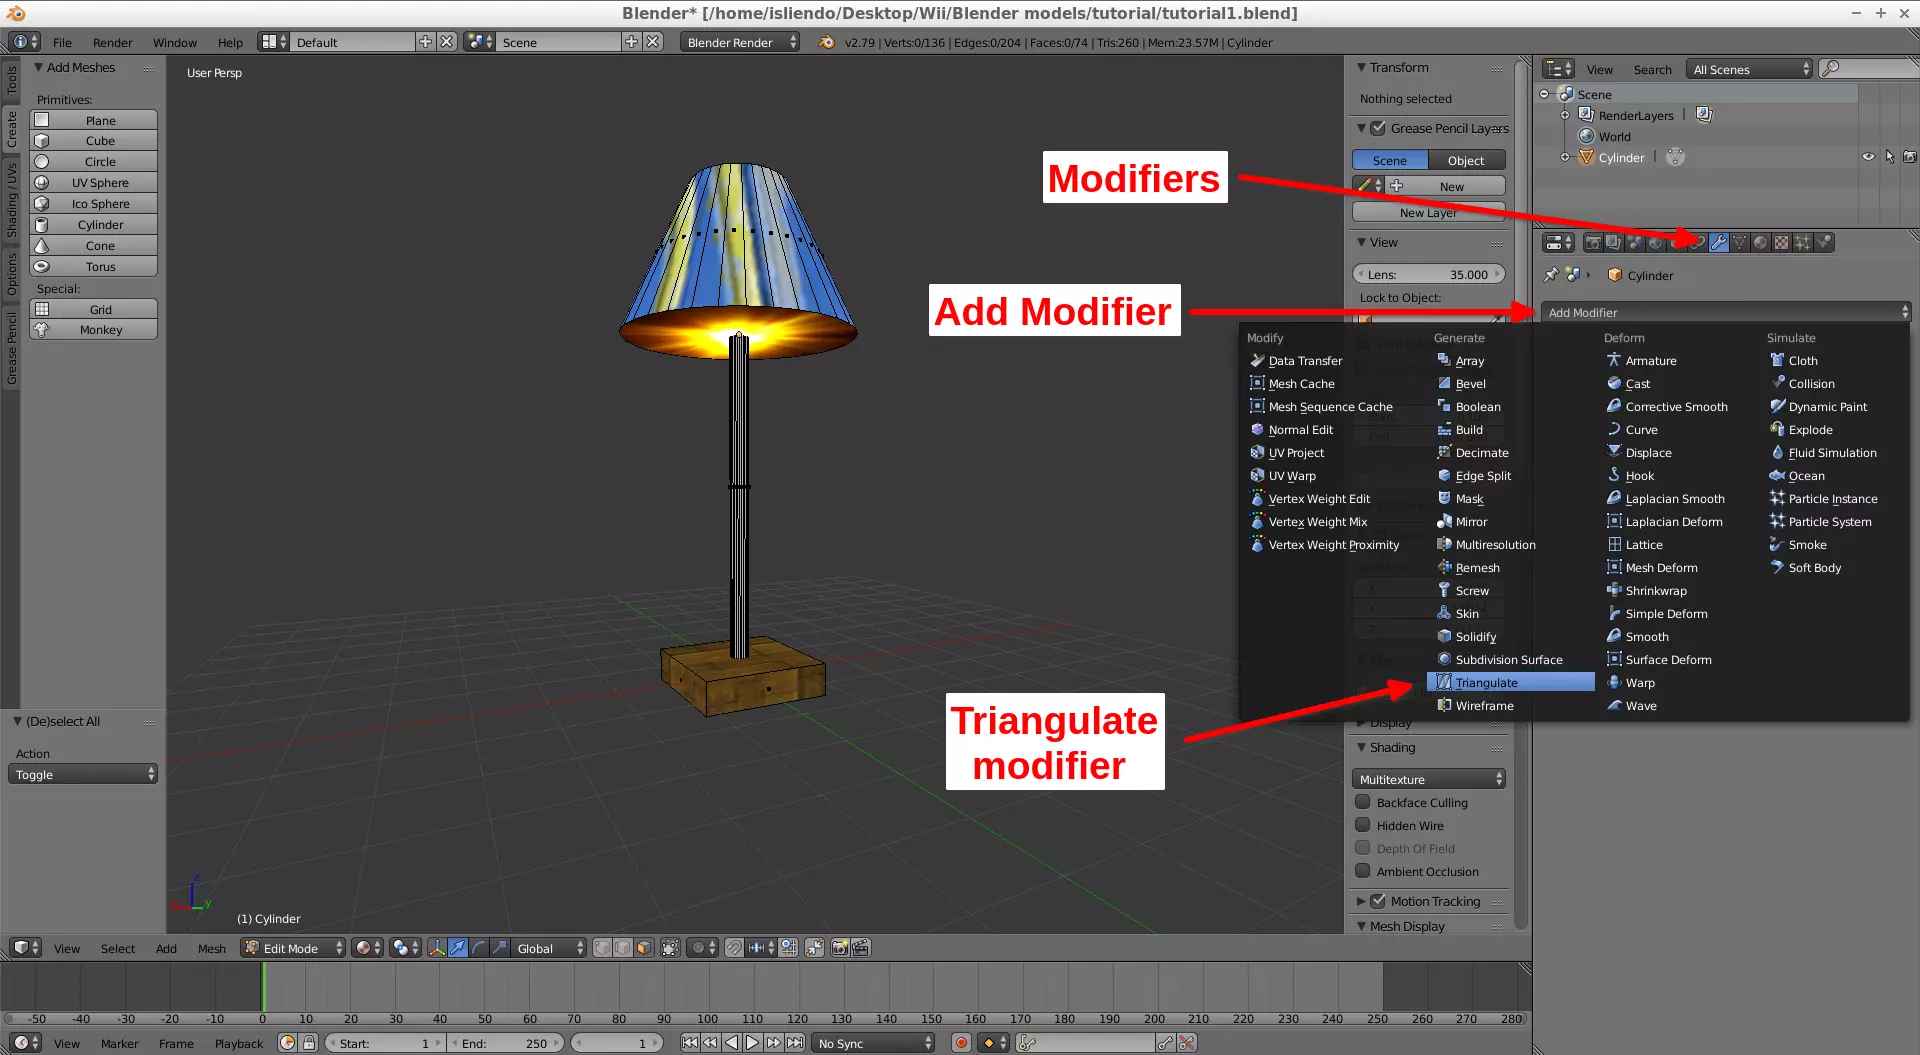
(Fig. 16 - Triangulate modifier)
(Fig. 17 - Applying triangulate modifier)
Note 2: this is done because the collision of the object depends on triangles, if your model is not triangulated you will pass through it on game or will have weird collision.
At this point the object is ready to continue with the tutorial, if you want to apply other modifiers and detail your model a little more and such you will have to learn how to use Blender better from tutorials in Youtube. Don’t try difficult stuff at start, you will get frustrated, do SM64 or OoT like-objects first, at the end, when you get the rhythm of it, you will get better making more defined and detailed objects.
Export the object as an FBX file and an OBJ file (to a known location) by going to File > Export (Fig. 18). Name both files the same (the OBJ will come with an MTL file - Fig. 19 and 20). Try putting the FBX, OBJ and MTL files in the same directory as the textures you used. This is in case you are working in various computers to not get errors with the textures like me (Fig. 21).
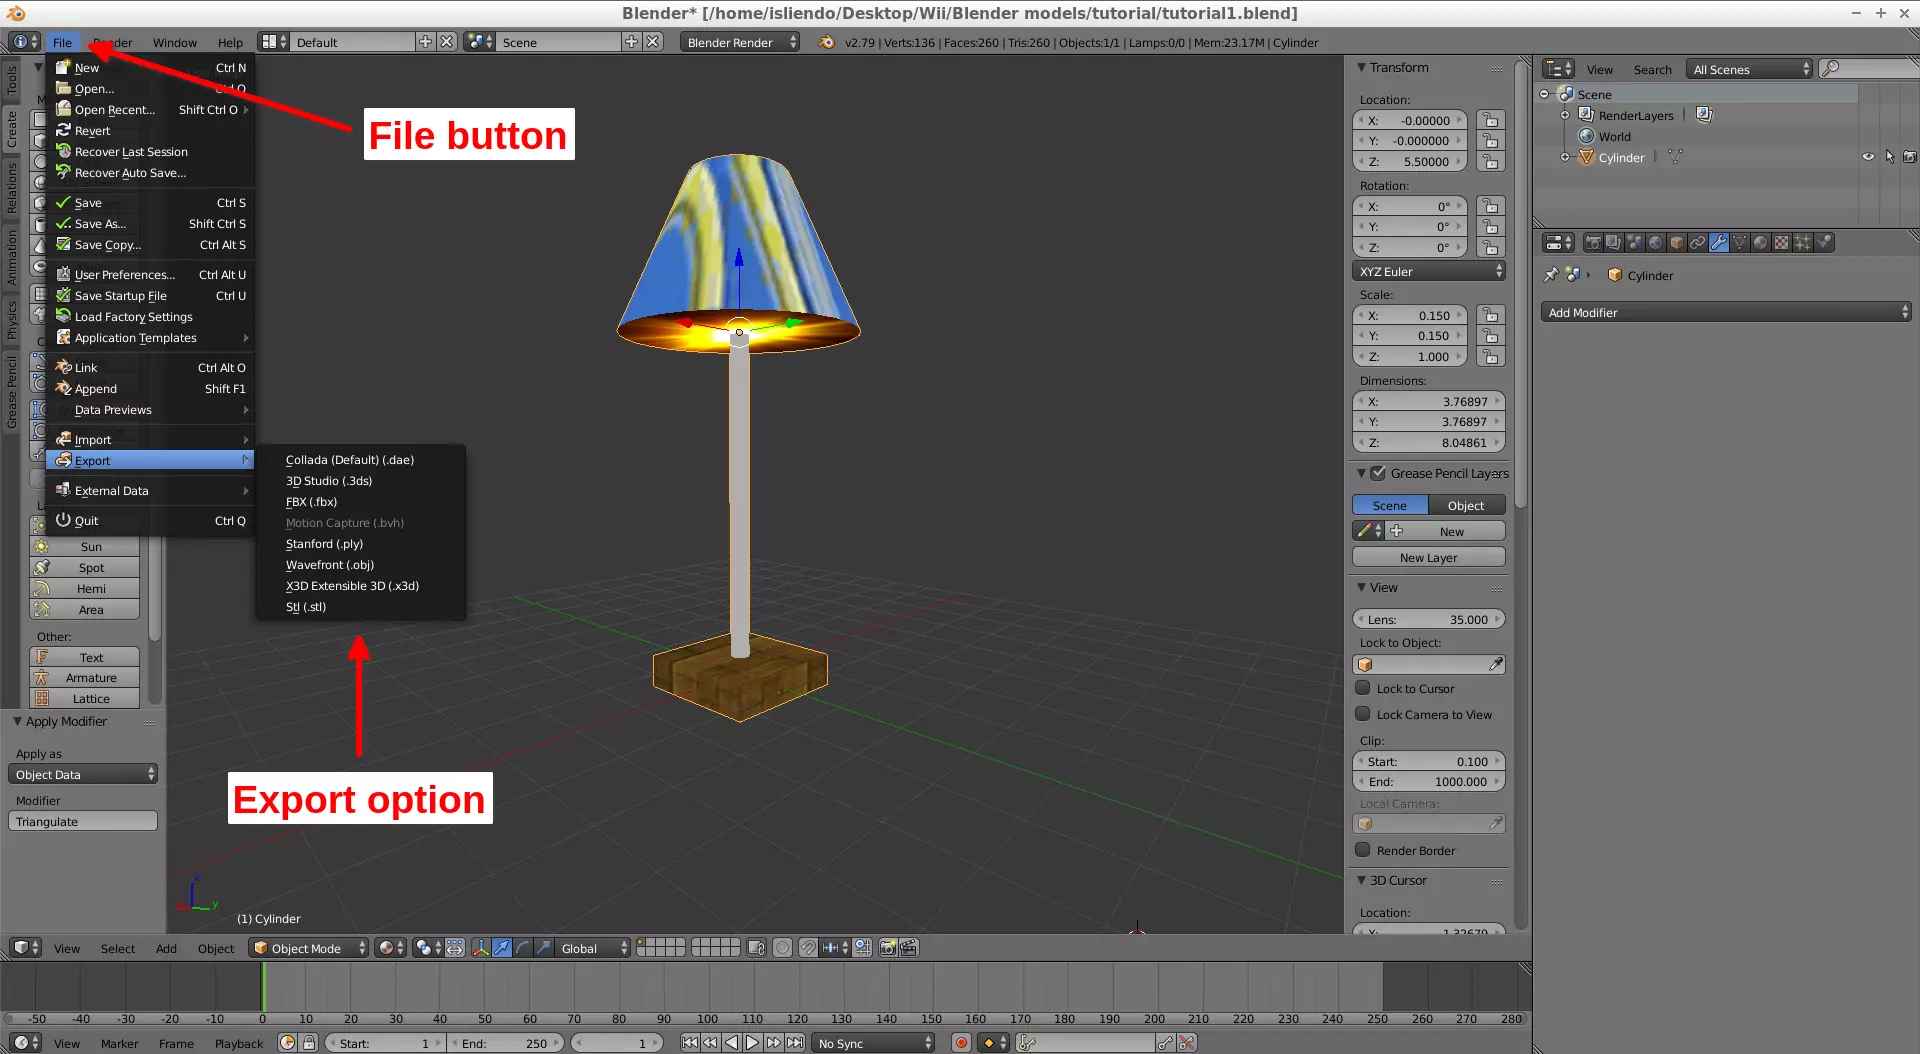
(Fig. 18 - Export option)

(Fig. 19 - FBX file export)
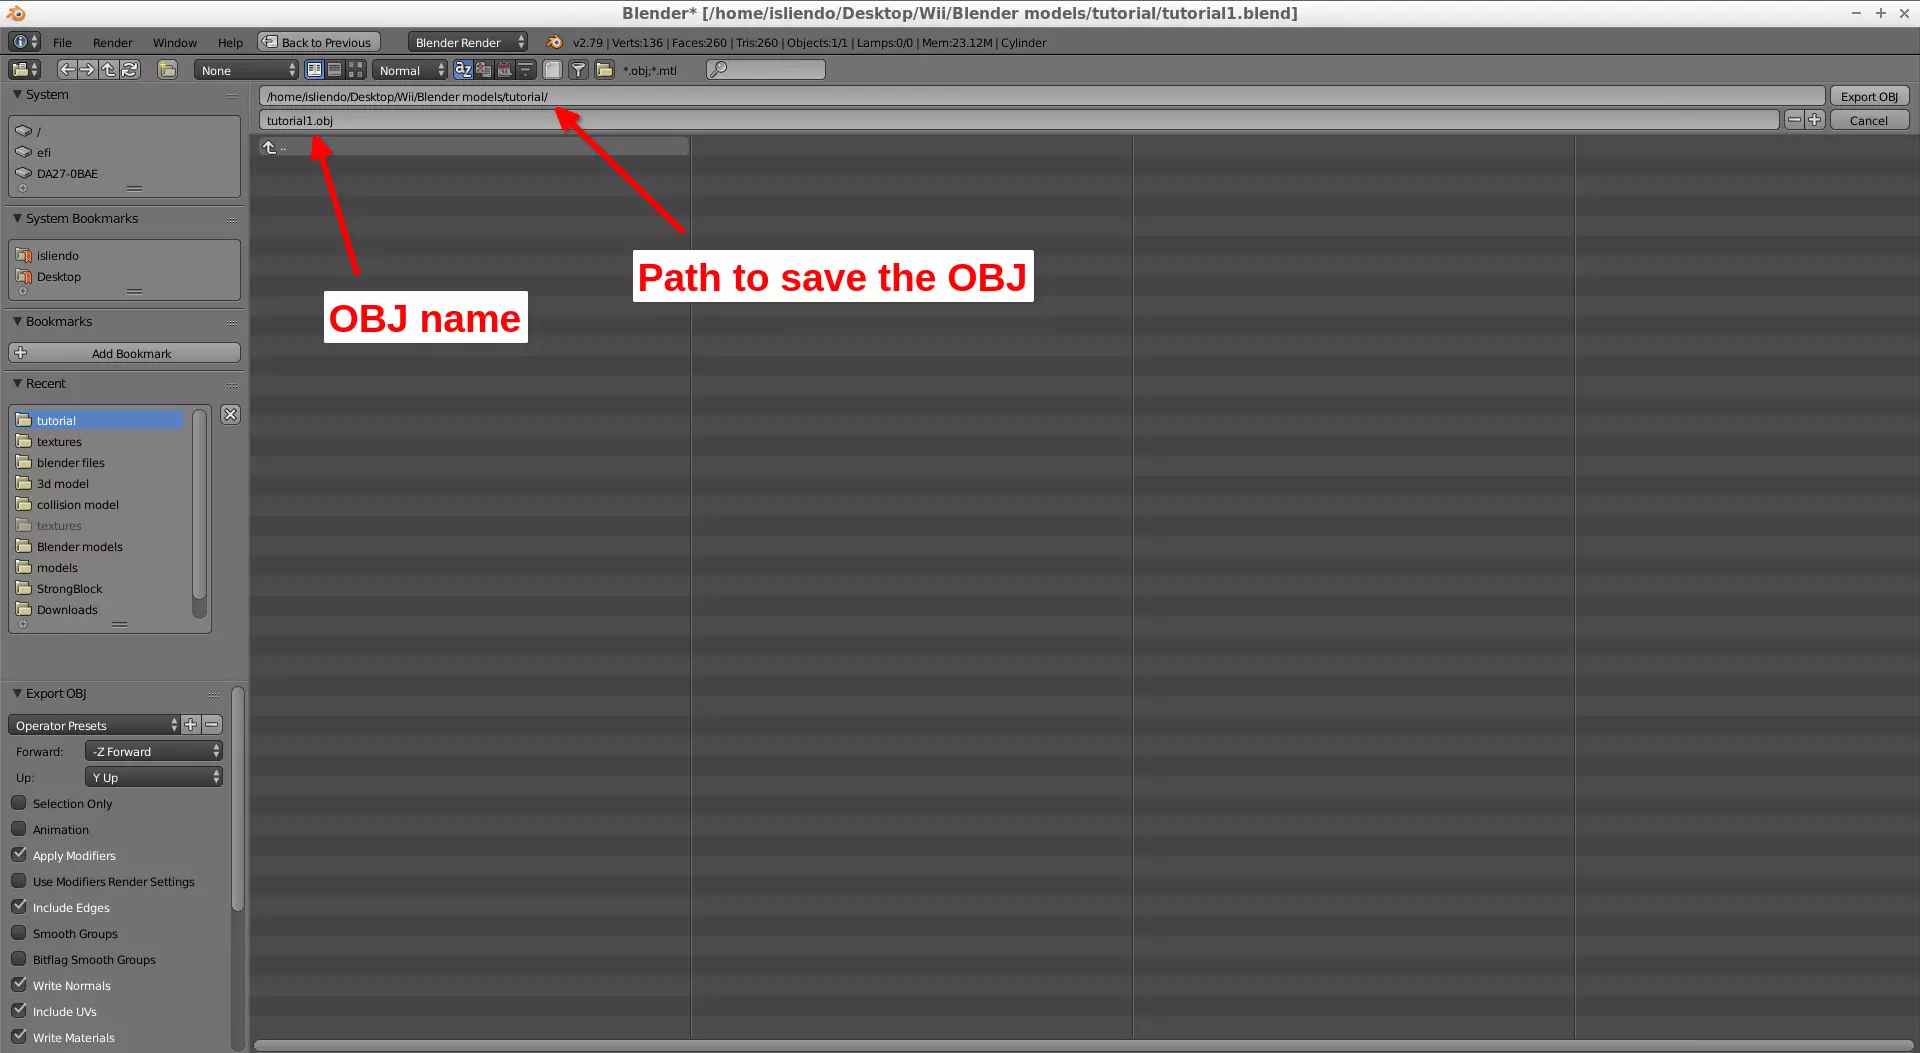
(Fig. 20 - OBJ file export)
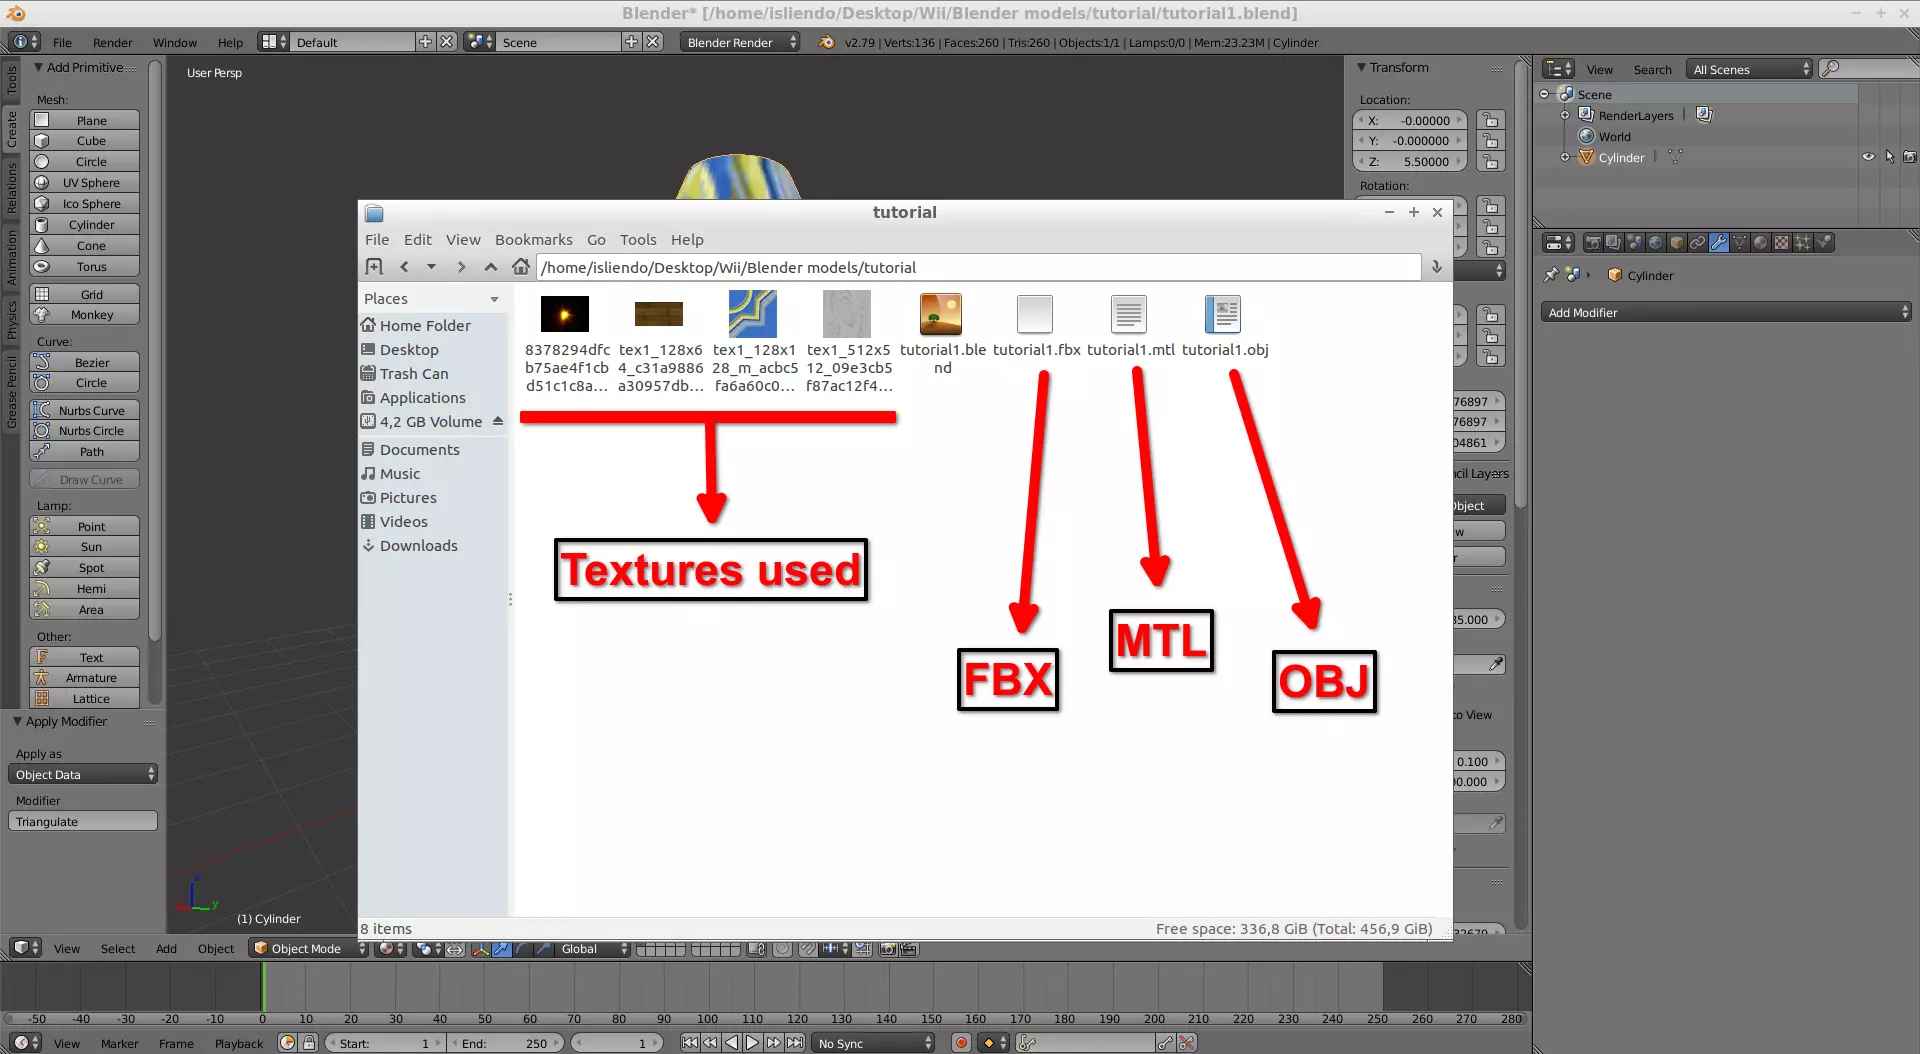
(Fig. 21 - Folder containing textures and exported Blender files)
Now you can close Blender (save your blender project files, just in case) and we are going to enter the file conversion part of the tutorial to be able to get a file of the model we've worked on that can be introduced in the game.
We will be using 3 programs of the 5 mentioned at the beginning of the tutorial: SuperBMD, Collision Creator and Arc Covertor. Be sure to have them organized in respective folders to use them (Fig. 22).
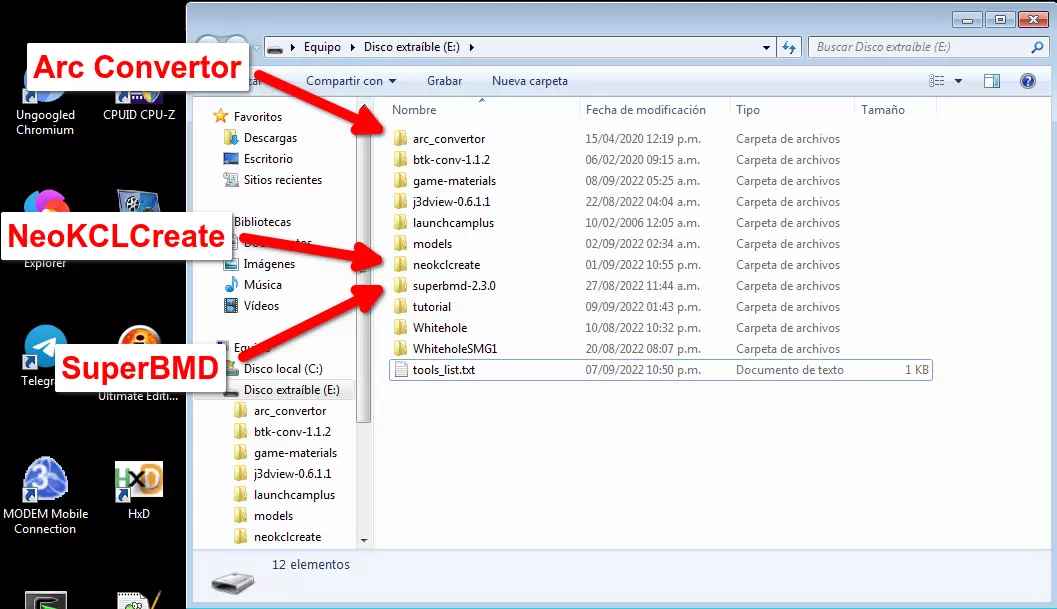
(Fig. 22 - Tools organized in folders)
First locate where all your needed files are (Fig. 23).
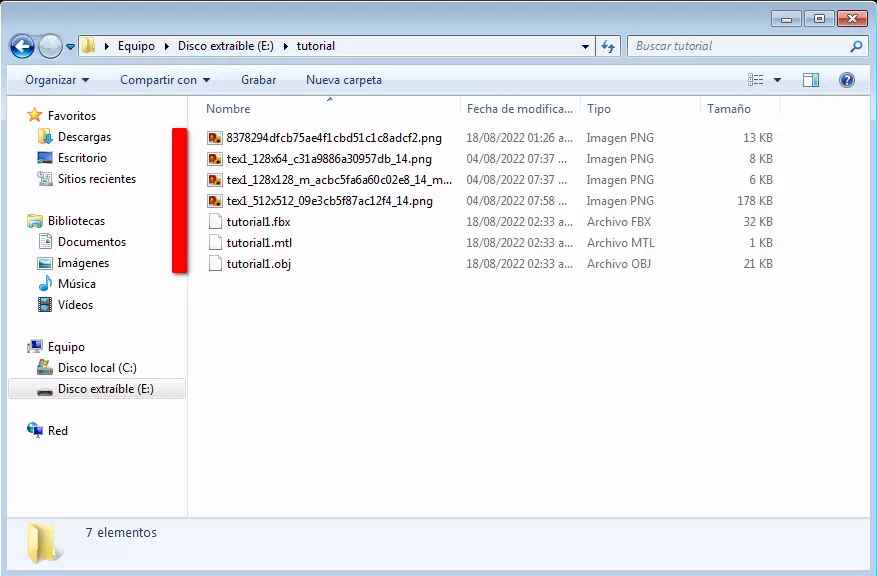
(Fig. 23 - Textures and exported Blender files folder)
Open a New window and in that window locate the SuperBMD tool (Fig. 24a - keep the window of your needed files open). Drag and drop the FBX file into the superbmd_rotate.bat. A BMD file will appear in the same folder as the FBX file (this is a file that contains your model - Fig. 24b).
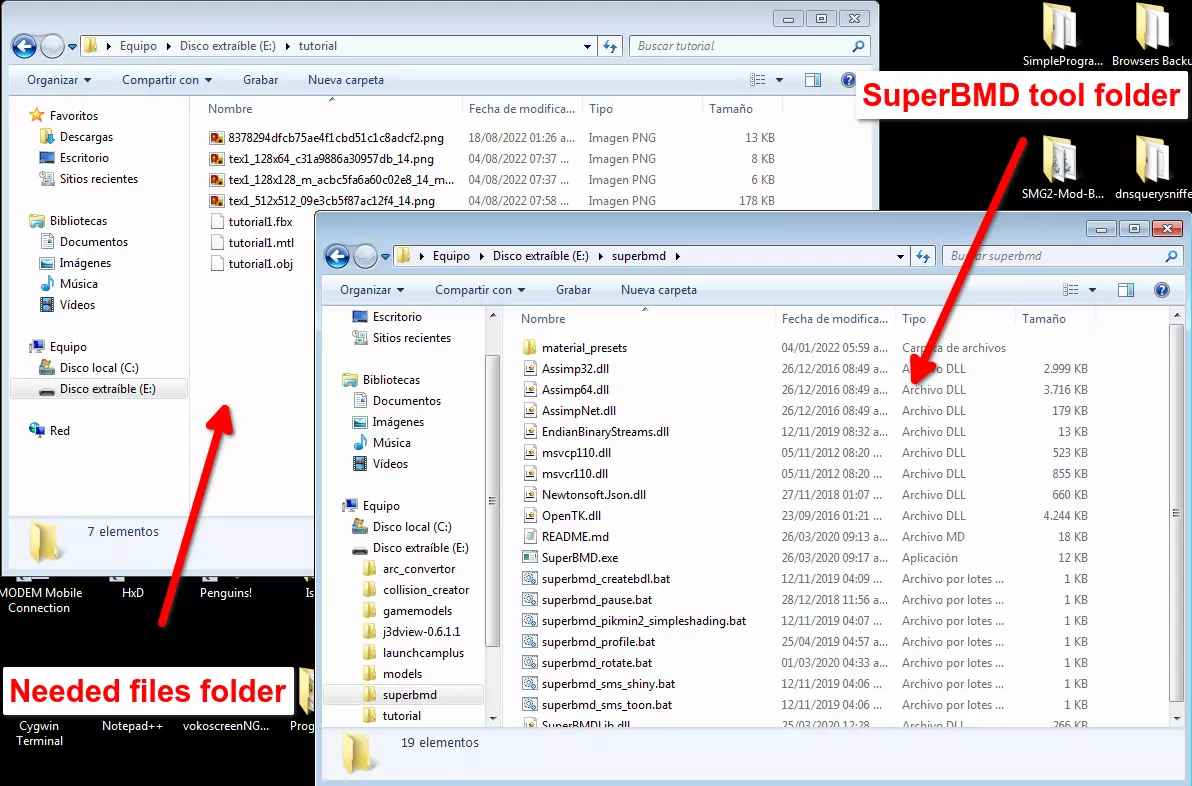
(Fig. 24a - SuperBMD tool folder)
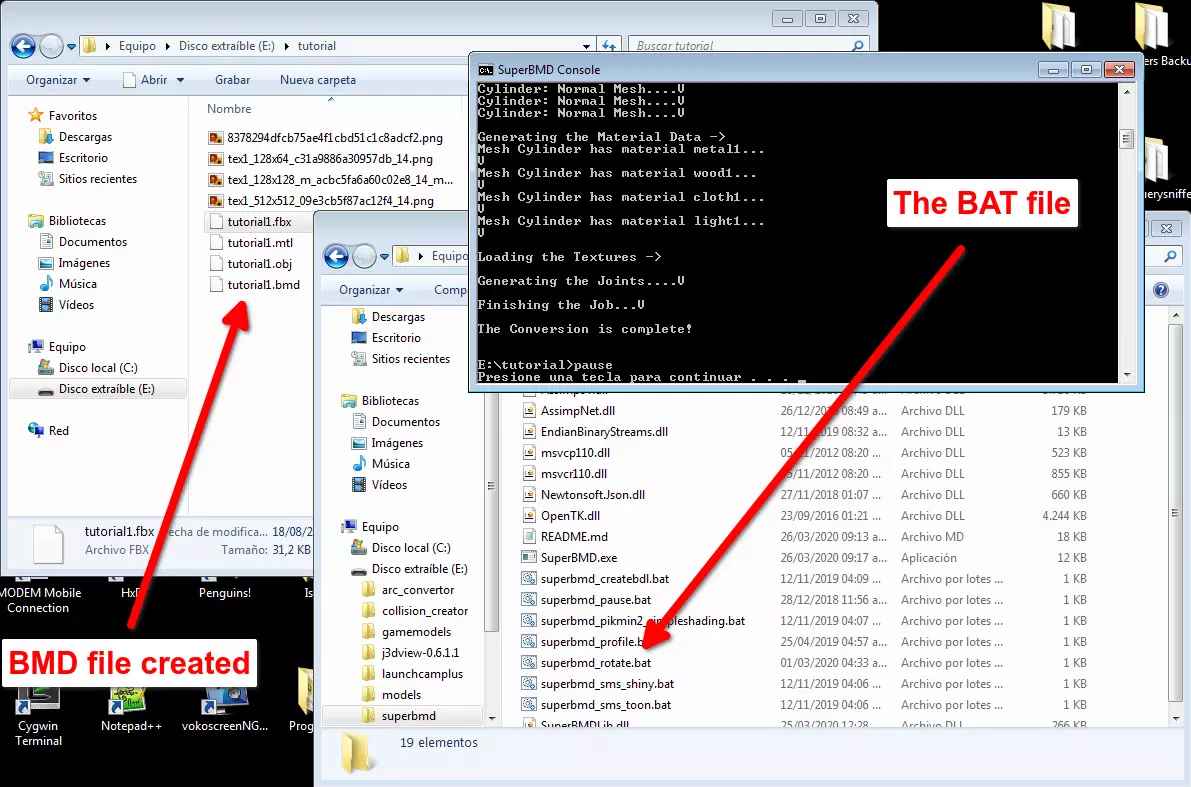
(Fig. 24b - BMD file creation)
Open the BMD file created with j3dview (File > Open Model... - Fig. 25a) and save it as a BDL file in the same location the BMD file is (File > Save Model As... - Fig. 25b). This is done to correct material lightning display issues in game that SuperBMD does not cover yet (very important step in the next tutorials!).
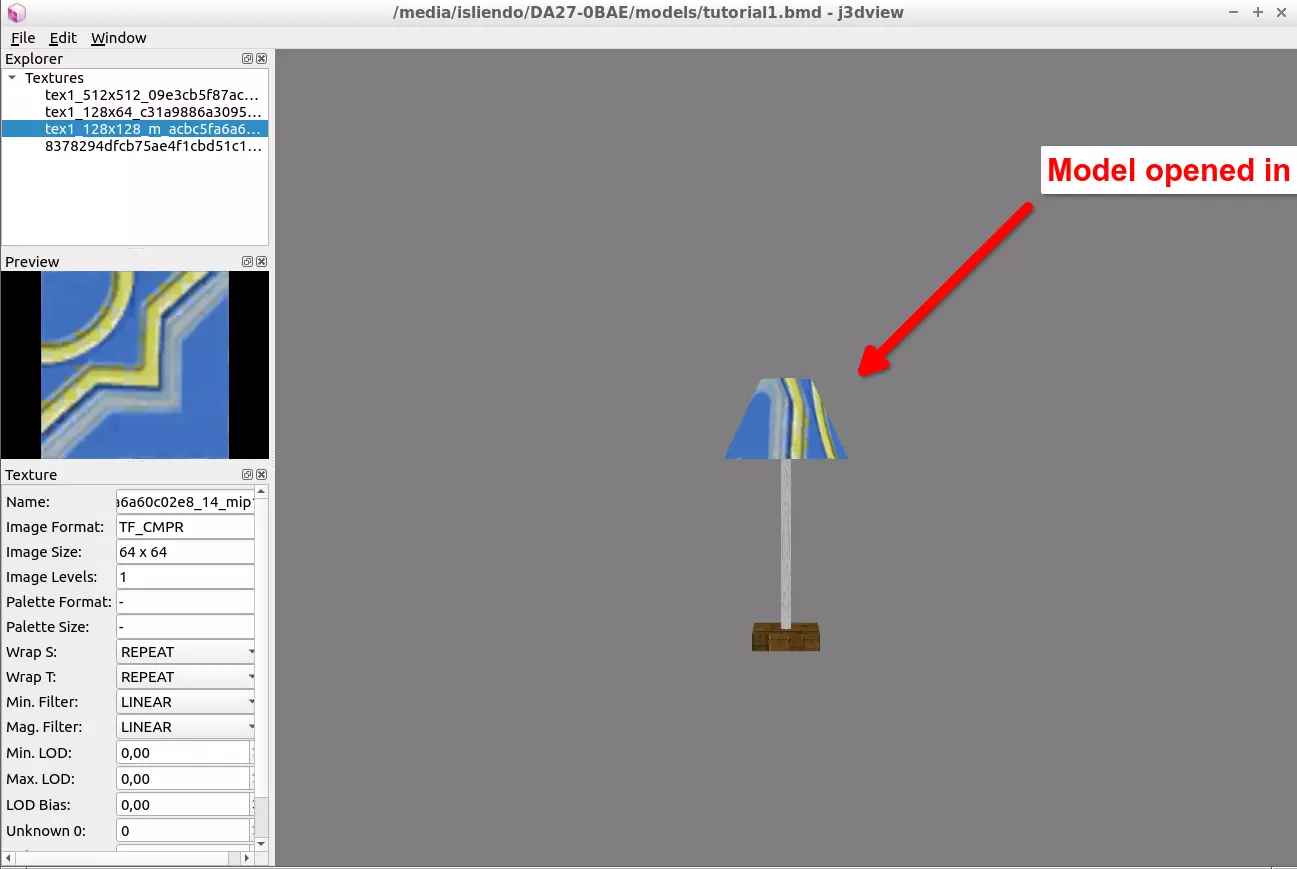
(Fig. 25a - BMD file opened in j3dview)
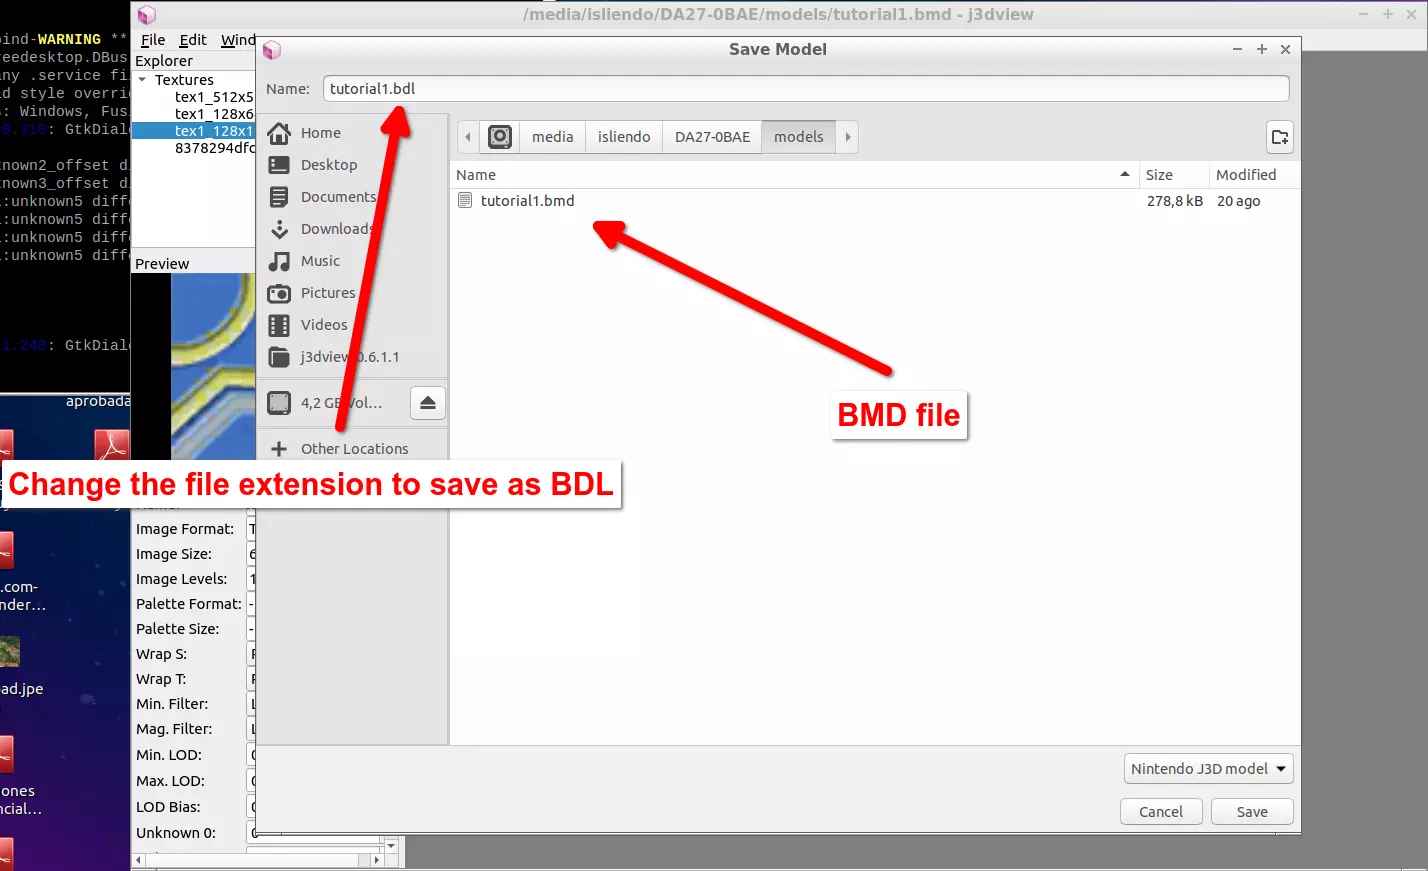
(Fig. 25b - Saving BMD file as BDL from j3dview)
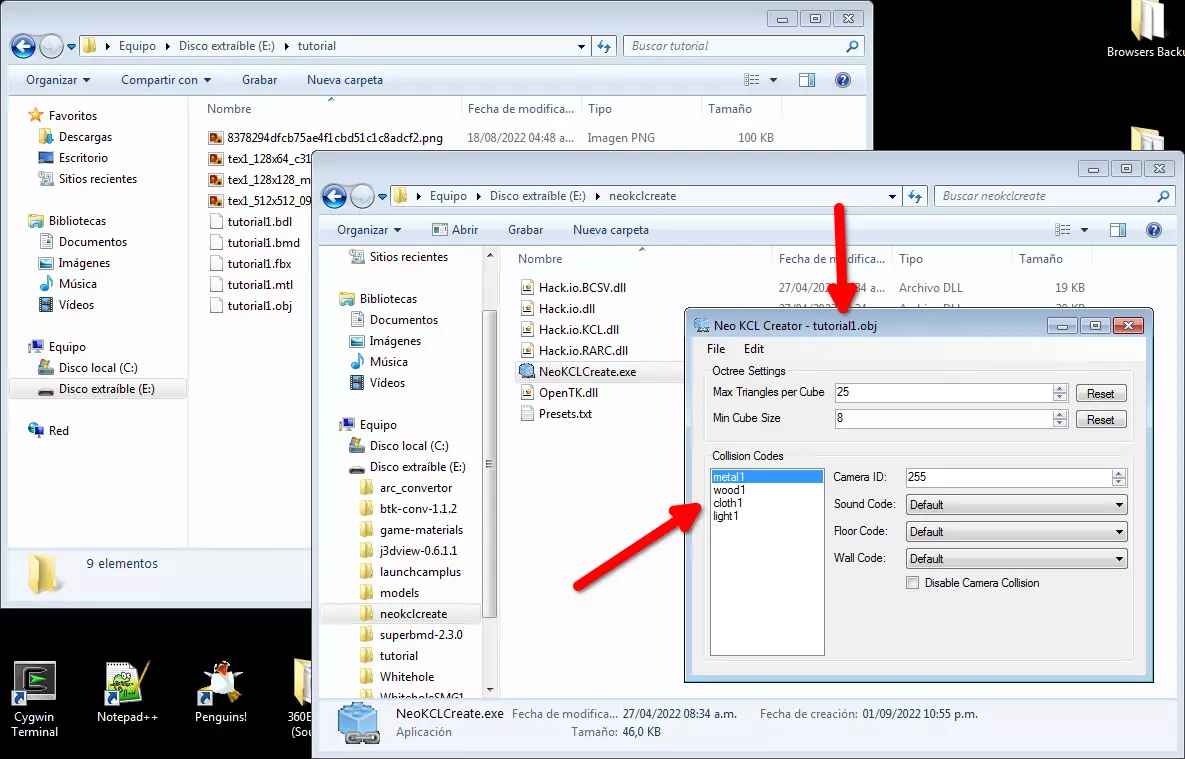
Locate the Collision Creator tool (NeoKCLCreate), open it, go to File > New and select the OBJ file of your custom model (Fig. 26a and 26b).
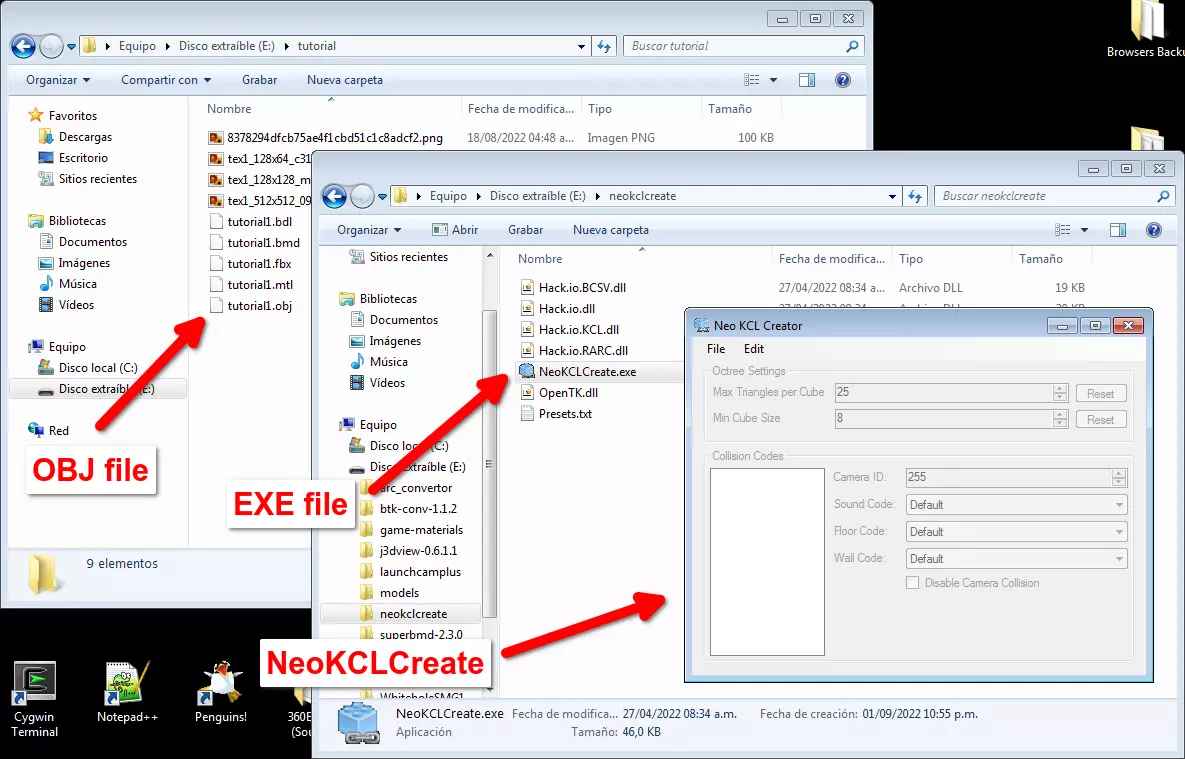
(Fig. 26a - Collision Creator tool opened - NeoKCLCreate)
(Fig. 26b - OBJ file opened in NeoKCLCreate)
Set the Sound Code, Floor Code and Wall Code to the values you want for each material used in the model:
1) Sound Code: the sound that the material emits when Mario steps on it.
2) Floor Code: the properties the material has that affects Mario when walking on the material.
3) Wall Code: the property the material has that affects Mario when wall grabbing to the material.
I don’t know about the other options yet so I won’t explain them.
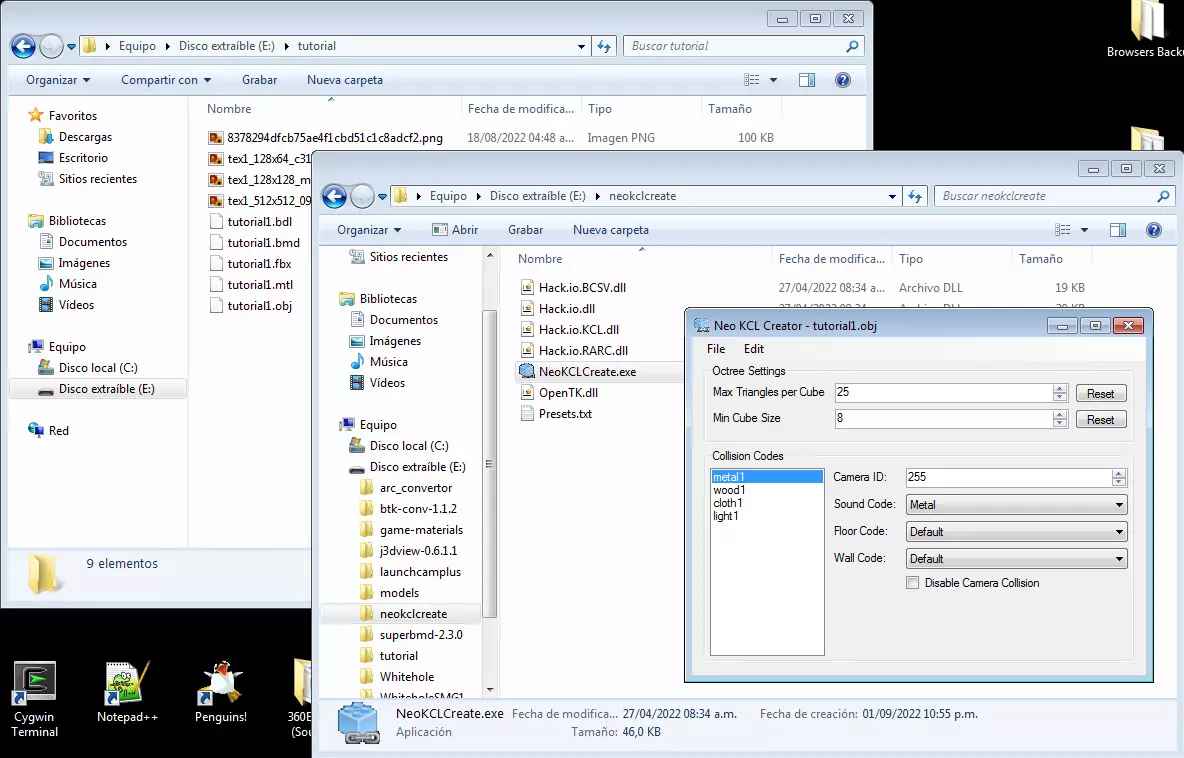
I will only modify the Sound Code of each material since this is not a very complicated object. I will set the Metal value to the metal1 material (Fig. 27a), Wood to the wood1 material (Fig. 27b), Carpet to the cloth1 material (Fig. 27c) and Cloud to the light1 material (didn’t knew what to assign to a light as sound to be honest - Fig. 27d).
(Fig. 27a - metal1 sound code)

(Fig. 27b - wood1 sound code)
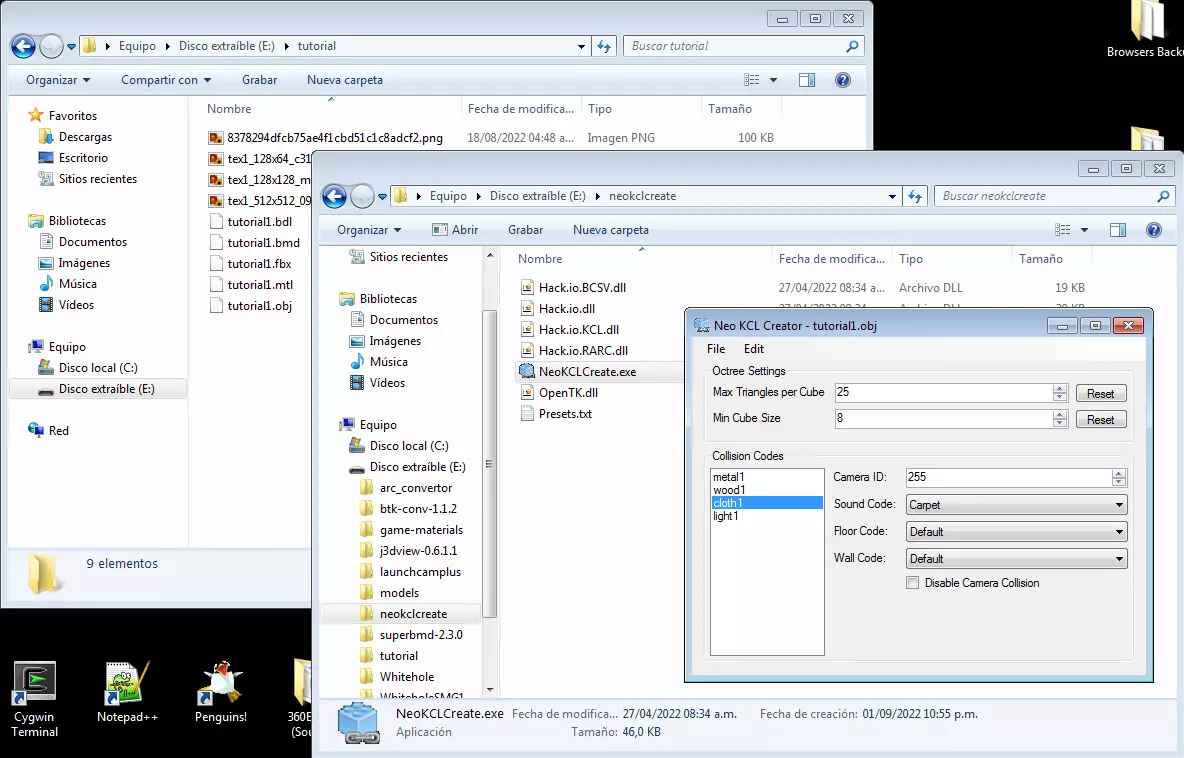
(Fig. 27c - cloth1 sound code)
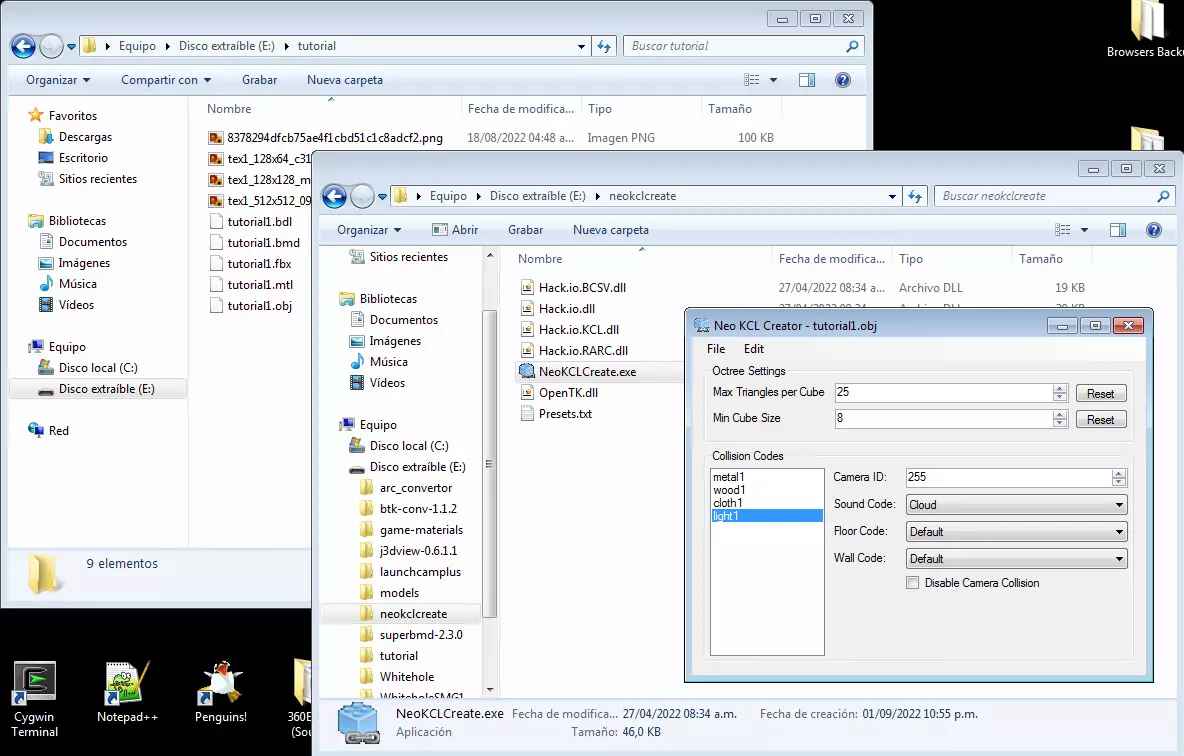
(Fig. 27d - light1 sound code)
After that, click on File, then Save and you can now close the program. A KCL and PA files will appear on the same folder as the OBJ file (Fig. 28). These are the collision files for your object in game.
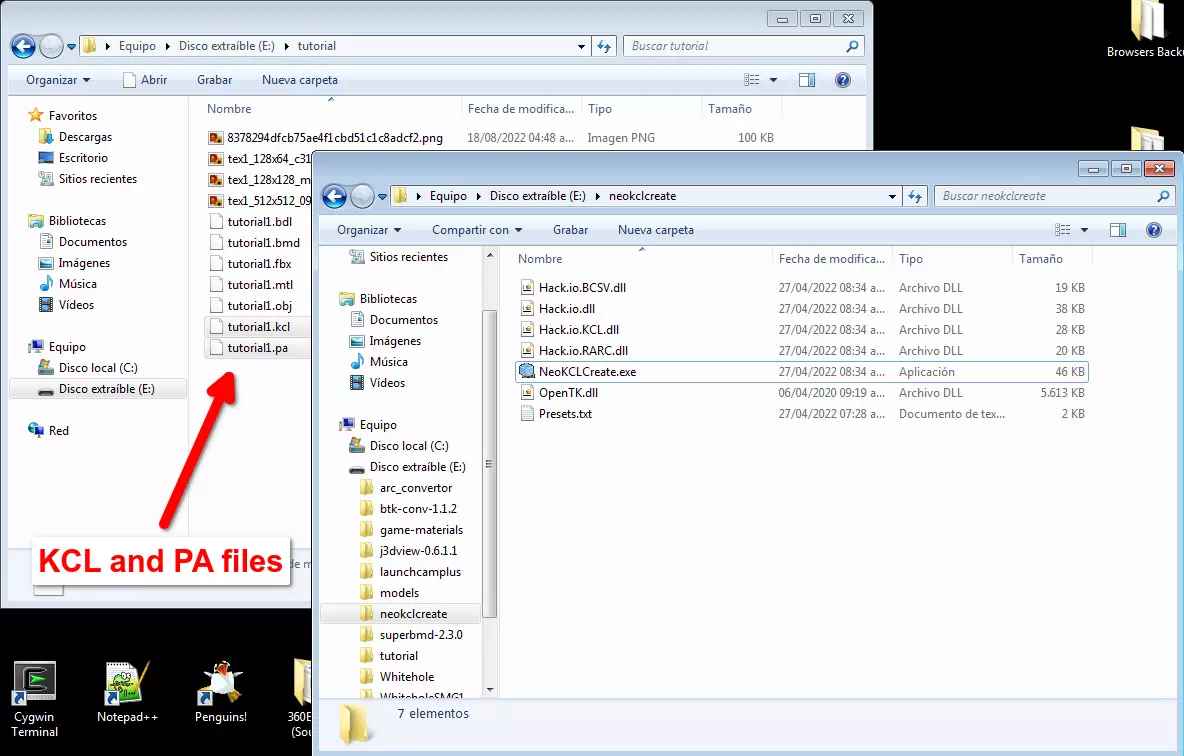
(Fig. 28 - KCL and PA files creation)
Create a folder named exactly as your model without the file extension (in my case it will be named tutorial1) and place the BDL, KCL and PA files inside of it (Fig. 29a and 29b).
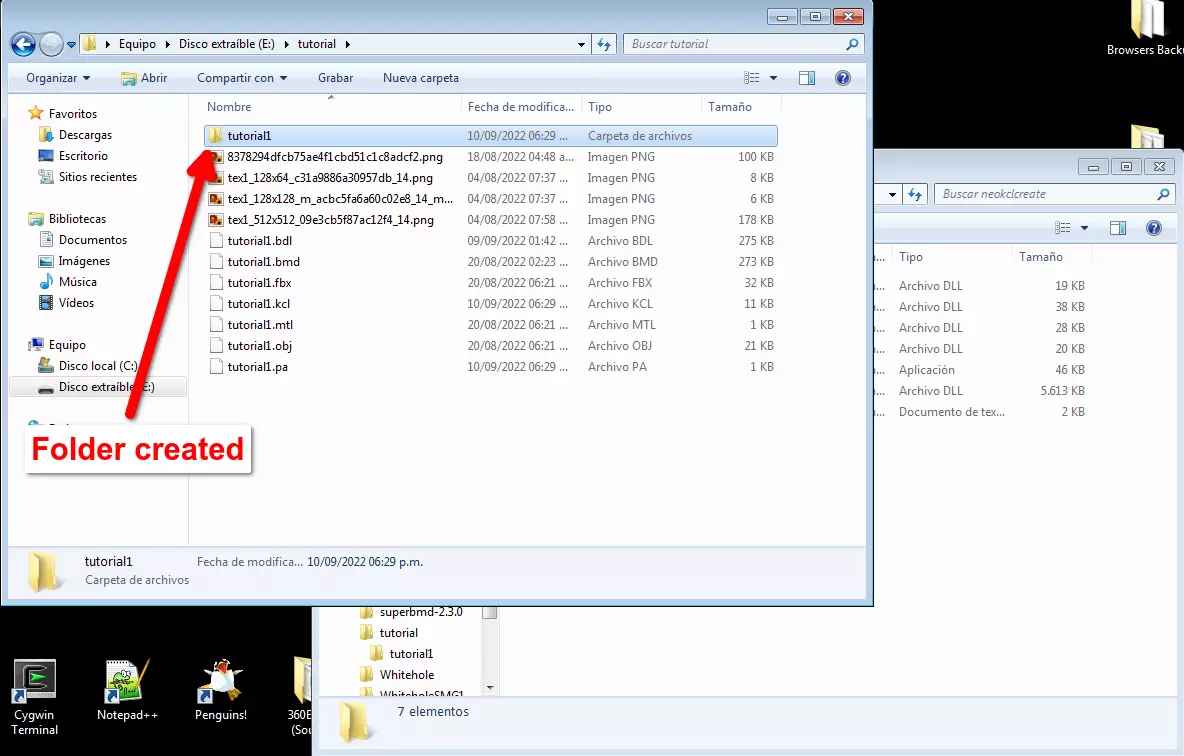
(Fig. 29a - Folder creation)
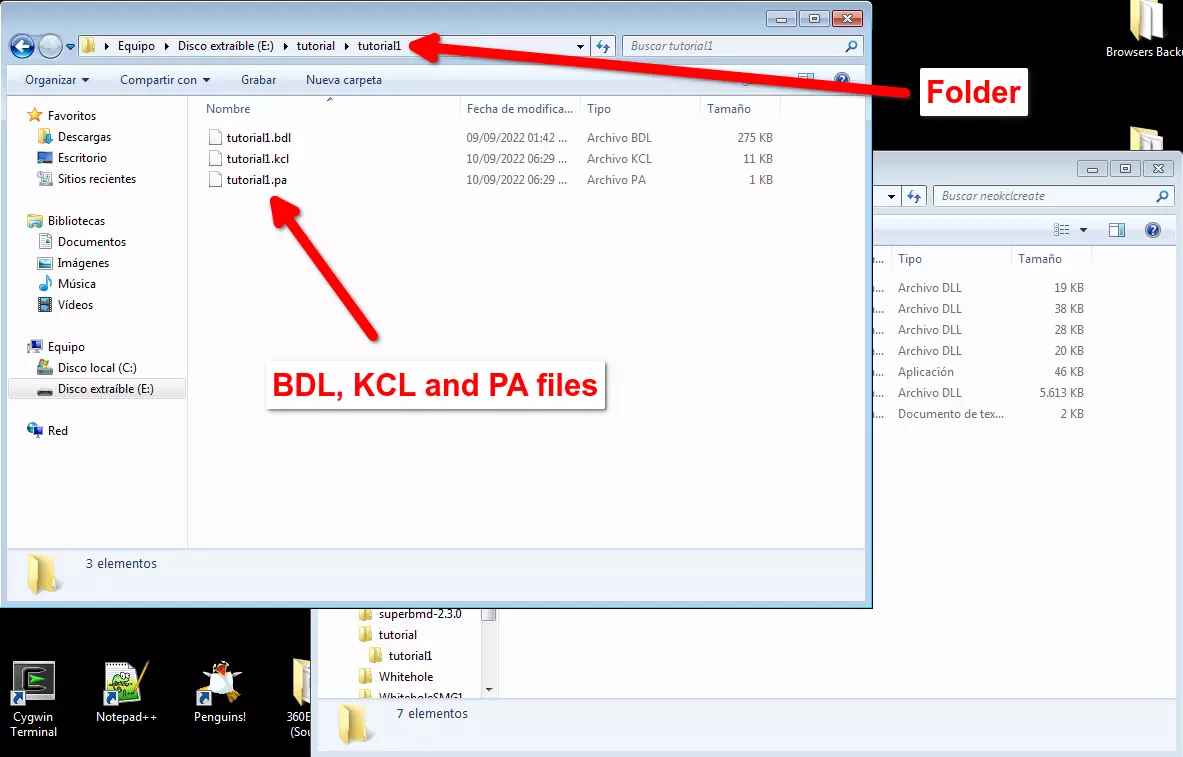
(Fig. 29b - BDL, KCL and PA files inside folder)
Then, in the other window, locate the Arc Convertor tool and drag and drop the folder created to the arcPack.exe file. An ARC file will appear in the same place the folder is (Fig. 30). Now drag and drop the ARC file into the yaz0enc.exe file, an ARC.YAZ0 file will appear in the same place the ARC file is (Fig. 31).
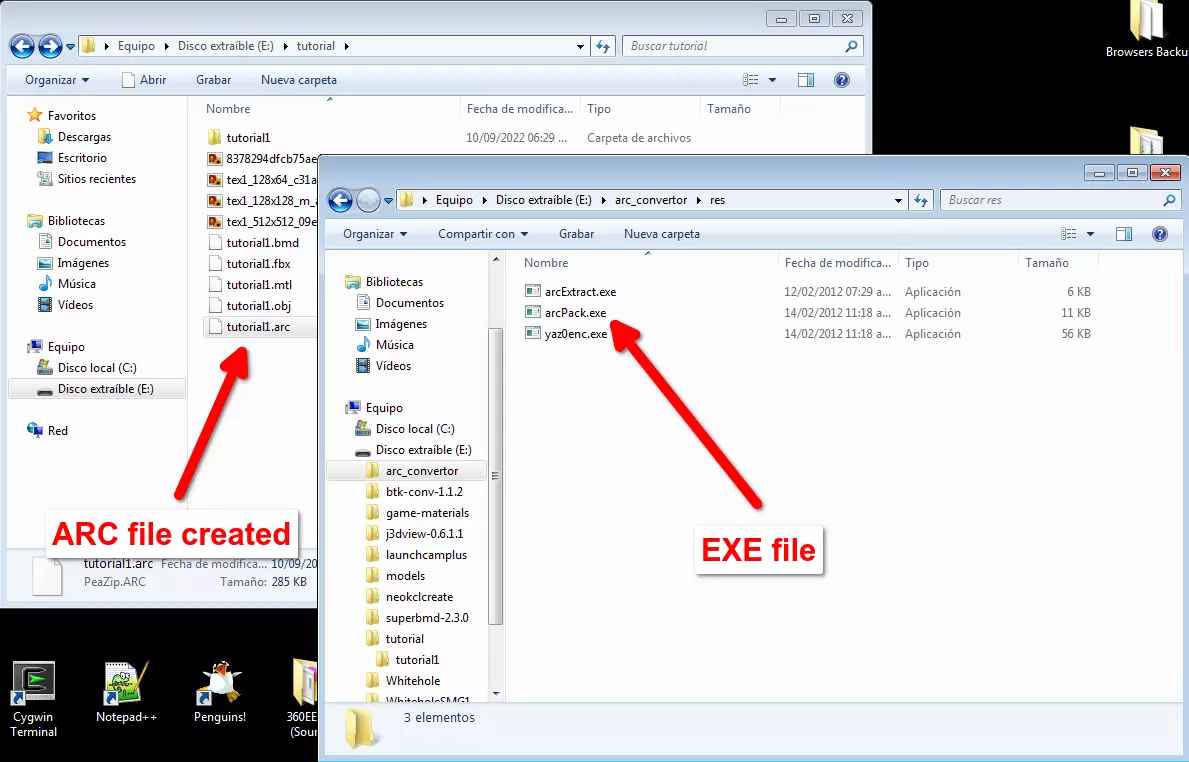
(Fig. 30 - ARC file creation)
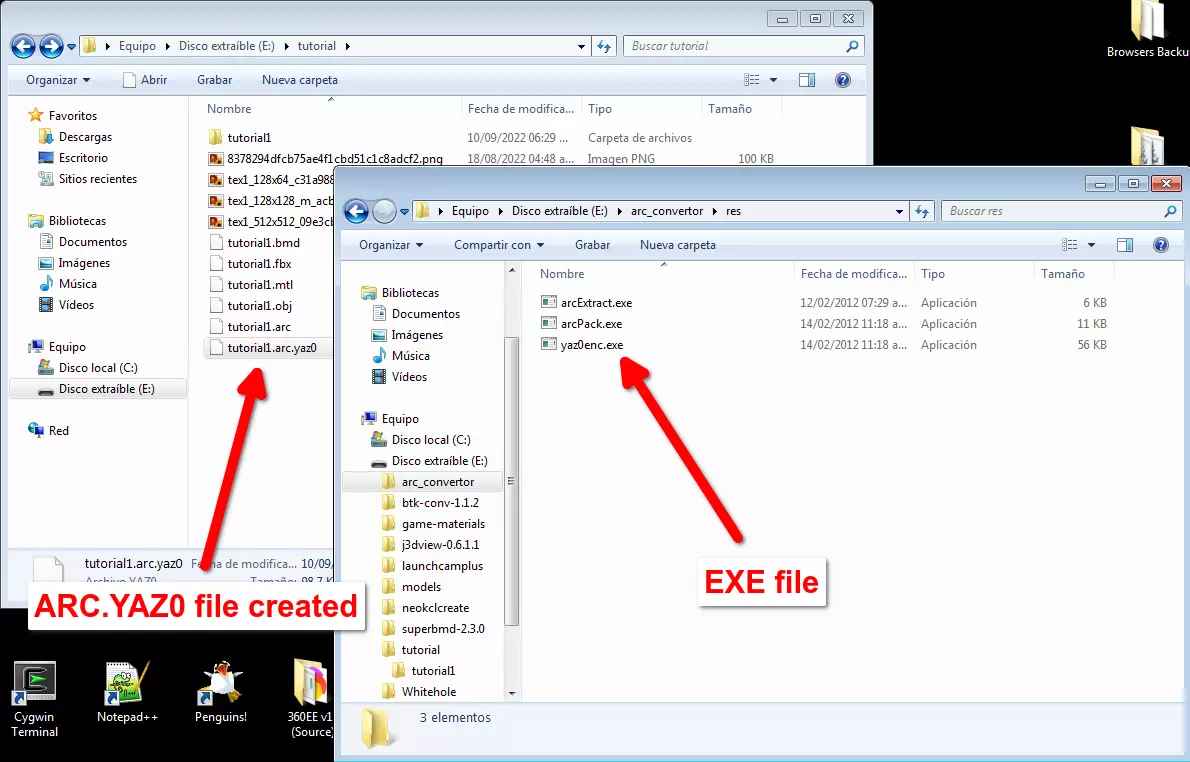
(Fig. 31 - ARC.YAZ0 file creation)
Delete the first ARC file (you don’t need it anymore) and rename the ARC.YAZ0 file to ARC only. That file will be the one that you will import into the game through Whitehole.
Copy the ARC file got into the ObjectData folder of your SMG1 dump and then open Whitehole. Go to Tools > BCSV Editor > Open > Objects > PlanetMapDataTable. You should see a large table (Fig. 32).
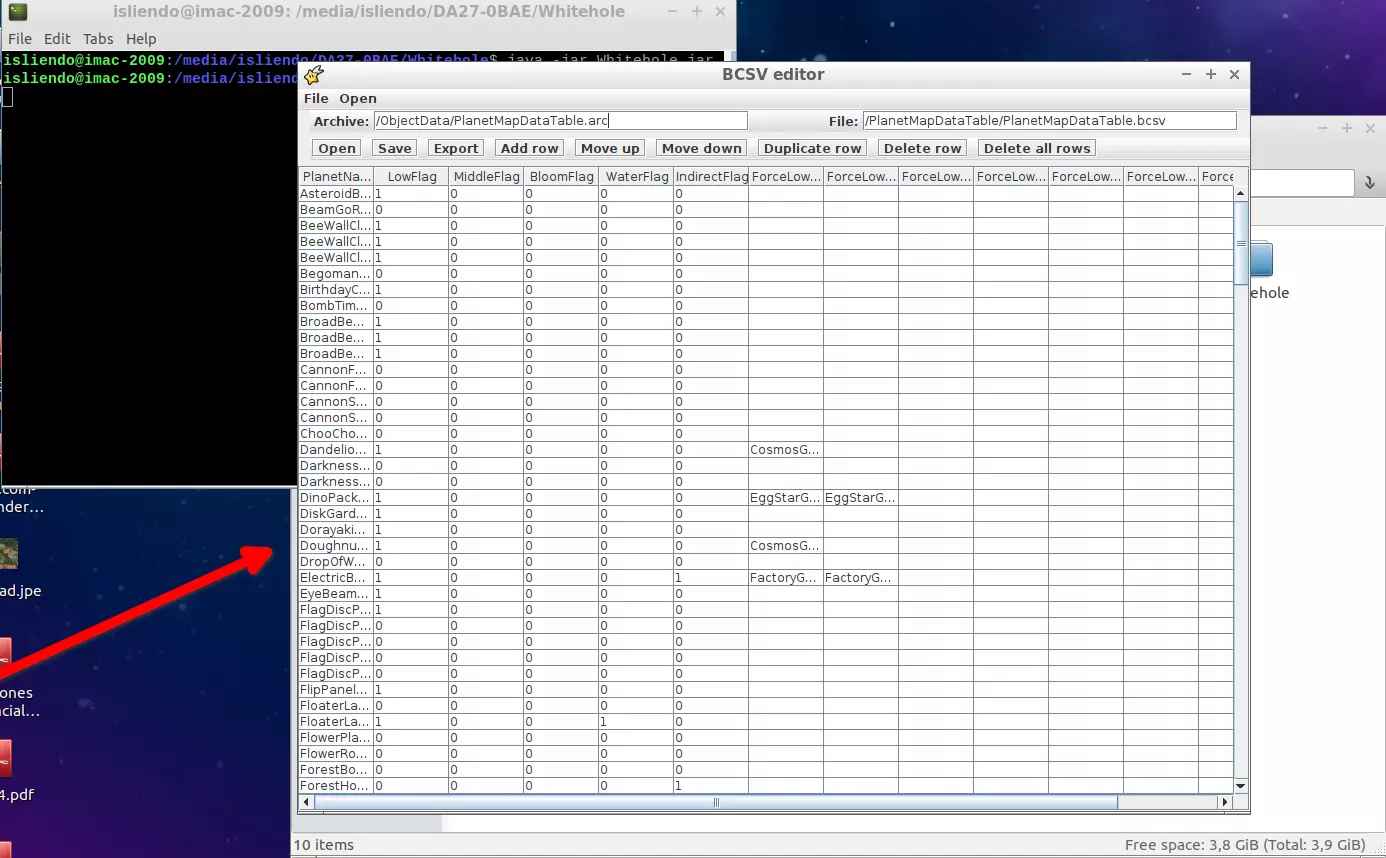
(Fig. 32 - PlanetMapDataTable in Whitehole's BCSV editor)
Click on Add row and scroll down to the end of the table. In the empty row created type from left to right the following: Name of your object, 0, 0, 0, 0 and 0 (Fig. 33 - in my case the name is tutorial1). Click save and open the galaxy you want your model in (I will choose AstroGalaxy - Fig. 34).
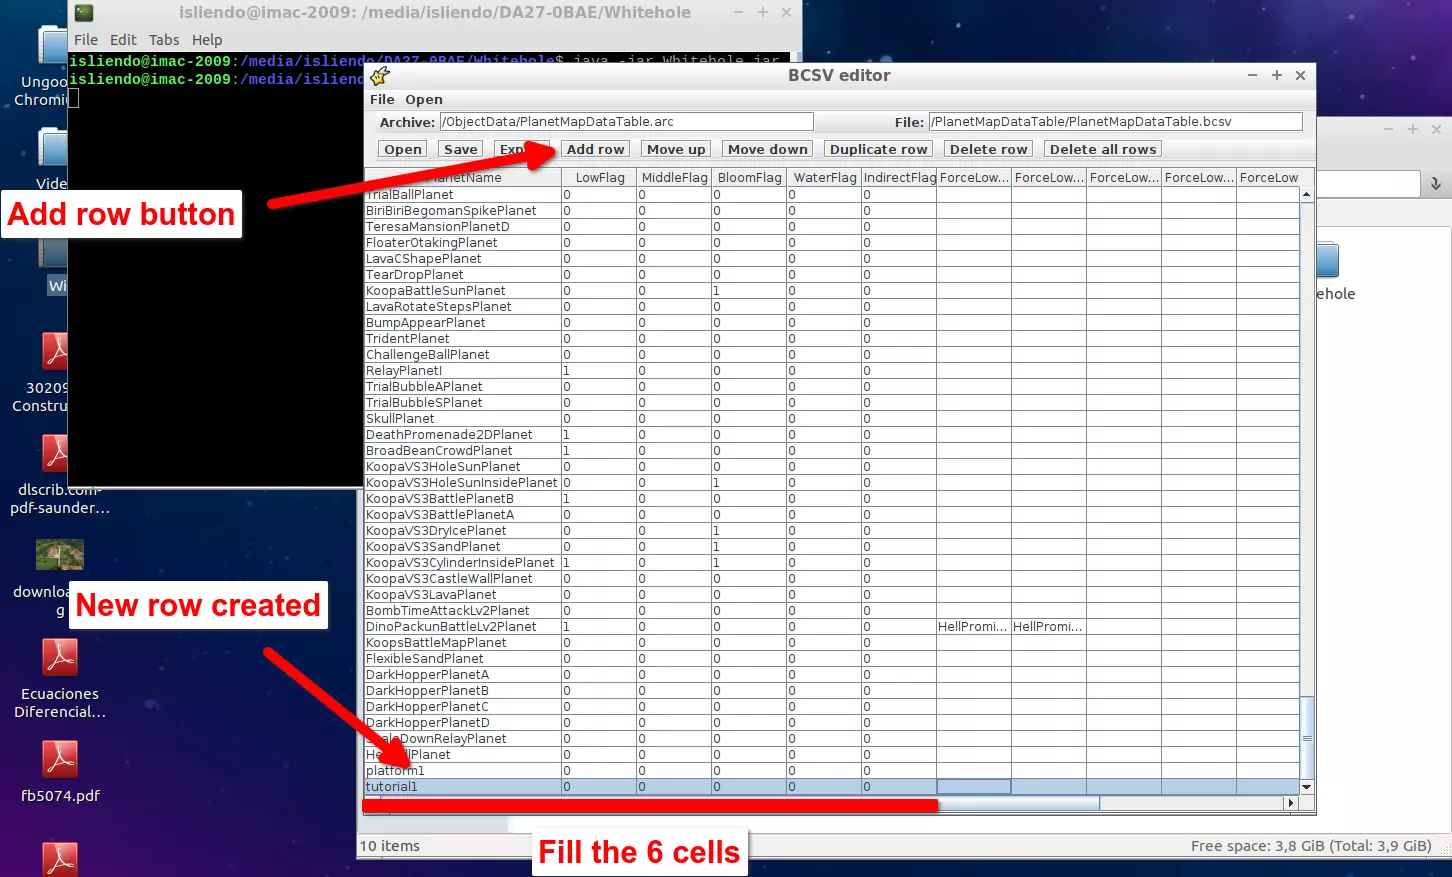
(Fig. 33 - Create and fill new row)
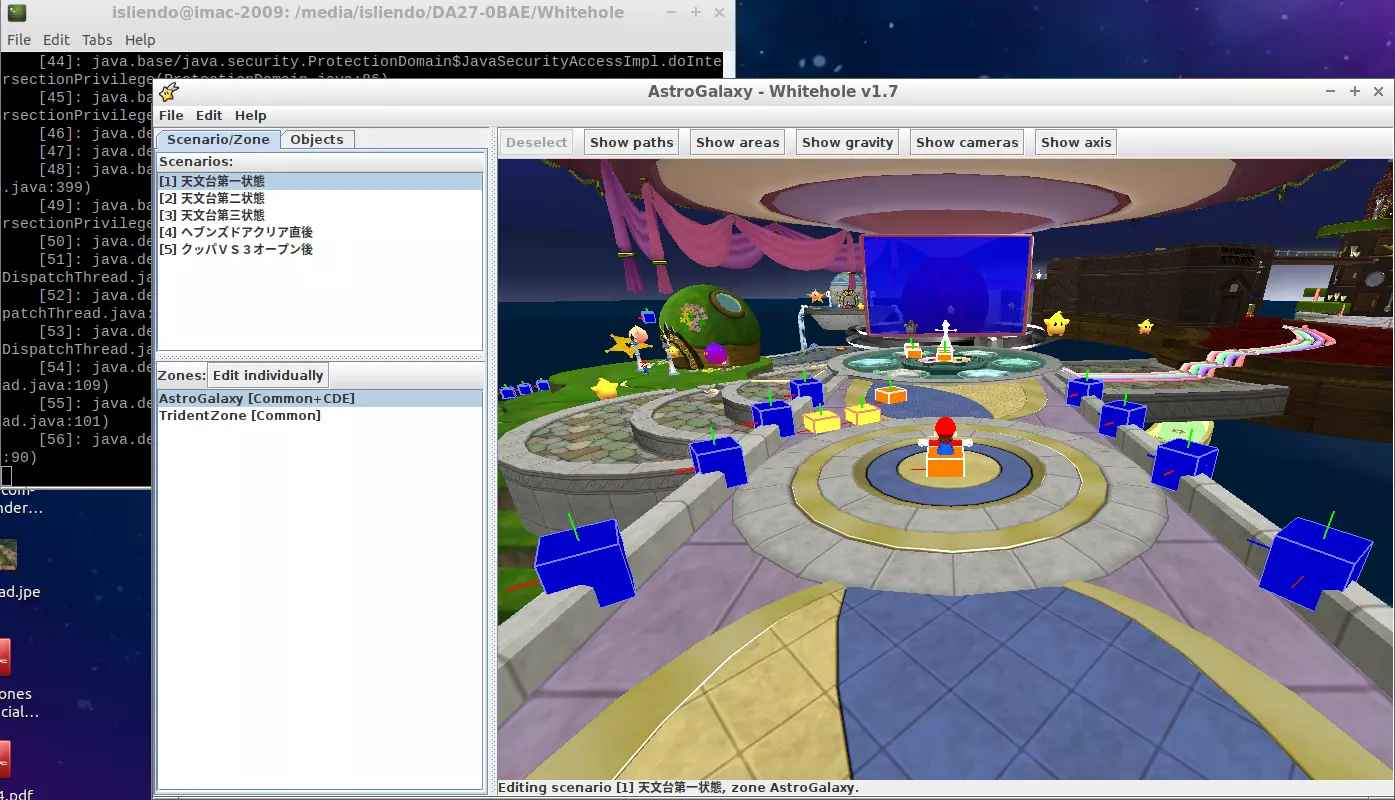
(Fig. 34 - AstroGalaxy galaxy opened on Whitehole)
Add an object through Objects > Add object > Normal, input your desired object name on the search bar (I will choose a simple coin) and place it anywhere on the galaxy (Fig. 35). Then, click on the object and change its Object property to the name of the model you created (press Enter). Scale it to a viewable size and BAM! the model should show up (Fig. 36a and 36b).
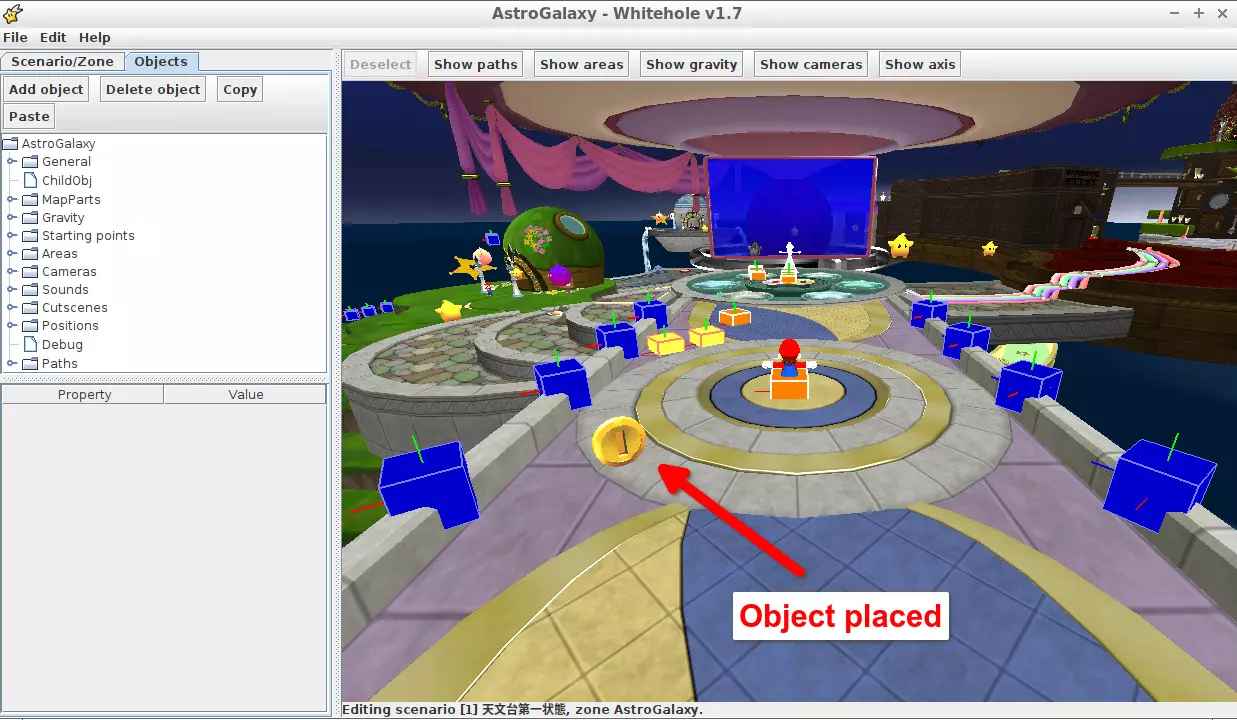
(Fig. 35 - A Coin placed on the galaxy)
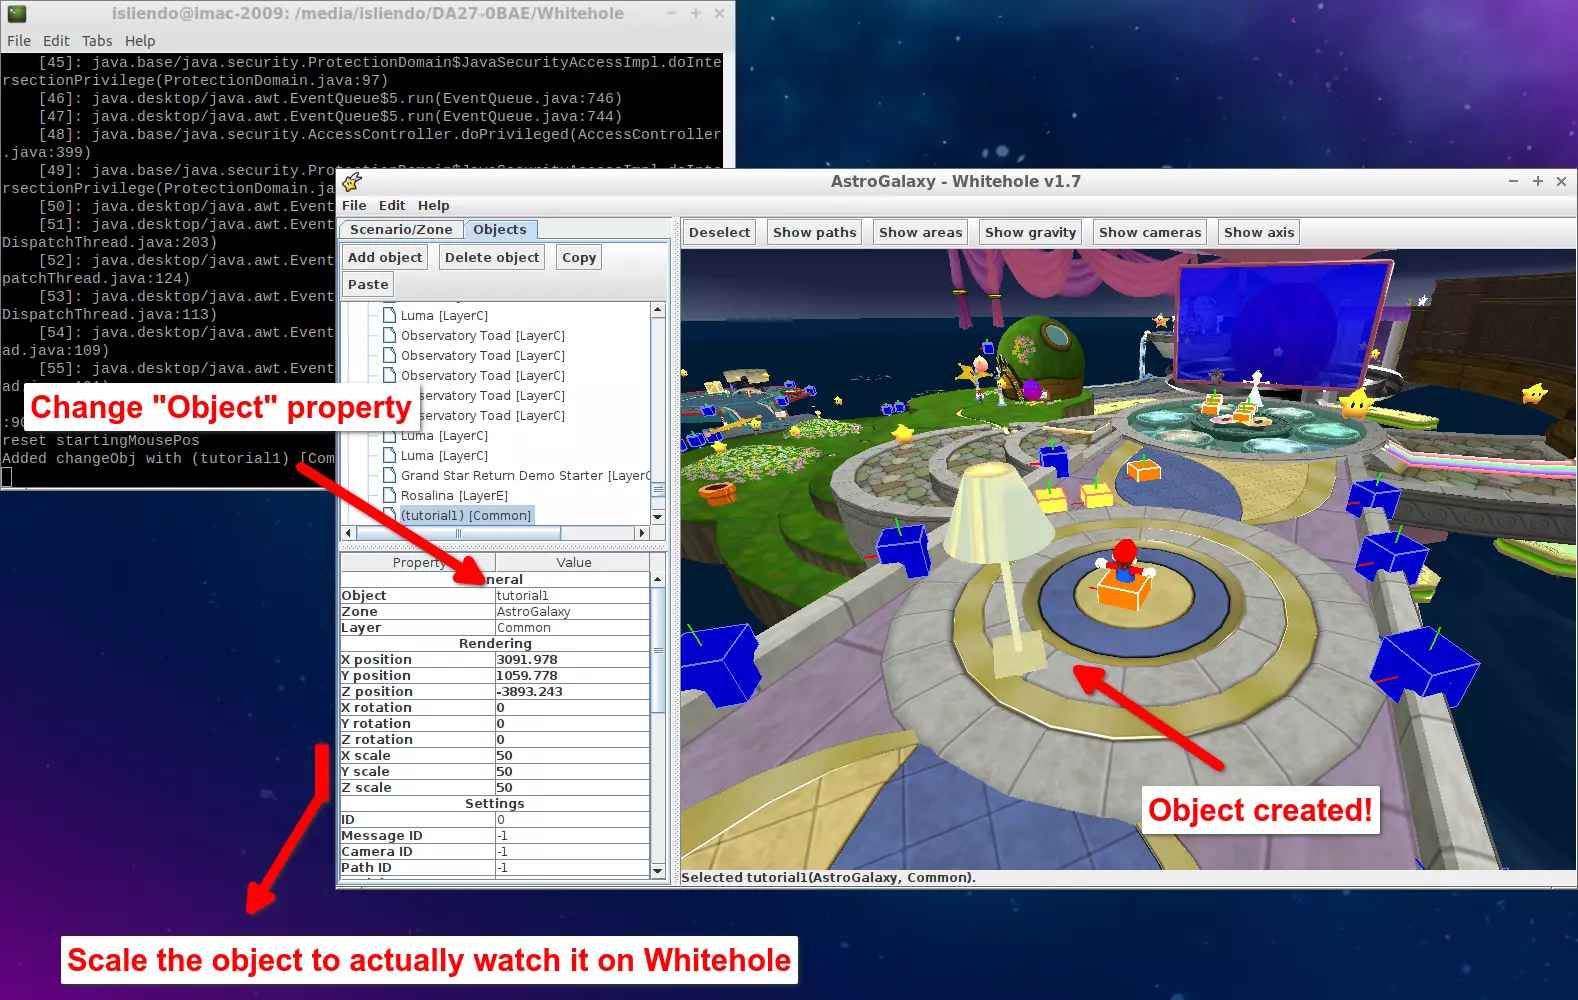
(Fig. 36a - Changing the Coin properties)
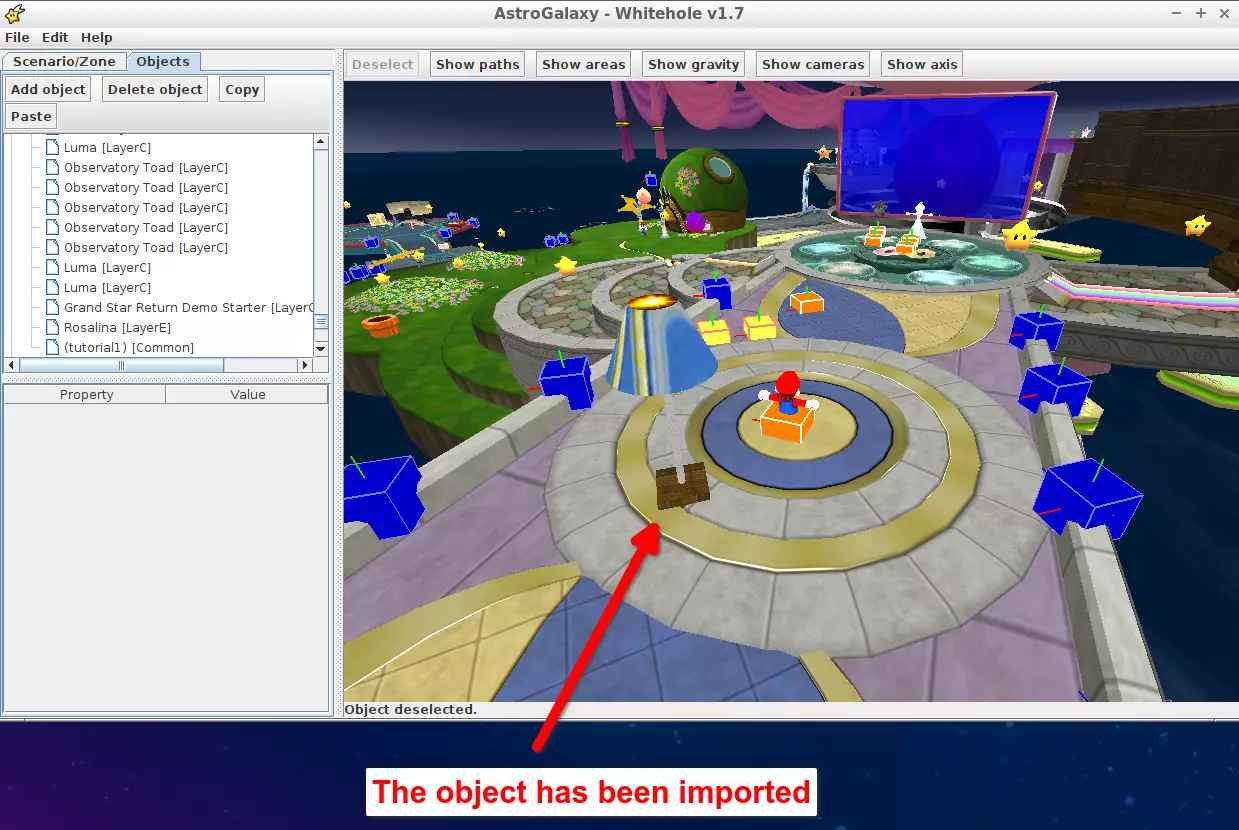
(Fig. 36b - Model imported into the galaxy)
Now to test it on game, either with Dolphin or Riivolution (Fig. 37)
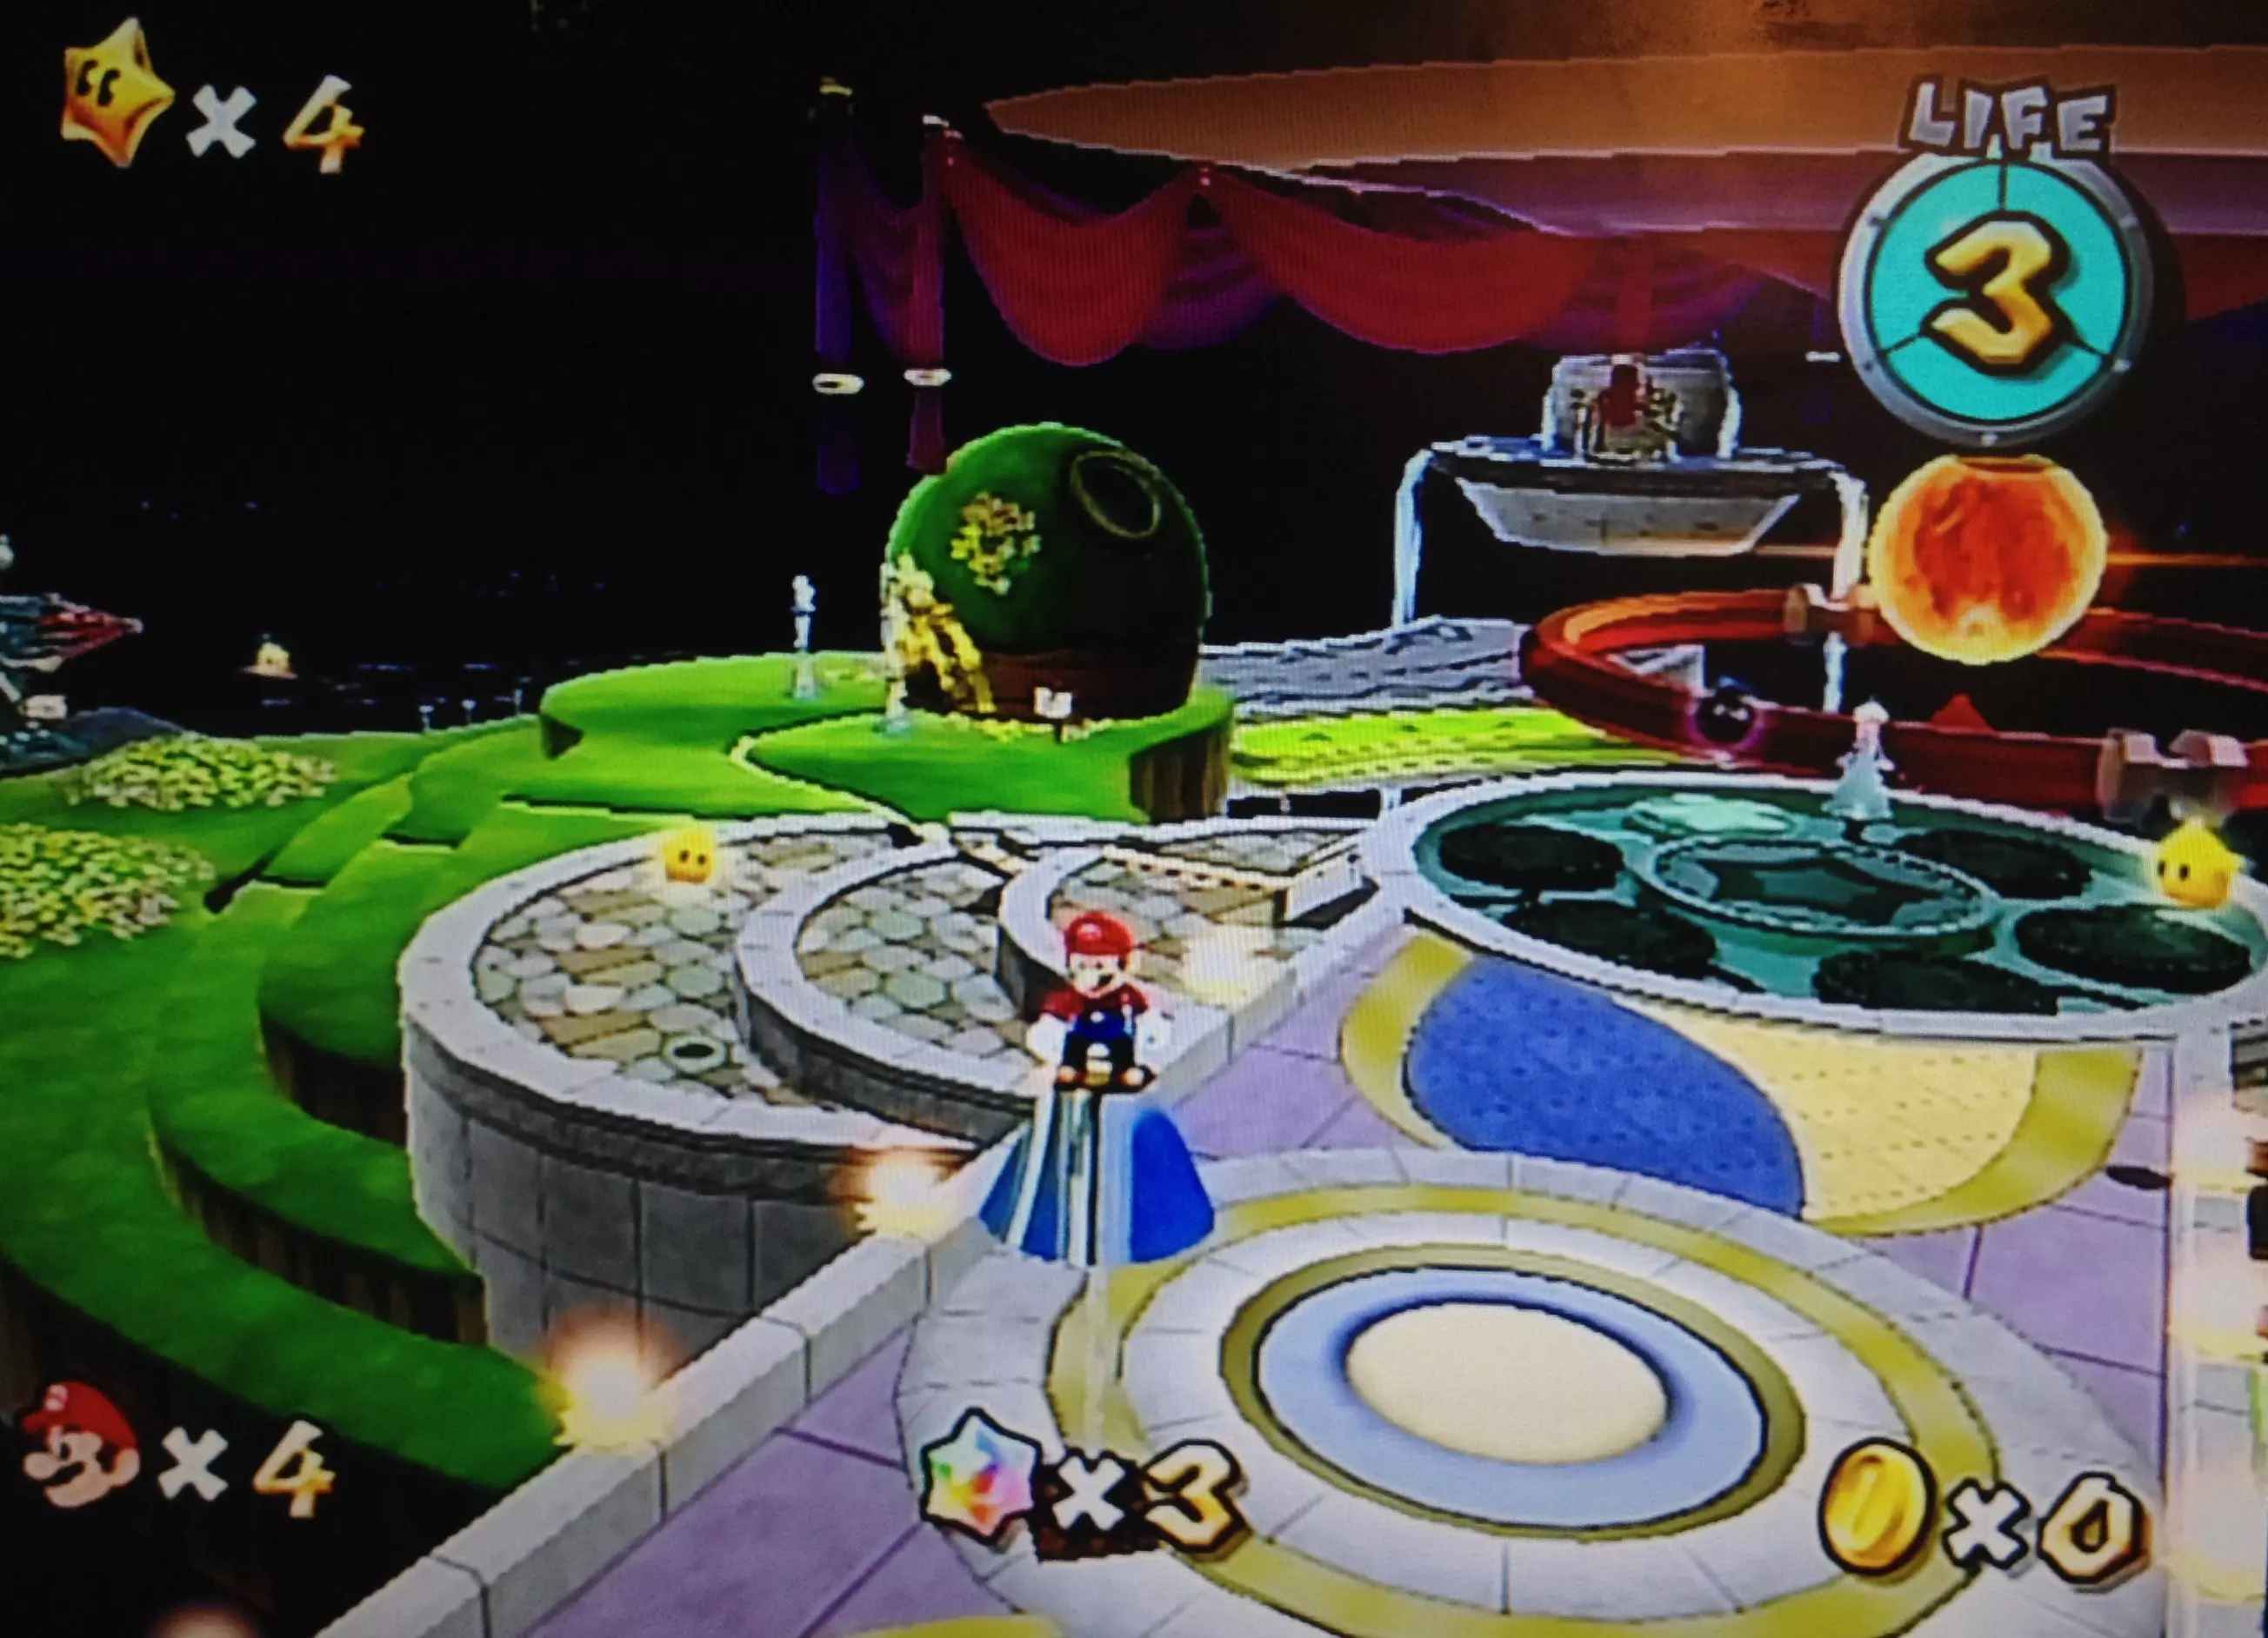
(Fig. 37 - Mario standing over the model on game)
Other tutorials
This guide was based in the following tutorials: